Keeping your operating system updated is important not only to maximize your device’s performance, but also to protect it against online threats. Most major operating systems have their own notification system to let you know when there’s an update, new features, or a patch that needs to be installed.
Software updates are beneficial, but dealing with these notifications can be irritating sometimes. If you’re using a Mac, you’re probably tired of dealing with the same “Update Available” notifications all the time.
Whenever the Mac Store downloads new updates in the background, these alerts are generated via Notification Center to remind you that they are ready to be installed. But what if, for some reason, you don’t want to install these updates yet? You might want to hold off on it because the new update has a bug and you’re waiting for the fix to be released, or you simply don’t want to install those updates right now.
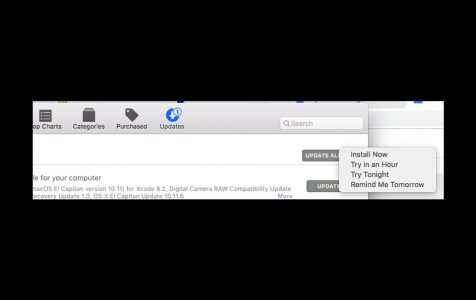
Regardless if you want to install them now or later, being notified every time of those updates can be exasperating. The problem is, Mac doesn’t have a way to get rid of these notifications permanently. When you click the update notification, you only have four options:
Pro Tip: Scan your Mac for performance issues, junk files, harmful apps, and security threats
that can cause system issues or slow performance.
Special offer. About Outbyte, uninstall instructions, EULA, Privacy Policy.
- Install Now
- Try in an Hour
- Try Tonight
- Remind Me Tomorrow
This means that whatever option you choose, you will still have to install the updates eventually. Until you do, these notifications will keep on bugging you.
Although Apple doesn’t offer a direct way to disable macOS update notification, there are some methods to get rid of them while allowing you to be in control of the updates you want installed on your Mac.
How to Disable macOS Update Notifications
There are several ways to turn off update notifications on macOS, depending on how you want to deal with these updates.
Method #1: Disable Notifications Temporarily.
If you want some peace and quiet for until midnight only, you can pause the alerts via the Notification Center. To do this:
- Click on the Notification Center icon in the right-most side of the menu bar.
- Click on the Notifications tab.
- Click the settings icon at the bottom of the Notifications window.
- Switch on Do Not Disturb.
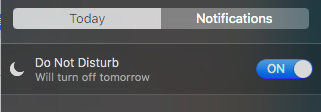
When the Do Not Disturb mode is on, you’ll notice that the Notification Center icon on your Desktop is dimmed. All banners and alerts will be hidden from you and notification sounds will be muted. You can pause the Notifications Center until midnight by default, but you can change the time period in the settings according to your preferences. You can also turn on the Do Not Disturb mode when the display is sleeping or when you’re mirroring the screen.
Method #2: Turn Off Automatic Update Download.
The easiest way to get rid of update alerts is by turning off the automatic download of all newly found updates in the background. This will completely ignore all macOS updates so you don’t have to deal with them every time. However, be warned that doing so would be risky, as you might be opening up your device to new vulnerabilities since updates are security-related.
If you’re really decided to turn off automatic updates permanently, follow the steps below:
- Click the Apple logo and choose System Preferences.
- Select App Store.
- Click the golden lock icon at the bottom left of the screen, then type in your admin username and password.
- Uncheck Download newly available updates in the background.
- Click the lock once again to save your changes, then close the window.
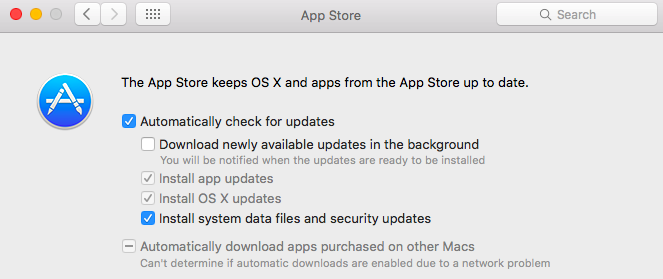
This will completely stop all software updates and notifications from bothering you, unless you decide to turn them on again.
Method #3: Auto-Install All Updates.
This option is the opposite of the first one. If you’re tired of all the nagging updates, you can choose to have your Mac automatically install all the newly found updates on its own. This way, you won’t have to deal with the constant alerts and requests for permission when there are updates that need to be installed.
To ensure sufficient storage space for updates, you might consider using a cleaning tool like Outbyte macAries to delete junk files. Ensure that this solution is right for your storage management needs.
Follow these steps to set up the automatic installation of your macOS updates:
- Click the Apple logo and choose System Preferences.
- Click App Store.
- Click the lock icon at the bottom of the window, then type in your username and password to be able to make changes to your system settings.
- Tick off Install app updates and Install macOS updates under Automatically check for updates.
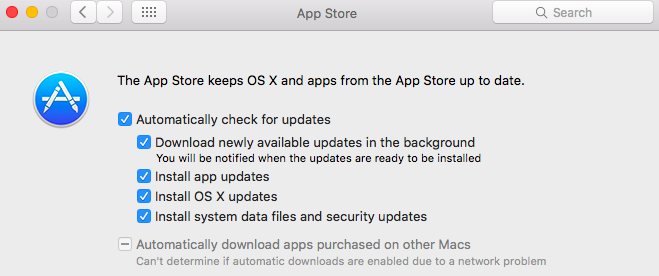
- Click the lock icon once again and exit the window.
Method #4: Use Third-Party Apps to Manage Your Notifications.
There are many third-party apps on the Mac App Store that will help you manage your notifications and give you some peace. Most of these apps are lightweight and are easy to install.
Summary
Notifications are great when you need them, but they can be distracting when they constantly appear. Whether you want to disable macOS updates notifications temporarily or for good, the methods listed above can definitely help you get the quiet time that you need.