Instead of changing your network settings manually every time you switch locations, you can Mac’s built-in Network Location service to configure multiple virtual locations. This saves you a lot of time and effort because each location has settings that match a particular network port’s configuration.
For instance, you can set up one location for your home address that will connect to your wired network. You can also configure another location for your office address that connects to a wired Ethernet with a different domain name server or DNS settings. Then, you can set up a location for the Wi-Fi network at your favorite restaurant or cafe.
This might seem like a lot of work at first. But when you have everything configured, switching to various networks due to location changes will be so much faster and more convenient in the future.
Setting up multiple location profiles can also be handy when you find it difficult to connect to the internet in a particular location. You only have to tweak and test the network settings for that specific location so you don’t have to worry about messing up the network configurations for the other locations.
Pro Tip: Scan your Mac for performance issues, junk files, harmful apps, and security threats
that can cause system issues or slow performance.
Special offer. About Outbyte, uninstall instructions, EULA, Privacy Policy.
In this guide, we’ll show you how to set up multiple network locations on your Mac, before discussing the major ways that you can customize each of these network profiles. This way, you can be sure that your Mac will always connect to your preferred network and you can easily manage these connections, regardless of your location.
What Are Network Locations on Mac?
Network locations can be hard to understand, especially for non-tech savvy users. The easier way to define a network location as a collection of saved network preferences. If you want to have your Ethernet network configured in a specific way at home but want to have a different setup at the office, then having several network locations is perfect because you don’t have to dive into System Preferences every time you connect to a different network from a different place.
How to Set Up a Network Location on Mac
Networks locations are easy to set up and you only need to do it once. You can create as many network locations as you need. Or you can even set up multiple network locations for a single location. For instance, if you have a wired network and a Wi-Fi network at home, you can set up a separate network location for each connection.
Before you set up any network location, make sure your Mac is optimized using a Mac cleaner to prevent errors from cropping up.
Here’s how to set up a network location on Mac:
- Launch System Preferences from the Apple menu or by clicking its icon in the Dock.
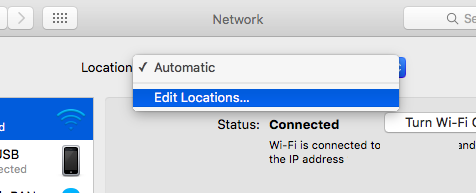
- Click on the Network icon, then choose Edit Locations from the Location dropdown menu.
- Set up a new location by clicking the (+) button.
- The newly created location has a default name of Untitled. Rename it to something that corresponds to the location such as Home Wi-Fi or Office Wi-Fi.
- Click Done.
How to Set up Multiple Network Locations on Your Mac from an Existing Profile
Sometimes you don’t have to create new network locations for all your profiles. Instead, you can try to create a profile from an existing profile, and add a few changes. In this case, copying the existing profile and making adjustments is a lot faster and easier compared to creating an entirely new profile from scratch.
To do this:
- Access the Location dropdown from System Preferences > Network.
- Click Edit Location and choose the profile that you want to copy.
- Click the settings icon, then choose Duplicate Location from the dropdown menu.
- Rename the duplicate, then click Done.
- Apply any adjustments you want to add to this profile.
- Click Apply to save all your changes.
How to Switch to a Different Network Location
Once done, you can then customize the network connection details for each port for the new location network you just created. Once you have completed the setup, you can switch between different locations by doing one of the following:
- via Apple menu: Click on Apple menu > Location, then choose the location you want to switch to. Take note that the Location menu item only appears once you have set up multiple network locations.
- via Network Preferences: Click on Apple menu > System Preferences > Network, then click the Location popup menu. Select your preferred location, then hit the Apply button.
How to Automatically Switch Locations
Switching between home, work, and mobile network connections was made easier by the two options above. But did you know that you can configure your Mac to choose your selected network automatically according to your location? If you enable the Automatic entry in the Location dropdown, your Mac chooses the best location by scanning which connections are up and available.
This Automatic option works smoothly when each profile has unique network types. For example, you both have a Wi-Fi and wired connection for your office location. If you have types of connections, such as multiple Wi-Fi networks, the Automatic option sometimes chooses the wrong one, leading to connection issues.
How to Set Your Preferred Network Order
In order to make it easier for the Automatic option to make the best possible choice when picking a network to use, you can decide a pre-set order for making a connection. To do this:
Select the Automatic location in the dropdown menu, then click on the Wi-Fi icon in the Network preference pane.
- Click on the Advanced button.
- Choose the Wi-Fi tab in the Wi-Fi dropdown menu to see the list of networks you have connected to in the past.
- Choose your preferred network and drag it to your desired position in the preference list.
The networks located at the top of the list are the most preferred network to connect to since the items are listed in decreasing importance.
If you want to add a Wi-Fi network to the preference list, simply click the (+) button at the bottom of the list, and follow the onscreen instructions. To remove a network from the list and make sure you don’t connect to it automatically, choose that network and click the (-) button.
Customizing Your Location Profiles
Aside from renaming your network profile, there are several other ways you can customize it according to your preferences. But before you do, make sure your target profile is selected in the System Preferences > Network > Location before getting started.
You can edit the connection type by accessing the interface found in the left-side menu. You can customize the settings to better suit your needs. For instance, choosing a VPN interface allows you to edit the server address, local ID, and the authentication settings. Don’t forget to click the Apply button to save your changes.
You can also add new interfaces or different connection types to your newly-created profile. To do this, click the (+) button under the left-hand menu to access the Interface dropdown. From there, you can choose a new connection type from the list, including Wi-Fi, Bluetooth, VPN, or PPPoE. Give your new interface a name, then hit the Create button.
If you want to delete a location profile that you no longer need, head over to System Preferences > Network > Location > Edit locations. Choose the location that you want to remove, then click the (-) button. Click on Done > Apply, and that location will be gone from your list.
Connection Problems?
If you can’t connect to a location profile you just created or if you’re suddenly unable to connect after making some changes to your network settings, you can restore a lost connection by simply renewing the DHCP license. Here’s how to do it:
- Go to System Preferences > Network.
- In the left menu, choose the faulty location profile.
- Hit the Advanced button, then choose the TCP/IP tab.
- Click on the Renew DHCP license button.
You can also click on the Assist Me button in the main Network window, then click Diagnostics for macOS to run a scan and determine what the problem is.