If you’re someone who values privacy a lot and you don’t want other people snooping on your messages, this neat little iPhone trick will surely be right up your alley. With the release of iOS 11, iOS users can now modify notifications on iPhone and dictate how they appear when the device is locked. You can set your iPhone notifications settings to hide the message previews when the phone is locked, then unlock it via Face ID to view the message.
This feature is useful if you don’t want other people to see your messages but still want to be notified when they arrive. iPhone X units are shipped out with this feature turned on, keeping screen notifications hidden until you unlock your device with Face ID. Face ID supports only one user, so nobody else will be able to access your device and view your messages. If someone is persistent, he would need your passcode to be able to get in.
Aside from disabling message previews, there are also other ways to change notifications on iPhone, depending on how you want to receive them, or whether you want to receive them at all. You can turn off notifications on iPhone, disable notification previews, group notifications according to app, and turn on or off emergency alerts.
Pro Tip: Scan your Mac for performance issues, junk files, harmful apps, and security threats
that can cause system issues or slow performance.
Special offer. About Outbyte, uninstall instructions, EULA, Privacy Policy.
This article will show you how to modify Notifications on iPhone, so you gain better control over them.
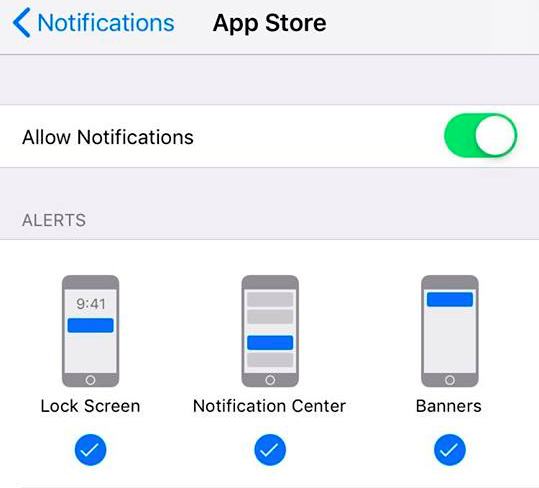
How to Change Notifications on iPhone
Notifications are useful because they alert you when you receive a message, an email, or an update for your apps. However, you can find yourself easily overwhelmed by notifications that you need if you don’t get them under control. Plus, it can be annoying to be interrupted by the notification sounds every time you receive one.
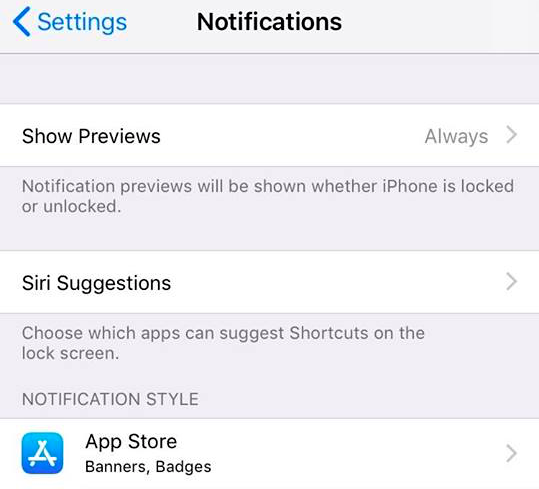
If you’re receiving too many unnecessary notifications on your iPhone, what you need to do is to turn Notifications on for only the apps that you want to receive them from, or manage your iPhone Notifications settings. If your iPhone is running iOS 12, you can access the Notifications settings via the Settings app. You can play around with the settings to achieve the results that you need.
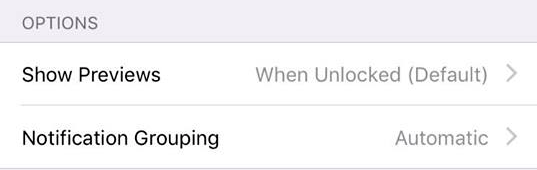
Changing the ‘Show Previews’ Settings
Being able to see your notifications even when the screen is locked is convenient because the alerts let you know if you need to act on something (or you can just ignore the message). However, other people could just pick up your iPhone and see your messages or the first few lines of the email you received.
Fortunately, iOS 11 has made it possible to show notifications on your locked screen without showing the content. This way, you will still get notified when there’s a new iMessage or you got a new email, but other people won’t be able to read them while your phone is locked.
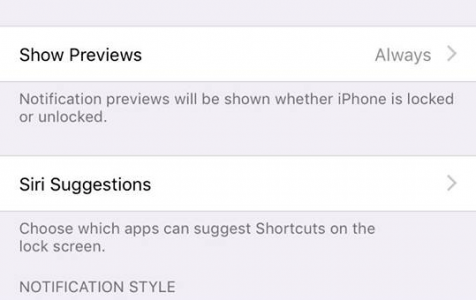
The Show Previews settings allow you to handle the previews for individual apps, or for all apps at once. Follow the steps below to change notifications on iPhone by editing the Show Previews menu:
- Tap Settings > Notifications.
- Tap Show Previews located at the top of the page.
- Choose from three options: Always, When Unlocked, or Never.
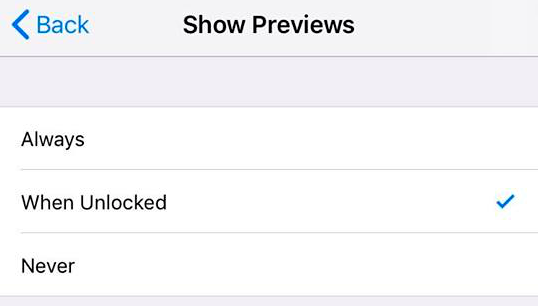
If you choose Always, the preview will be shown for all notifications regardless of whether the phone is locked or unlocked. If you choose When Unlocked, you’ll receive the notifications but you won’t be able to see the content unless you unlock the phone. If you choose Never, notification previews won’t be shown at all.
Siri Suggestions
Siri is the built-in virtual assistant for iOS, macOS and other Apple devices, and one of its functions is to make recommendations. This setting allows Siri to recommend actions that you may want to do with the app notification. For example, you can use Siri to reply to a message you received or to call back the contact whose call you missed.
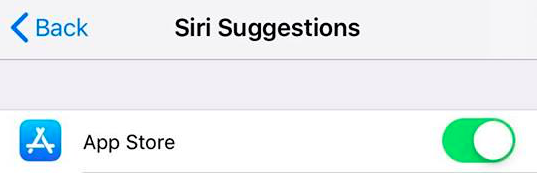
You can also choose which apps you want to use this feature on. When you tap Siri Suggestions, you’ll see a list of all the apps on your phone with a toggle switch beside each of them. You can toggle the switch depending on which apps you want to turn this feature on or off.
Notification Style
This setting allows you to change notifications on your iPhone on the app level. You can decide whether you want to turn the notifications on or off for each app, what kind of kind of alert you want to receive, whether you want previews to be displayed or not, and how to group your notifications.
Going through each app and changing the settings can be time-consuming, but it will spare you from having to deal with unnecessary notifications and save you time in the long run.
Grouped Notifications
This is a new feature that was launched when iOS 12 was released last September 2018. Instead of getting individual notifications for every little thing, you can now group your notifications according to your preference. Take note, however, that some apps – such as Message, iMessage, and email apps – are better off with individual notifications instead of being grouped with others.
To set up this feature, follow the steps below:
- Tap Settings > Notifications.
- Tap the app you want to customize the alerts for.
- Scroll down and tap Notification Grouping.
The Notification Grouping is set to Automatic in iOS 12 by default, but you can choose to group them By App instead. This means that all notifications for a particular app will be grouped under a single stack every time. If you don’t want your notifications to be stacked together because you prefer to receive them one by one, you can choose Off.
You can also customize the stacks themselves via Notification Center. To do this:
- On your home screen, swipe down to open the Notification Center.
- Press and hold on the stack of notifications you want to customize. This will activate Force Touch and isolate the stack on the screen.
- Click the three-dot menu on the upper-right corner of the screen to see more options. Here, you will see a couple actions you can do with the notifications.
- Click Deliver Quietly if you want the notifications to show on the app but not in the Notification Center. Click Turn Off if you don’t want to receive any notifications from that app at all.
- Click Settings to view more options in the Settings app.
Government Alerts
Government offices and emergency organizations often send out messages to alert people during disasters or emergencies. This is also used to send out announcements and AMBER alerts.
Summary
Notifications are helpful because they let you determine whether you need to act on or just ignore a notification. Modifying the iPhone Notifications settings allow you to control what notifications you want to receive and how you want to get them.
To keep your devices running smoothly, you might consider regularly optimizing both your phone and Mac. Outbyte macAries is one option for Mac optimization, but ensure the software is the right fit for your needs.