Apple’s Mail app allows you to access all your email accounts in one place, so you don’t need to go to each email service’s website just to check your emails. You can sync your Yahoo accounts, Gmail accounts, business email accounts, school accounts , and other carrier-specific emails all in your Mail app. All you need to do is set up the app to start managing your emails.
But what if something goes wrong with your Mac mail server settings and you can’t receive incoming mails? Or what if you can’t send outgoing mails due to incorrect Mac Mail SMTP settings?
This article will show you how to set up your Mail app using the correct settings, and how to troubleshoot problems related to sending or receiving emails.
How to Set Up an Email Account on the Mail App
The first step to configuring the Mail app is by setting up an email account that you will use to send and receive emails.
Pro Tip: Scan your Mac for performance issues, junk files, harmful apps, and security threats
that can cause system issues or slow performance.
Special offer. About Outbyte, uninstall instructions, EULA, Privacy Policy.
Follow these steps to set up your email account using the Mail app:
- Click the Mail app from the Dock or Finder > Applications > Mail.
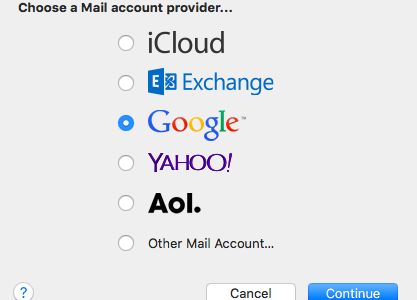
- Click the email provider associated with your email account. Your options are iCloud, Microsoft Exchange, Google, Yahoo, and AOL. If your email address has a domain that is not included in the list, such as a school or work email address, click Other Mail Account.
- Hit Continue.
- Type in your email address and password, then click Sign In to continue. If you’re using an email account that is not listed in the options, you need to enter the account type and specify the incoming and outgoing mail servers.
- Click the checkmark button next to each app you want to use for this account.
- Click Done.
For multiple email accounts, just repeat the process until you see all of your accounts on the Mail app. By following the steps above, you’ll be able to access your email accounts without having to log in to these different service providers every time.
The Mail app is a convenient tool to organize all your email accounts. But there are times when users input the wrong Mac Mail account settings , causing mails not to be delivered or received.
How to Fix Mac Mail Server Settings
Before you edit any of your Mac Mail account settings, it is important to scan your computer first to see if the issue is being caused by outside factors. You can use a reliable app such as Mac repair app to delete all junk files from your computer that might be interfering with your processes. Aside from getting rid of trash, this tool also boosts your RAM and optimizes your system, resulting in a faster and smoother performance.
However, if the problem persists even after you have optimized your Mac and resolved possible issues, then it is highly probable that the problem really lies in your account settings.
The default port for Mac Mail app is 1025. If you can’t send or receive emails through the Mail app, there is a huge chance that your ISP or internet provider is blocking port 1025. What you can do is try an alternate port, such as 587 or 25 – a fix that usually works for most ISPs. But if you are still unable to connect using these ports, you might need to use a unique port number, which you can obtain from you r internet service provider.
Aside from the port number, you also need to verify with your service provider the following information:
- Account type – It could be IMAP, POP, Exchange IMAP, or Exchange EWS1.
- Incoming Mail Server or Host Name – The host name of the incoming mail server, e.g., mail.abcde.com.
- Port – Port number used for the incoming and outgoing server.
- Authentication – The options are Password, MD5, NTLM, Kerberos, or None. Check with your service provider.
- Outgoing Mail Server (SMTP) – The host name of the outgoing Simple Mail Transfer Protocol or SMTP, e.g.,abcde.com.
- SSL Support – Check whether the SMTP supports SSL or TLS encryption.
If your problem is that you can’t receive emails, then you need to look at your incoming mail server settings to see what’s wrong by following these steps:
- Open your Mail app by clicking the icon at the Dock.
- Click Mail on the top menu.
- Go to Preferences > Accounts, then choose the account you want to edit from the left-side menu.
- Click the field next to Incoming Mail Server to edit it. You also need to make sure you enter the correct username and password for the email account.
- To edit the port number, click the Advanced tab and replace the port number in the Port You can also choose to enable or disable SSL.
If your problem, on the other hand, is that you can’t send any emails, then the issue probably lies in the outgoing SMTP server. To edit your port number for the Mac SMTP server, follow these instructions:
- Launch your Mac Mail app, and click Mail on the top menu.
- Select Preferences and go to the Accounts
- Select your account on the left-side menu.
- Click the dropdown menu next to Outgoing Mail Server (SMTP).
- Choose Edit SMTP Server List.
- Check to make sure that TLS Certificate is listed as None, then click Advanced.

- You will see here the Port being used by your account. This is where you replace the port number. Try to use a different port or the one given to you by your service provider.
- Click OK to finish. You might need to restart the app to make sure that the changes have been applied.
Once you’ve done the changes to your Mac SMTP server, you can try sending yourself a message to see if it finally works.