
If you love multitasking or if your work requires multiple apps to be open at the same time, more screen space would be getting more work done. The easiest way to increase your screen real estate is by connecting a second or a third display to your computer. We’ve seen this always done on Windows computers, but can you use a second screen with a Mac? The answer is Yes.
This article will show you how to use a second screen with a Mac, which adapters to use, how to set up the external screen, and which settings to tweak to make the setup work.
You can use two screens on a Mac and turn all of the displays into a mirror of each other. You can also choose to extend your workspace with each display having different apps and windows. You can also switch to closed-display mode where you connect your Mac to an external display while the built-in display is closed or disabled. The closed-display mode is usually used during a presentation.
Using two screens with a Mac or MacBook is generally a simple process. However, some issues may cause your display not to work, so you need to configure this correctly. Follow our guide below to correctly configure an external display on Mac.
Pro Tip: Scan your Mac for performance issues, junk files, harmful apps, and security threats
that can cause system issues or slow performance.
Special offer. About Outbyte, uninstall instructions, EULA, Privacy Policy.
Step 1: Check Your Device Requirements.
For your dual-screen setup to work, you need to check first the hardware requirements of your device. These are the specifications you should know about:
Type of Port
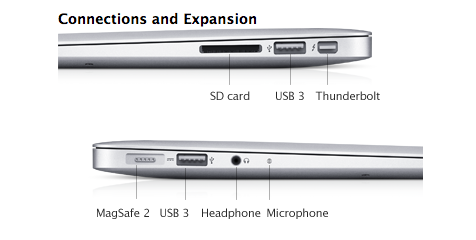 Different Mac models have different ports. You need to understand what type of port your Mac has so you know which cable to use. These are the different types of ports according to the Mac models:
- Thunderbolt 3 (USB-C) – MacBook Pro 2016 or later, MacBook Air 2018, iMac 2017 or later, iMac Pro (all models), and Mac mini 2018 use Thunderbolt 3 (USB-C) ports.
- USB-C – MacBook models launched in 2015 or later have a single USB-C port.
- Thunderbolt – MacBook Pro 2011 – 2015, MacBook Air 2011 – 2017, Mac mini 2011 – 2014, iMac 2011 – 2015, and Mac Pro 2013 have Thunderbolt or Thunderbolt 2 ports.
- Mini DisplayPort – MacBook Pro late 2008 – 2010, MacBook Air late 2008 – 2010, Mac mini 2009 – 2010, iMac 2009 – 2010, and Mac Pro 2009 – 2012 are equipped with Mini DisplayPorts.
- USB-A – This is used by devices to connect using a USB cable.
- HDMI – This can be used by displays and Smart TVs that connect using an HDMI cable.
- Ethernet – This port is usually used to connect to the network using an Ethernet (RJ45) cable.
- FireWire – This is used by devices that connect using a FireWire 400 or FireWire 800 cable.
Video Support
Once you’ve seen the type of ports your device has, the next step is to find out how many screens and what types of display your Mac can support.
To know this information:
- Click the Apple menu, then select About This Mac.
- Click Support > Specifications. This will open up a webpage with the technical details about your Mac model.
- Look under Graphics and Video Support or Video Support.

You should see how many displays and what types of mode your Mac supports. In the example above, the device can support dual display and video mirroring.
Step #2: Check What Port Your Display Has.
Once you have identified the type of port your Mac has, the next step is to check the available ports on the screen you are going to use. These are the types of ports you are most likely to find in a display:
- VGA – A VGA connector transmits analogue signals and requires a three-row 15-pin DE-15 connector. Old monitors have VGA ports, but there are also flat displays that still use VGA. The VGA connector just converts the analog signal back to digital. However, the conversion process may result in poor video quality.
- DVI – DVI provides better video quality compared to VGA because it can transmit digital signal Depending on the type of DVI port (DVI-A, DVI-D or DVI-I), a DVI connector can have up to 24 pins.
- HDMI – This is the most common port you will usually find on the back of a TV. DVI supports video only, while HDMI supports up to eight audio channels. It can also support resolutions of up to 8K and higher.
- Thunderbolt – If you bought an Apple Thunderbolt display before it was discontinued in 2016, then your monitor probably has a Thunderbolt 1 or 2 port.
- Thunderbolt 3, USB-C, or USB 3 – Thunderbolt 3 and USB-C ports look the same, so you can use any monitor equipped with either of these ports. The main difference is that Thunderbolt is comparably faster and can take more power than USB-C ports. However, monitors with USB-C ports are cheaper and easier to find than those with Thunderbolt 3 ports. The USB 3 or USB 3.1 port, on the other hand, is the predecessor of USB-C.
- Mini DisplayPort – Apple’s LED Cinema Displays, which were introduced in 1999 and were replaced by the Thunderbolt display in 2011, use Mini DisplayPort connection.
Step 3: Decide Which Cable and Adapter to Use.
After finding out which types of ports your Mac and your display use, you can then choose which cable to use to connect them. Take note that the cable doesn’t have to come from Apple, as long as it is of good quality and gets the job done.
If your Mac and monitor both have an HDMI port, you can simply use an HDMI cable to connect them. If they both have a USB-C port, you can use a USB-C or Thunderbolt cable to do the job. But if your monitor has a VGA or DVI cable, you might need to use an adapter to make the connection work.
Another detail you need to figure out is whether the port on the back of your display is male or female. Female ports have holes while male ports have spikes. Apple adapters are female, so you will need to choose an adapter that fits your device’s endpoints.
If you’re going to need an adapter for your connection, make sure that you buy from Apple because third-party adapters no longer work with macOS Sierra. Here are the types of adapter that you might need:
- USB-C to HDMI – The Apple USB-C Digital AV Multiport Adapter allows you to connect a Thunderbolt 3 – equipped Mac to an HDMI-equipped display.
- USB-C to VGA – Apple’s USB-C VGA Multiport Adapter allows you to connect to a VGA monitor or projector. Take note, however, that this will not support HDCP or High-bandwidth Digital Content Protection content, such as HD movies from the iTunes Store.
- USB-C to DVI – Apple doesn’t have a USB-C to DVI adapter, so you’ll have to find one from third-party suppliers, such as Amazon or eBay.
- USB-C to Mini DisplayPort – Apple does not have a USB-C to Mini DisplayPort adapter, which means you won’t be able to connect a MacBook Pro 2016 or later to any monitor that uses a Mini Display Port. However, you may search for this adapter on Amazon or another third-party supplier.
- Mini DisplayPort to VGA – Apple’s Mini DisplayPort to VGA Adapter lets you connect your Mac equipped with Mini DisplayPort or Thunderbolt ports to an external display or projector that has a VGA port.
- Mini DisplayPort to DVI – Apple’s Mini DisplayPort to DVI Adapter lets you connect a Mac with Mini DisplayPort or Thunderbolt ports to a monitor or projector that equipped with a DVI port.
- Mini DisplayPort to HDMI – Apple does not have a Mini DisplayPort to HDMI adapter, but you might find one on Amazon.
- HDMI to DVI Adapter – Apple has an HDMI to DVI Adapter you can use to connect an HDMI to a DVI port.
- Thunderbolt 3 (USB-C) to Thunderbolt 2 Adapter – Apple’s Thunderbolt 3 to Thunderbolt 2 Adapter allows users to connect a Thunderbolt display to a new Mac.
Step 4: Choose Your Display Mode.
Once you’ve got the hardware figured out, it’s time to set up your external screen by choosing a display mode. There are three modes you can choose from: extended desktop mode, video mirroring, and AirPlay.
Extended Desktop Mode
This display mode allows you to maximize your workspace by having full-screen apps and windows on each display. You can arrange the apps and windows using Mission Control to keep everything organized.
To turn on extended desktop mode, follow these steps:
- Switch on your external display and connect it to your Mac.
- Click Apple > System Preferences > Displays.
- Click on the Arrangement tab.
- Make sure that the Mirror Displays checkbox isn’t ticked off.
- To arrange your displays, drag one of the displays where you want it. You should see a red border around the display you are trying to arrange.
- To change your primary display, drag the menu bar (white) to another display.
Video Mirroring Mode
When you’re on video mirroring mode, all of your screens show the same apps and windows.
To turn video mirroring on:
- Turn on your external display and connect it to your Mac.
- Go to Apple > System Preferences > Displays, then click on the Arrangement tab.
- Tick off Mirror Displays.
Once done, you should see the same display on all of your monitors.
AirPlay
When you have an Apple TV, you can mirror the entire screen of your Mac to your TV or use it a separate display using AirPlay.
To turn this feature on:
- Turn your TV on.
- Click the AirPlay icon from the Dock. If you don’t see this icon, click Apple > Displays, then tick off Show mirroring options in the menu bar when available.
- Remember the passcode that appears on your TV, then type it on your Mac.
- To mirror your display, click the AirPlay icon, then select Mirror Built-in Display.
- To turn your TV into a separate display, click the AirPlay icon, then select Use As Separate Display.
- To turn off AirPlay, click the icon, then choose Turn AirPlay Off.
Troubleshooting Connection Issues
Using two screens with a Mac or MacBook should be a simple process, but it is possible to encounter some problems due to various reasons. Here are some common problems you are likely to encounter when using an external display and how to fix them:
External Display Is Not Working
If your adapter is not from Apple, there is a possibility that the adapter won’t work because of compatibility issues. If this is the case, try using an Apple adapter and see if it will work.
But if you encounter this problem when using an Apple adapter, here are some fixes you might want to try:
- Disconnect and turn off your monitor. Reconnect your adapter and switch the screen back on.
- If it doesn’t work, disconnect the cable, power off the display, then connect it again. Restart your Mac to see if the external monitor is now working.
- Adjust the display’s brightness.
- Select a different resolution by going to System Preferences > Display.
- Clean up and optimize your Mac with a tool such as Mac repair app.
Mac Can’t Detect the External Display
When you connect your external monitor to your Mac, the display should be automatically detected. But if it isn’t detected, try the solutions below:
- Connect your monitor to your Mac and go to System Preferences > Displays.
- Press the Option key to make the Detect Displays button appear.
- Click Detect Displays. Your Mac should now be able to see the external monitor.
Final Notes
Using two screens with a Mac or a MacBook is a great hack if you want to enjoy a bigger display or you want to increase your productivity. Before you do, make sure to check the ports on your Mac and your monitor, then use a quality cable and an adapter to connect your devices. You can choose from the various display modes available, depending on what you want to use the external display for. If you come across any issues, check out the troubleshooting guide above to get your setup working properly.