Photography has evolved over the decades — from bulky cameras to digital cameras to the smartphone cameras that we use every single day. Instead of waiting for days, or even weeks, to get the photos developed so the people can see what they look like, users can now instantly see what the photo looks like and save it on the device (or delete if they’re not satisfied with the photo). Before, users are limited to the amount of the film negatives that are available. Today, however, people can take as many pictures as they want — anytime, anywhere.
There are also a lot of things people can do with their photos. They can edit them and have them printed, sent via email, post on social media, or send as attachment to messages. And the best way to organize your photos on Mac is by transferring them to the Photos library. The user just needs to connect the device (camera or phone), then import the photos to the library. You can even set up your Mac to automatically import photos once it detects an external drive.
Unfortunately, not all photos that get imported retain their quality during the process. There are instances when photos get corrupted or damaged after being transferred from the SD card of the camera or your phone. Some photos get lines across them while others load only half of the original photo. It is also common for some photos to not open using Preview and other photo-editing apps.
According to user reports, the original photos in the camera look fine, but they get corrupted once they are imported to the Photos library. Users also noted that the macOS corrupt images appear mostly on Macs running Catalina. The corrupt photos on macOS do not only appear when opening the file using Preview, but also other third-party photo apps on Catalina, including Pixelmator, Adobe PSE 2020, Affinity Photo, XnViewMP, and others. The weird thing is that the corrupt photos on macOS Catalina look definitely fine and in good quality when transferred to other Macs using older versions of macOS, such as High Sierra, Sierra, and Mojave. They also do not look corrupt when opened with computers running Windows or Ubuntu.
Pro Tip: Scan your Mac for performance issues, junk files, harmful apps, and security threats
that can cause system issues or slow performance.
Special offer. About Outbyte, uninstall instructions, EULA, Privacy Policy.
The photos on the original device are not corrupted when you connect them to a different computer and open it from there. But the files that were imported on the Photos library remain corrupted even when you send it via email or stored on a physical drive. This means that the corruption happens during the import process and there is nothing wrong with the original file.
The difficult part of this is that the corruption does not happen for the entire photos, so you might not notice the problem immediately. According to some users, the damage happens to photos sequentially, but does not affect all others. For example, photos 1 and 2 might be corrupted, but 3, 4, and 5 might look fine. Then 6, 7, and 8 will also be corrupted. You’ll never know unless you check each and every one of them. This could be a problem if you’re importing thousands of photos because who would have time to go through all of them one by one?
What Causes Corrupt Photos on macOS Catalina?
Since the corruption happens during the import process, then the issue might be related to the Photos library itself. A system process might have failed or there could be a software incompatibility that is causing the images to be corrupted. An outdated Photos app could also be the culprit here.
It is also worth looking into the compatibility of the camera or device where the photos originated with macOS itself. If there is conflict somewhere, then some of your photos might be damaged.
Here are other factors you also need to consider:
- Corrupted preferences of the Photos app
- Damaged SD card, camera, or storage disk where the photos will be imported from
- Malware
Resolving the problem of corrupt photos on macOS can seem like a daunting task, but the solutions are actually very simple.
How to Fix Corrupted Photos on Mac
If you’re wondering how to import your images to your Photos library successfully, below are some of the methods you can try. But before you do so, it is recommended that you do some system cleanup first to make the troubleshooting process a lot easier. Here are some of the basic steps you should follow:
- Close the Photos app completely by choosing Quit from the Photos menu or pressing Command + Q.
- Delete other apps that you don’t need and get rid of junk files using a Mac cleaning software.
- Run your anti-malware program to rule out malware infection as one of the causes.
- Install all system updates available for your Mac.
Once you’ve completed the above steps, you can now proceed with the troubleshooting methods below:
Method 1: Update the Photos App.
As mentioned earlier, one of the common causes of corrupt photos on macOS is an outdated Photos App. This error is most likely to happen if you’ve recently upgraded to macOS Catalina or installed a major update without updating the Photos app itself. Keeping your Photos app updated should quickly fix this error.
To do this:
- Click the Apple icon, then choose App Store from the dropdown menu or click the App Store icon from the Dock.
- Click the Updates tab from the top menu.

- You should see all the pending updates you need to install on your computer.
- Look for the Photos app and see if there are any updates you need to install.
- Or you can click Update All to install all available updates.
Wait for the update process to be completed, then try importing your photos again.
Method 2: Repair the Photos Library.
macOS has a hidden feature that allows users to fix issues with the Photos library. This hidden repair tool can fix common Photos library issues, including corrupted images, a library refusing to open, or a library showing errors when copying or importing. You don’t have to download anything because all you need to do is press some keys to repair the Photos library.
Here are the complete steps:
- Hold down the Option and Command keys while launching the Photos app.
- Type in your admin name and password when prompted.
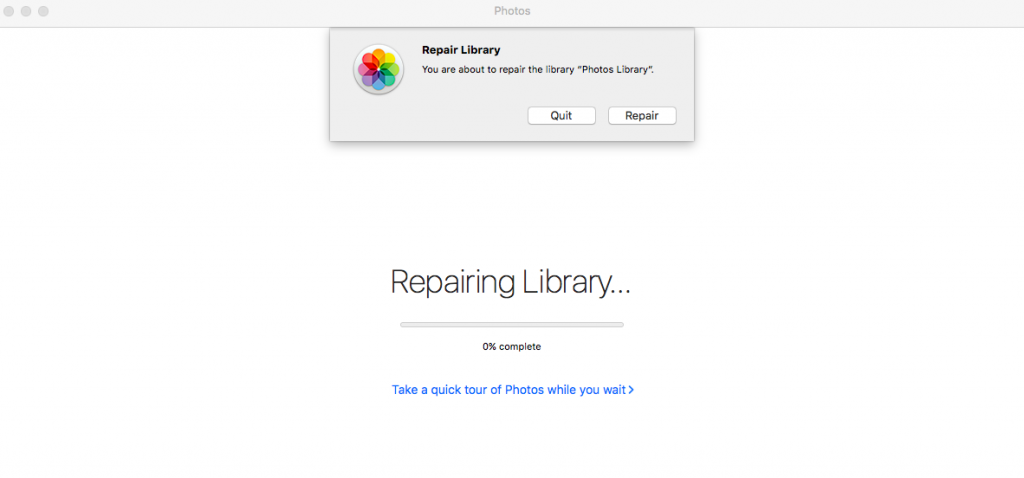
- A message will pop up, asking you to either Repair or Quit the library. Click on Repair.
- You will see a progress bar that signifies how far along you are. Depending on the size of the library and the speed of your Mac, the process could be completed within a few minutes to a few hours.
- Wait for the repair to finish.
Once done, try importing your photos again to see if the problem has been fixed.
Method 3: Copy the Images Manually.
If you’re having trouble importing the files to the Library, you can try copying them manually instead. However, don’t copy all the images at the same time. Copy them by batches so you can quickly check if any of them gets corrupted in the process. Just plugin or connect the source of the images, open it just like other external drives, and choose the photos you want to copy.
You won’t be able to copy them directly to the Photos library so you need to create a temporary folder on your Mac to copy them to. For example, you can create a new folder on the Documents or the Picture folder. Once you have copied the photos, press Command + A to select all of them. Right-click on the highlighted photos, click Share, then choose Add to Photos.
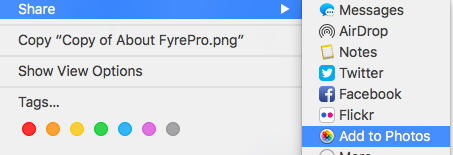
The images you selected would then be added to the Photos Library.
Summary
Importing your photos from your camera or phone to the Photos library should be a very simple process. But a lot of things can happen during the process, leaving users with corrupted or damaged photos. If this happens, the methods above can be very useful in ensuring the photos you imported to the Photos library will be as good as the original.