Traditionally, Microsoft has used passwords across its products, including Windows, for security. During setup, users create a password, required for account access and system adjustments. Without it, access to user accounts and system changes on the Windows operating system are restricted.
But Microsoft is changing all of that. In the recently-released Insider Preview Build 18936, Windows 10/11 gets rid of passwords and provides a more secure login option for Windows users. With this new update, Windows 10/11 will be passwordless from now on, at least for Windows Insiders in the Fast ring. Microsoft has been working on getting rid of passwords from Windows 10/11 devices and Microsoft accounts for several months now, but this new major Windows update brings Microsoft’s vision of passwordless Windows 10/11 into reality.
No More Passwords for Windows 10/11
Last May, Microsoft’s crypto, identity and authentication manager, Yogesh Mehta, announced that the Windows Hello feature launched with the Windows 10/11 May update, has taken the 800 million Windows 10/11 users one step closer to a passwordless future. Microsoft has also been slowly trying to convince users to use other authentication processes such as the Microsoft Authenticator app, physical security keys under the FIDO2 standard, and sign in option using a phone number.
Why is Microsoft making Windows 10/11 passwordless? The answer is simple: passwords are vulnerable and they are easy to forget. Users tend to reuse them across every website and apps on all of their devices. People creating generic passwords for all of their accounts is common. So when one account gets hacked, the other accounts get compromised too. Using strong passwords may minimize the risk, but the challenge lies in remembering it.
Expert Tip: For smoother PC performance, consider using a PC optimization tool. It handles junk files, incorrect settings, and harmful apps. Make sure it's right for your system, and always check the EULA and Privacy Policy.
Special offer. About Outbyte, uninstall instructions, EULA, Privacy Policy.
With the release of Windows 10/11 Insider Preview Build 18936 (20H1), the passwordless world of Windows 10/11 has now become a reality, for the lucky few Windows Insiders at least.
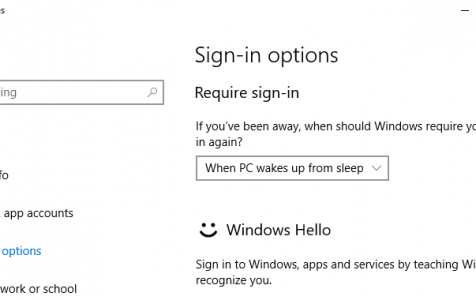
New Sign-In Options
This means that there will be no more passwords for Windows 10/11 when this update has been fully rolled out. There will still be a login screen, but the password option will no longer be included in the sign-in options. Instead of typing in a password, users can use modern authentication methods instead. These new login options include the Windows Hello facial recognition, a fingerprint scan, and a PIN.
To enable these new sign-in options, open the Settings app and go to the Accounts menu. Turn on Make your device passwordless under Sign-in options to enable this seamless sign-in experience. You no longer have to type in your password whenever you log into Windows.
Using a PIN to Log Into Windows 10/11
Using a PIN makes the login process a lot simpler and easier. Instead of trying to remember your password, all you need to do is remember a string of numbers to be able to log into your Windows 10/11 account.
A PIN may seem a lot simpler and easier to crack, but it is actually more secure than a password. According to Diana Huang, Microsoft’s director of engineering for Windows security, a PIN uses a simple r form of authentication compared to a password, but the main difference lies in symmetry. Password is a symmetric key, which is usually being tracked by a server. A Windows Hello PIN, on the other hand, is an entropy and not a symmetric key. Therefore, it is not being tracked by a server and the Windows client does not save a copy.
To set up a PIN in Windows 10/11, follow the instructions below:
- Open the Settings app, then click the Accounts icon.
- Click Sign-in options on the left side, and click the Add button under PIN on the right side.
- Verify your account password when prompted, and then click OK.
- Type in the numbers you want to use as PIN in a dialog box. The minimum length is four digits from 0–9 only and no letters or special characters are allowed. Your PIN can be as long as you want.
- If you need to review your PIN, select the icon to the right side of the dialog box. This will briefly show the number you’ve typed into the box.
- Click OK to finish the setup.
Using Windows Hello Face to Log Into Windows 10/11
Windows 10/11’s Hello feature offers several ways to log in to your laptop, including facial recognition. You will need an infrared or Intel RealSense camera and a PIN to configure the facial recognition sign-in option. If you don’t have a PIN, you can set that up using the instructions above.
To set up Windows Hello facial recognition, follow the steps below:
- Open Settings and choose Accounts.
- Click Sign-in options on the left sidebar and scroll down to Windows Hello.
- Click Set up under the Face option.
- Click the Get Started button, then enter your PIN.
- Look into the camera while Windows Hello scans your face. This should be a quick procedure if you keep still. If you have glasses or wear a hat, remove them first before you scan your face.
- Click Improve Recognition if you want to do additional scans.
- Close the setup process once you are satisfied.
The next time you want to log into Windows, the camera will be scanning your face for authentication.
Using Fingerprint to Log Into Windows 10/11
Microsoft is making Windows 10/11 passwordless, so it is important to enable other sign in options, such as fingerprint scanning. Your fingerprint is unique to you so nobody else can use it to gain access to your account. It is also an easier way to log into your computer instead of memorizing a password or a PIN.
To configure Windows Hello fingerprint login, follow these steps:
- Go to Settings > Accounts.
- Scroll down to Windows Hello, then click Set Up under the Fingerprint section.
- Click the Get Started button, then type in your PIN. If you don’t have a PIN, create one using the instructions above.
- Place your finger on the fingerprint reader to scan your fingerprint. You may need to do this a couple of times to give the scanner a good copy of your prints.
- Click Add Another if you want to use another finger for the fingerprint login.
- Close the program once done.
Summary
If Microsoft continues with this trend, Windows 10/11 will be passwordless in the near future. The good news is that Microsoft has introduced more secure and more convenient login alternatives with the Windows Hello feature. The passwordless feature is currently being rolled out to select members of the Insiders program and it will probably take a while before this option shows up for all users in Settings.
Here’s a tip: Get your system ready for the new update by optimizing it using Outbtyte PC Repair. This tool boosts your computer’s performance and ensures all features are working smoothly at all times.