
Windows 10/11 is a stable operating system created by Microsoft. Not only does it start up fast, unlike its predecessors, but it is also safe and secure with built-in security software.
However, no matter how advanced Windows 10/11 is, it is considered far from perfect. It still receives regular updates to ensure users enjoy their experience. Since the operating system was rolled out in 2015, 12 major patches have been rolled out, and each introduced new features and improvements to existing functions.
In the process of installing these updates, things may sometimes fail. There may be missing data packets or incompatibility issues. As a result, various error codes are being thrown, the computer freezes, or worse, the user encounters the dreaded Blue Screen of Death.
Seeing these error codes, users often decide not to proceed with installing the latest Windows 10/11 updates. They don’t want to compromise their safety and user experience due to faulty patches.
Expert Tip: For smoother PC performance, consider using a PC optimization tool. It handles junk files, incorrect settings, and harmful apps. Make sure it's right for your system, and always check the EULA and Privacy Policy.
Special offer. About Outbyte, uninstall instructions, EULA, Privacy Policy.
Well, Windows 10/11 users need not think that way. These problems can be resolved by simply restoring Windows 10/11.
How to Restore Windows 10/11
Regardless of whether you’re dealing with a startup problem, a recurring error, or a BSOD, there are workarounds. And one of the most popular solutions involves restoring Windows 10/11.
As a Windows 10/11 user, you are lucky enough because your device is equipped with utilities that you can use to recover from common problems. Below, we will share the most popular ways to restore Windows 10/11. Here you go:
Method #1: Use System Restore on Windows 10/11
One way to restore Windows 10/11 involves using an in-built Windows 10/11 utility, which allows you to roll back your system’s changes to restore affected apps and files to a state when they were still working fine. This utility is called System Restore.
System Restore takes snapshots of your system files, registry keys, program files, and drivers. In case the system encounters an error, this utility can restore the affected programs and files to the saved state. System Restore is extremely helpful in the event of ransomware attacks when files get encrypted.
For System Restore to work, you need to create a restore point on Windows 10/11 first. Follow these steps on how to create a restore point on Windows 10/11:
- Click the Start menu and type create a restore point into the search field.
- Select the most relevant search result.
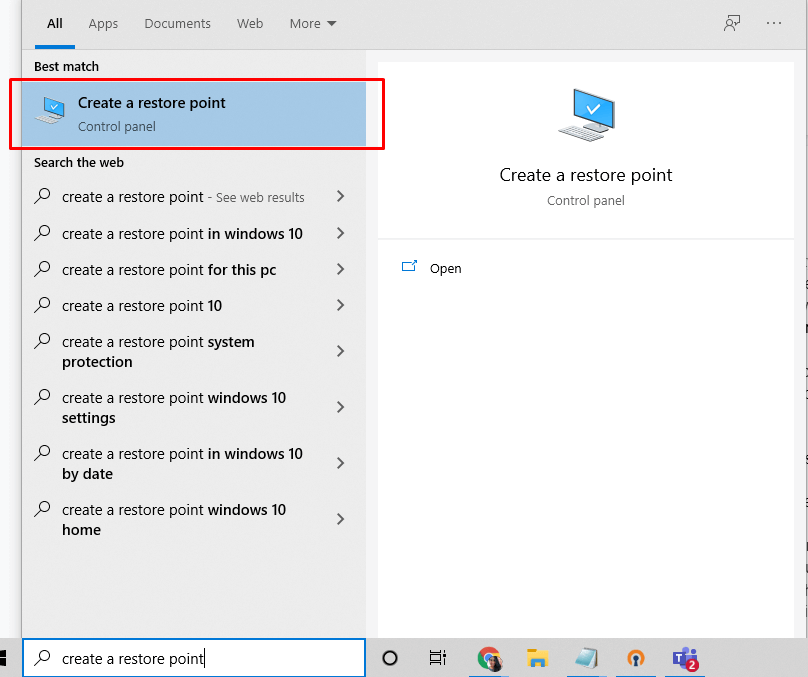
- The System Properties window should surface on your screen.
- Navigate to the System Protection tab and find the Create button. Click on it.
- At this point, the Windows 10/11 restore point is being created. It may take a while to create a restore point, so be patient.
- Once done, hit the Close button.
Assuming you already have System Restore points created on your Windows 10/11 device, you can now use them to restore Windows 10/11. Here’s how to do a System Restore on Windows 10/11:
- Press the Windows + S keys to access the Search function.
- Next, input restore.
- Select the Create a System Restore point option.
- Hit the System Restore button and click Next.
- Choose the restore point that you wish to restore and hit Next.
- Windows 10/11 will start making the necessary changes. Once done, it will reboot.
While System Restore is a very powerful tool, it is disabled by default. This means that you need to enable it first before Windows 10/11 can start creating restore points automatically or manually.
To enable System Restore on Windows 10/11, access it via the Control Panel. Use these steps to guide you:
- Go to the Start menu.
- Type Create a restore point into the search field.
- Click the most relevant search result. This will open the System Properties window.
- Navigate to the Protection Settings section and choose System.
- Hit the Configure button.
- Choose the Turn on system protection option.
- By default, Windows 10/11 will manage the space allocation for the restore points. However, you can also specify the storage amount you want to allocate for recovery. Also, notice that there is a Delete button. You can click on it if you want to delete all restore points stored on your device. This action is recommended if you no longer have enough space on your device.
- Hit the Apply button, then OK.
In case you are wondering, “how long does system restore take on Windows 10/11?” In an ideal scenario, the process should take about half an hour. Thus, if you notice that an hour has already passed and you’re not halfway there, it is possible that the program has frozen. Something on your device may be interfering with the System Restore program, keeping it from performing properly.
Method #2: Use the Reset This PC Option
Do you want to know how to restore Windows 10/11 to factory settings? Then here’s the answer: Reset This PC option.
If the System Restore utility fails to restore Windows 10/11, you can use the Reset This PC option instead. When you use this function, Windows will reset to its default factory state. At its default state, your Windows 10/11 PC will have all the manufacture-installed drivers and software. So, if you have purchased your computer with Windows 10/11 already installed, expect your PC to be in the same state after resetting it.
To restore Windows 10/11 using the Reset This PC option, follow these steps:
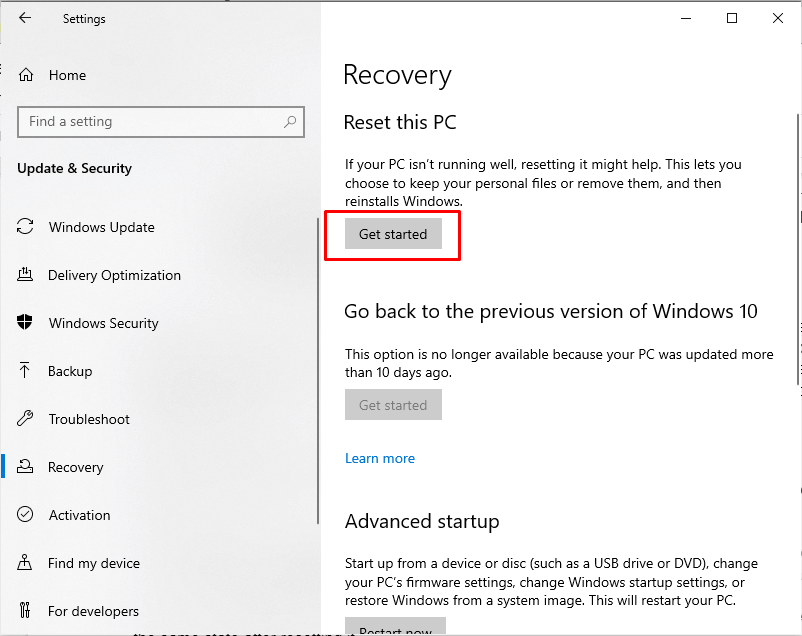
- Press the Windows + I keys to access the Settings utility.
- Go to Update and Security.
- Select the Recovery option and click the Get Started button under the Reset This PC section.
- Next, make sure to tick the Keep your files intact option unless you don’t want it.
- A list of all apps that will be removed will be shown on your screen. If you agree with deleting them, confirm and proceed.
- Wait for the process to complete.
Method #3: Use the System Image Backup
System Image is another all-in-one Windows 10/11 backup and restore option that can be used to restore Windows 10/11. Like System Restore, this utility takes a snapshot of the system, including its system files, apps, and other personal data.
So, why choose this option over other restoration methods? The main advantage of using System Image is that it protects your personal settings and data from loss after a ransomware attack or a system crash.
To use this, you first need to create a backup. Here’s how:
- Go to Control Panel and find System and Security. Click on it.
- Navigate to File History.
- Locate the System Image Backup option and connect a USB drive.
- Select System Image Backup and choose the USB drive you just connected.
- Hit Next and wait for the backup process to continue.
After creating a backup, you should be able to use System Image Backup any time you want. To do that, just follow these easy instructions:
- Connect the USB drive where the System Backup Image is saved.
- Hit Next.
- The Windows Setup screen will now appear.
- Choose the Repair Your Computer option.
- Select Troubleshoot.
- Once the Advanced System Recovery Options screen appears, choose System Image Recovery.
- Choose your OS and select the latest System Image.
- Click Next to continue.
- Decide whether you wish to install drivers.
- Reboot your computer once the restoration process is complete.
- Click Next and then Finish.
Method #4: Perform a Repair Install
If the steps above did not work, you can perform a repair install instead. Also called in-place upgrade, you can opt for this method if you have a Windows 10/11 installation media. You can also create one if you want. Simply download the Windows 10/11 installation files from the official Microsoft website and save the ISO file into a USB drive or DVD.
Here’s how to perform a repair install on Windows 10/11:
- Plug the bootable USB or DVD drive into your computer.
- Run the setup.exe file.
- Follow the on-screen prompts until you reach the Choose what to keep window.
- Tick the Keep personal files, apps, and Windows settings option.
- Hit Next to proceed with the repair install process.
- Once done, your computer will reboot.
What Is the Best Method to Restore Windows 10/11?
Among the methods we have mentioned above, which do you think is the best: System Restore, Reset This PC, System Image Backup, or Repair Install?
Well, there is no “best” method here. The answer depends on your current situation. If you have created restore points on your device, then System Restore might be the most convenient option. And if you want to reset your device to achieve a state wherein it’s as if it has just been bought, consider the Reset This PC option.
If you want to restore Windows 10/11 and keep your personal files and settings, System Image Backup is your best bet. And if all else fails, Repair Install might just do the trick.
What’s Next?
There are many reasons why you decided to restore Windows 10/11. Maybe malware has caused your files to become corrupt. Perhaps, you no longer have enough space left on your disk; hence, you want to optimize it.
If you want a quick and easy way to get rid of unwanted files and programs and optimize Windows 10/11, consider downloading and installing a PC repair tool. Yes, your Windows device may already have repair tools that help resolve common Windows issues. But they are still not enough to deal with other issues that cause your system to perform sluggishly.
Most third-party PC repair tools come with customized cleaning tools that improve your system speed. They even have features that protect your device from malware and safeguard your sensitive data.
So, the next time you plan to restore Windows 10/11, consider using a PC repair tool first. If it does not address your concern, then pull up this article and refer to the methods we have enumerated above.
Installing an anti-malware program also helps protect Windows 10/11, too! With an extra anti-malware tool up and running on your device, you give your computer an added level of security against new strains of malware that cause serious harm and may result in the need for a Windows 10/11 repair.
What are your thoughts about this article? We’d like to know. Comment below!