Daylight Saving Time or DST is the practice of adjusting the local standard time one hour forward on the first Sunday of March, and one hour backward on the first Sunday of November. This year, the DST started at 2:00 AM of last Sunday, March 10.
Computers, tablets, iPads, smartphones, and other digital devices are designed to automatically adjust to DST. However, some Windows 10/11 users noticed that their computer’s time did not adjust even though their systems were set to automatically make the adjustment.
If the time didn’t change according to DST, this means that the time on the Windows system is one hour ahead of the actual time. An incorrect system time may seem like a trivial thing, but it can have a huge impact on the Windows system as a whole. The system time affects your software, hardware, and networking components of the Windows environment.
What Happens When Your Computer’s Time Is Incorrect?
If Windows 10/11 doesn’t automatically adjust to daylight savings time, this can cause a lot of confusion, especially if you’re not aware that your clock is incorrect. For example, you might miss a scheduled conference call or meeting because the time on your computer was wrong.
Expert Tip: For smoother PC performance, consider using a PC optimization tool. It handles junk files, incorrect settings, and harmful apps. Make sure it's right for your system, and always check the EULA and Privacy Policy.
Special offer. About Outbyte, uninstall instructions, EULA, Privacy Policy.
Automated processes on your computer will also be greatly affected because the schedule is all messed up. Emails that are scheduled to be sent out at specific times will be forwarded one hour after and other scheduled tasks will be run later. The one-hour shift also affects time-sensitive payments and applications.
Incorrect time settings can also cause different errors on your computer. Some apps might fail to launch or you might not be able to sign into your account if the time setting is wrong. You will also be unable to download new system and app updates if Windows 10/11 doesn’t automatically adjust daylight savings time.
Windows 10/11 is designed to switch to DST automatically, but the adjustment doesn’t happen for some people because of a bug or an error. If your computer doesn’t switch to daylight savings time automatically on Windows 10/11, you can adjust your time manually via the Settings app.
This guide will show you how to adjust your computer’s time and date settings, as well as how to change time to DST automatically on Windows 10/11 so you don’t have to perform the action every time.
How to Change Time to DST Automatically on Windows 10/11
If Windows 10/11 doesn’t automatically adjust to daylight savings time, then there’s something wrong in your settings somewhere. Windows operating systems are structured to switch to DST automatically and an additional hour should be added to the time after 2:00 AM of the first Sunday of March. If your system time remains the same, you can manually fix your time settings by doing the steps below:
- Enable the time.windows.com server by editing the registry entry via Regedit.
- Press the Windows + R shortcut to open the Run utility.
- Type in regedit then hit the OK button.
- Navigate to this address: HKEY_LOCAL_MACHINE\SOFTWARE\Microsoft\Windows\CurrentVersion\DateTime\Servers.
- Check if time.windows.com is listed and enabled.
- If not, right-click anywhere in the right pane, click New > DWORD 32.
- Type in time.windows.com and set the Value to 1.
- Close the Registry Editor.
- Press Windows + X and choose Windows PowerShell (Admin).
- Type the following command in the console, then hit Enter:
Get-AppXPackage-AllUsers | Foreach {Add-AppxPackage -DisableDevelopmentMode -Register “$($_.InstallLocation)\AppXManifest.xml”}.
- Close Command Prompt and launch Control Panel from the Power Menu (Windows + X).
- Select Date and Time, and click on Set the time and date.
- Click on the Internet Time tab, then choose Settings.
- In the Internet Time Settings, tick off Synchronise with an Internet time server.
- Select time.windows.com from the Server dropdown menu.
- Click the Update Now button.
- Hit OK when the confirmation message comes up.
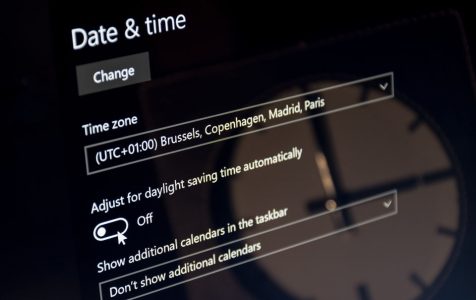
- Tick off Adjust for daylight saving time automatically and Set time zone automatically.
Once you’ve done these changes, restart your computer and you’ll see that it now reflects the correct DST time. However, the steps above will only adjust your time and do not really address the cause of your incorrect time settings.
Check out the methods below to fix your issues with your computer time settings.
Fix #1: Update Your Windows.
Keeping your system updated does not only install critical security updates and patches, but it also adjusts inconsistencies in your settings and processes. To update Windows 10/11:
- Click on Start, then choose Settings.
- Navigate to Update and Security > Windows Update, and then click the Check for updates button.
All your pending updates should have been downloaded by your computer in the background and you only need to install them. Once all the updates have been installed, reboot your PC.
Fix #2: Clean Up Your PC.
Cached data, temporary files, and other junk files can interfere with your system process or affect your settings. Use Outbyte PC Repair to get rid of junk files and optimize your processes.
Fix #3: Update BIOS or UEFI Settings.
One of the factors that could affect your time settings is your Unified Extensible Firmware Interface or UEFI configuration. UEFI is the modern version of Windows BIOS settings. Flashing your UEFI can reset your time and date settings. Follow the steps below to reset your UEFI settings:
- Click Start, then Settings.
- Choose Update and Security > Recovery, then click the Restart now button.
- Click Troubleshoot from the options given.
- Choose Advanced Options > UEFI Firmware Settings > Restart.
- Once the UEFI/BIOS loads, look for the option to reset it. It can be along the lines of Load Default, Load Default Settings, or Get Default Values.
- Save your settings and boot as normal.
Summary
Daylight Savings Time does not only cause you to lose an hour of sleep, but also affects your entire system. You need to make sure that all your devices have adjusted to DST automatically, especially your computer. A wide variety of issues can happen if Windows 10/11 doesn’t automatically perform this adjustment. If your computer doesn’t switch to DST automatically, you can do it manually by following the steps above.