Wondering if you can change your active network profile name in Windows 10/11? Yes, you can. Renaming networks helps differentiate them, particularly when they have similar generic names.
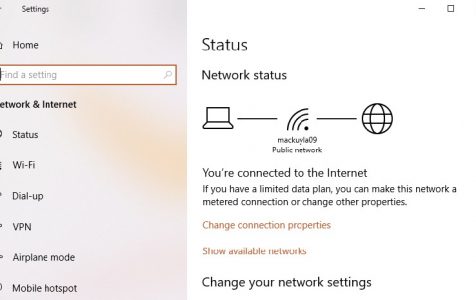
When you connect to a network, Windows 10/11 automatically creates a network profile for that particular network. Wireless networks follow the name of the SSID or Service Set Identifier, while wired networks are given generic names such as Network, Network 2, and so on. Fortunately, you can rename the active network profile on Windows with a simple Registry hack or by changing a Local Security Policy setting. If you want to see the list of your local networks, just go to Network and Sharing, then click View your active networks.
This article will show you how to rename the active network profile on Windows in two ways, depending on the operating system installed on your computer.
How to Change a Windows 10/11 Network Profile, Using the Registry
If you have Windows 10/11 Home installed, you need to edit the registry to rename the active network profile on Windows. You can also do this with Windows 10/11 Professional or Enterprise, but we recommend the method of editing your Windows 10/11 network profile via the Local Security Policy Editor, which we will discuss in the next section.
Expert Tip: For smoother PC performance, consider using a PC optimization tool. It handles junk files, incorrect settings, and harmful apps. Make sure it's right for your system, and always check the EULA and Privacy Policy.
Special offer. About Outbyte, uninstall instructions, EULA, Privacy Policy.
Here’s a warning though: The Registry is a very important system database, and any errors in it can render some of your Windows components unstable or even inoperable. So before you tinker with your computer’s Registry, make sure you know what you’re doing and follow the instructions to a T.
Editing the Registry to rename the active network profile on Windows is a simple hack which shouldn’t cause any problems or issues as long as you follow the instructions closely. And before you edit any entry in your Registry, make sure you back it up first along with all the important data on your computer in case something happens.
Here’s how to change a Windows 10/11 network profile, using the Registry:
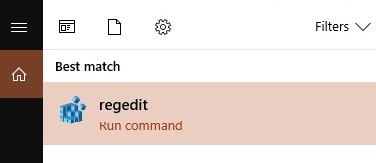
- Launch the Registry Editor by clicking the Start button, then typing regedit into the search field. Hit Enter and give permission for it to make changes to your computer.
- Once the Registry Editor is open, go to: HKEY_LOCAL_MACHINE\SOFTWARE\Microsoft\Windows NT\CurrentVersion\NetworkList\Profiles
- You can also copy-paste this to the Registry Editor’s address bar so you don’t have to go through all the folders.
- Click the downward arrow to the left of Profiles to expand the folder and view its contents.
- Each of the keys or folders under Profiles stands for one of your network profiles. You’ll notice that the folder names are in GUIDs or globally unique identifiers, usually composed of a string of letters and numbers.
- Click each key under Profiles and see the ProfileName field to check which network that particular key represents.
- To rename your network, double-click the ProfileName value, type in a new name inside the Value data box, then click OK.

- Doing this will change the name of that particular network profile.
- Repeat these steps for all the other network profiles.
- Once done, just close the Registry Editor
- Sign out of your active network profile, then sign back into the newly-renamed network. If the name change did not take effect, you might need to restart your computer before signing back in.
Here’s a tip: Corrupt keys and entries in the Registry can affect your computer’s performance, causing errors and crashes all the time. Use an app such as Outbyte PC Repair to remove these invalid entries from your Registry without causing any damage to your system.
How to Change a Windows 10/11 Network Profile, Using the Local Security Policy Editor
This method only works for computers running Windows 10/11 Professional, Enterprise or Education. Other versions of Windows 10/11 don’t have Local Security Policy Editor, so you should use the method discussed above. You might also be unable to access this tool if your computer is connected to a company network and is part of a domain.
To rename your active network profiles, using the Local Security Policy Editor, follow these steps:
- Open the editor by clicking Start, then typing msc into the search field under the Start menu. Hit Enter. If the tool doesn’t appear in the search results, then you’re probably running Windows 10/11 Home and should use the Registry Editor instead.
- Choose Network List Manager Policies from the left-side pane. You will then see a list of all the network profiles on your computer.
- To rename a network profile, just double-click the network, choose the Name field, then type in a new name. Click OK once done.
- To rename other network profiles, just double-click on their names and follow the same steps.
The name change should take effect immediately, and you should see it reflected in the Network and Sharing Center of your computer. If the profile name did not change, try signing out and then signing back in again. If it still doesn’t work, restart your computer, then sign back into the network.
If you changed your mind and don’t want to use the profile name you have created, just go back to Policy Editor, and instead of choosing the Name field, tick off Not Configured, then click OK. This will restore the default name of your network.
That’s it! We hope that this guide helped you in figuring out how to personalize your Windows 10/11 network profiles so you no longer have to choose between Network 1 or Network 2.