
Several Windows 10/11 users have recently opted to revert to previous builds due to issues with the latest update. They reported problems with the Windows Store and Start menu. Of particular concern was the appearance of the error code “Windows 10/11, version 1709 – error 0x80242006”.
Is this error really that serious? What does it do to your device, and what caused it to appear? We’ll delve deep into the root cause of this error below.
Feature Update to Windows 10/11, Version 1803 – Error 0x80242006
The Windows Update error 0x80242006 is a known Windows problem that strikes while trying to install updates, and its frequency of occurrence increases when Microsoft rolls out major builds. In fact, the cases of this error’s appearance soared with the release of the Version 1709, Version 1607, and Version 1703 builds. The release of Version 1803 has also triggered the Windows 10/11 error 0x80242006 for some users.
Nonetheless, the majority of the affected users cited that they were facing the error code with the error message “Feature update to Windows 10/11, version 1803 – Error 0x80242006.”
Expert Tip: For smoother PC performance, consider using a PC optimization tool. It handles junk files, incorrect settings, and harmful apps. Make sure it's right for your system, and always check the EULA and Privacy Policy.
Special offer. About Outbyte, uninstall instructions, EULA, Privacy Policy.
But what causes the KB4043961 error 0x80242006 to show? Well, there are many potential culprits. The most popular one is an incompatibility issue with Windows Defender, which has caused BITS to update its components. Still, there are other possible triggers to the error. Regardless, we have collated a list of possible fixes that may successfully eliminate the error once and for all.
10 Ways to Resolve the Error Code 0x80242006
So, how do you fix the error code 0x80242006? There are many solutions you can try. However, we are not suggesting that you try them all. We want you to find one that best suits your situation and start from there. You can also consider the level of difficulty of the fix. If it sounds too technical for you, consider looking for other, easier alternatives.
Without further ado, here are the solutions that have worked for many users:
Solution #1: Use the Windows Update Assistant
The Windows 10/11 Update Assistant is a smart tool that downloads and installs feature updates on your device. However, you can’t use it right away because you need to download it first.
Solution #2: Use the Group Policy Editor
The Group Policy Editor is a Windows administration tool that allows users to manually configure various computer or network settings. Administrators can use it to configure password requirements and define what settings or applications can be changed.
To use this tool to resolve the 0x80242006 error code, follow these steps:
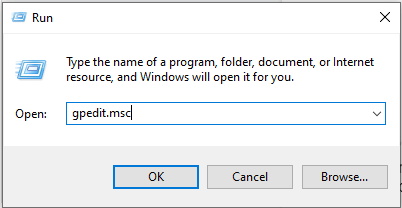
- Press the Windows logo key + R shortcut to launch the Run utility.
- Type gpedit.msc into the text field and press Enter.
- Choose Computer Configuration and click Administrative Templates.
- Next, select System and double-click on Specify settings for optional component installation and component repair.
- Click Enabled and check the Contact Windows Update directly option.
- Save your changes by clicking Apply and OK.
Solution #3: Run the Command Prompt
The Command Prompt is a utility that allows you to give your system instructions. It can be used to troubleshoot problems and automate tasks. It can also resolve the 0x80242006 error code when used correctly.
Here’s how:
- Right-click on the Windows icon.
- Choose Command Prompt (Admin).
- Once the Command Prompt window launches, copy and paste these commands:
- WSReset.exe
- dism /online /cleanup-image /restorehealth
- dism /online /cleanup-image /StartComponentCleanup
- sfc /scannow
- powershell
- Get-AppXPackage -AllUsers |Where-Object {$_.InstallLocation -like “*SystemApps*”} | Foreach {Add-AppxPackage -DisableDevelopmentMode -Register “$($_.InstallLocation)\\AppXManifest.xml”}
- Once these commands have been executed, close the Command Prompt window and restart your computer.
- Upon restart, try downloading and installing the update.
Solution #4: Rename the Windows Update Folder
Another way to resolve the error message is to rename the Windows Update folder or the SoftwareDistribution folder. Here’s a step-by-step guide on what to do:
- Press the Win + R shortcut to access the Run applet.
- Type notepad into the text field and hit Enter.
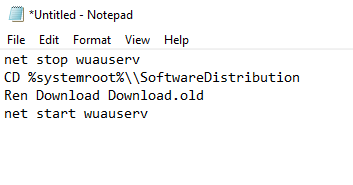
- Enter these commands:
- net stop wuauserv
- CD %systemroot%\\SoftwareDistribution
- Ren Download Download.old
- net start wuauserv
- Press the Enter key.
- Now, click File in the top-left corner of the window. Choose Save As.
- Rename the file as rename.bat and hit Enter.
- Finally, find the file that you have just created. Right-click on it and choose Run as Administrator.
- Once done, restart your computer.
Solution #5: Reset the Windows Update Components
The Windows Update utility is a handy tool that allows you to automatically install any available Windows Update version. But at times, its components become problematic and trigger errors, like the Windows Update error 0x80242006. In that case, resetting them may do the trick.
Follow these steps:
- Right-click on the Windows icon and choose Command Prompt (Admin).
- Next, disable the BITS, MSI Installer, Cryptographic, and Windows Update services. To do that, type these commands into the Command Prompt. Make sure you press Enter after each of them:
- net stop wuauserv
- net stop cryptSvc
- net stop bits
- net stop msiserver
- Then type these commands to rename the Catroot2 and SoftwareDistribution folders. Again, press Enter after each of them:
- ren C:\\\\Windows\\\\SoftwareDistribution SoftwareDistribution.old
- ren C:\\\\Windows\\\\System32\\\\catroot2 Catroot2.old
- Now, enable the services that have been disabled in the previous step. Input these commands and hit Enter after each of them:
- net start wuauserv
- net start cryptSvc
- net start bits
- net start msiserver
- Lastly, exit the Command Prompt window and restart your device.
Solution #6: Run the Windows Update Troubleshooter
If you get an error code like the Windows Update error code 0x80242006, the Windows Update Troubleshooter can be used to resolve it.
Here’s how to use this troubleshooter:
- Press the Win + I shortcut to launch the Settings utility.
- Go to the Update and Security section and navigate to the Troubleshoot pane.
- Find Windows Update from the list and click on it.
- Click the Run Troubleshooter button and wait for the scan to complete.
Solution #7: Disable Windows Defender
Windows Defender is an antivirus program that comes with your Windows operating system. Unlike other known antivirus programs, it is free and does not require users to install anything.
While it plays a significant role in protecting Windows, it is also notorious for causing issues. One is the error code 0x80242006.
In such a case, try disabling it. Here’s how:
- Press and hold the Win + R shortcut.
- Type gpedit.msc into the text field and press Enter.
- Go to Computer Configurations and select Administrative Templates.
- Click Windows Components and choose Windows Defender.
- Double-click on the Turn Off Windows Defender option.
- Select the Enabled option and click Apply.
- Click OK.
Solution #8: Reset the Windows Update Cache
If there is a corrupt package in your Windows Update cache, you need to reset the cache in question. Most of the time, users will use the Windows Update Troubleshooter to fix this, but it doesn’t really help. The best way to go is to delete the contents of the Windows Update Store folder. Here’s how:
- Launch the Command Prompt with administrator rights.
- Type these commands:
- net stop wuauserv
- net stop bits
- rd /s /q %windir%\SoftwareDistribution
- net start wuauserv
- net start bits
Hit Enter after each of them.
Restart your computer and see if the error persists.
Solution #9: Perform a Clean Install
If resetting the cache of Windows Update does not help, try performing a manual installation of the update. Visit the Microsoft Update Catalog and download the update you want to install. And if that doesn’t work, perform a clean install instead.
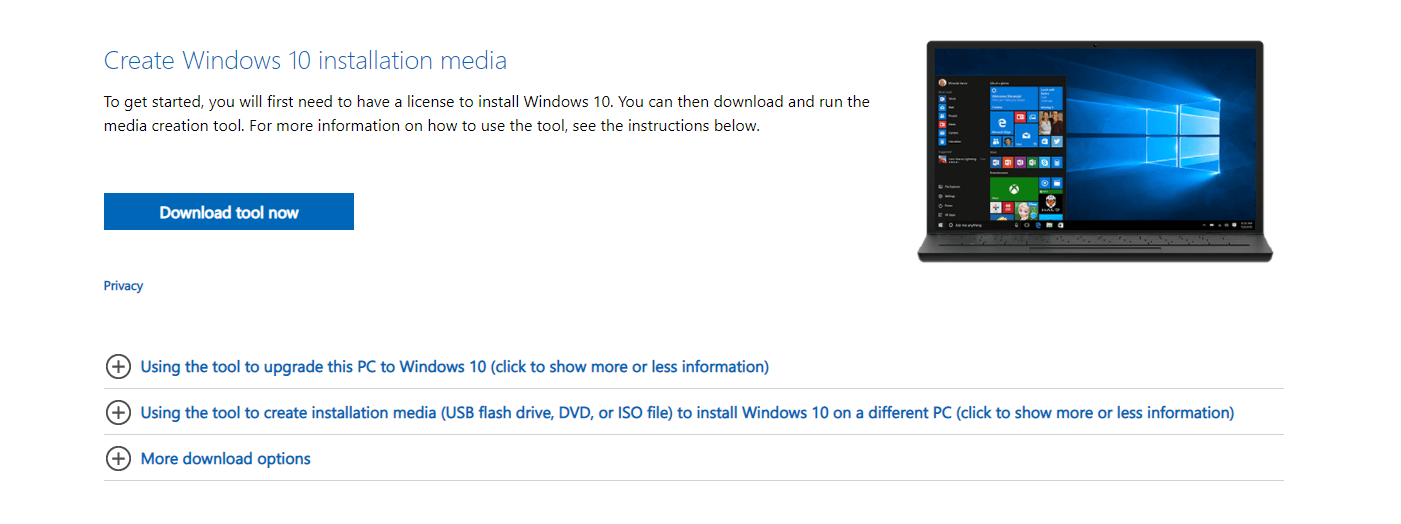
The idea is to download a Windows installation image from the servers of Microsoft using the Windows Media Creation tool and an external storage device like a USB stick. After that, start by double-clicking on the setup.exe file and then follow the on-screen instructions.
For a detailed guide, refer to these instructions:
- Download the Windows 10/11 Media Creation Tool from Microsoft’s website.
- Next, create a bootable flash drive.
- Boot your new Windows 10/11 installer using the flash drive.
- Next, install Windows.
- Follow the on-screen instructions to complete the setup process.
Solution #10: Check Your System for Outdated Drivers and Junk Files
A device driver is a program that controls a certain type of component that is connected to your computer. It serves as a software interface for hardware devices, allowing operating systems and other applications to access hardware functions without requiring further details.
From time to time, hardware manufacturers roll out new device driver versions to support their latest hardware. But when users choose not to install these newer driver versions, they become more at risk of problems and errors.
That is the reason Windows experts suggest installing driver updates once available. Most of the time, when Windows 10/11 receives an update, drivers are updated, too. However, because you are having problems installing an update, you may have to try other alternatives.
One option you can try is the use of third-party driver updater software. You can find many reliable driver updater tools online.
Aside from checking for outdated drivers, you also have to scan your system for unnecessary files. These space hogs consume your system resources and sometimes even trigger error codes to appear. That is why it is best that you get rid of them every now and then to ensure your computer is running smoothly.
And because manually getting rid of junk files can be time-consuming, we recommend you to use a PC repair tool like Outbyte PC Repair instead. This tool is designed to eliminate unwanted files from your system. It will do the job for you so you don’t need to check every folder for junk to delete.
Windows Update Error 0x80242006: Summary
Windows updates are optional, but disregarding them is like inviting hackers to attack your device. And unfortunately, installing updates may not always be easy as you may encounter errors like the error code 0x80242006 in the process. However, don’t let such problems distract you. There are many things you can do to resolve errors associated with Windows updates.
You can start with using the Windows Update Assistant, but you have to download it first. If you hate the idea of downloading tools, you can use the Group Policy Editor or run the Command Prompt instead. You can even rename the Windows Update folder or reset the Windows Update components.
If you want to take the easy route, consider running the Windows Update Troubleshooter. Other solutions that you can try include disabling Windows Defender, performing a clean install, and ensuring your device drivers are up to date.
Have you resolved the error code 0x80242006 using the solutions above? Share your thoughts below!