Windows errors can be incredibly frustrating and diminish productivity. Their appearance, often accompanied by an endless loop of restarts, leaves us feeling drained. Adding to the frustration is the lack of understanding regarding the cause of these errors.
Well, in an era where everything is made easy with technology and the internet, many of us would expect things to work seamlessly. But this couldn’t be further from the truth. Windows 10/11, like other operating systems, may still encounter errors from time to time. One common Windows issue is the error code 0x8007025d.
What Is the Windows Error Code 0x8007025d?
The error 0x8007025d is a Windows installation error. When it shows, it stops the installation process at a certain percentage. And unfortunately, retrying the installation will only throw up the same error message.
According to many affected Windows 10/11 users, the error code comes with the following error message: “Windows cannot install required files 0x8007025d.”
Expert Tip: For smoother PC performance, consider using a PC optimization tool. It handles junk files, incorrect settings, and harmful apps. Make sure it's right for your system, and always check the EULA and Privacy Policy.
Special offer. About Outbyte, uninstall instructions, EULA, Privacy Policy.
What Causes the Error Code 0x8007025d on Windows 10/11?
Reports say that the error could be triggered by corrupted data.
USB 3.0 uses MSI or Message Signaled Interrupt mode to communicate with your operating system. USB 2.0, on the other hand, uses the Interrupt Request (IRQ) system, which is quite outdated already.
Now, the MSI system requires the asynchronous handling of data transfer on both the operating system and the USB device. For this, a buffer is required to stream data at high data rates. So, if you are seeing the Windows 10/11 0x8007025d error, it is likely that your USB device is sending corrupted data or your device cannot decode the data being sent correctly. Simply said, corrupt data coming from the USB device cannot be decoded by Windows 10/11. As a result, the error code shows.
Aside from corrupt data, here are other possible causes of the Windows install error code 0x8007025d:
A Bad Sector on the HDD or SSD
If there is a bad sector on the HDD or SSD and your Windows installation attempts to copy installation files to this location, an error message will be thrown up by the buffer, such as the error code 0x8007025d.
An HDD or SSD may have bad sectors due to prolonged use of disk space, such as when playing computer games, or the storage space itself requiring formatting.
Corrupt RAM
Corrupt RAM may also result in this error. Often, when people suspect that RAM corruption is the reason the error is appearing, they will perform a clean install. Now, it is worth noting that it means there will be no other programs using the RAM and the entire RAM will be dedicated to the installation of Windows 10/11. Therefore, no matter how small the corrupted sector of your RAM is, the error may still show.
Malware
Though malware entities aren’t popular culprits of this error, they can still trigger it to appear. After all, malware is quite unpredictable. It can do whatever criminals ask it to do.
What to Do When Windows 10/11 Cannot Install Required Files (0x8007025d)
We understand how frustrated you are right now, as the error is keeping you from installing an update. But before you panic, we suggest that you give this article a good read. Here, we will be sharing ways to resolve the error.
If the first fix does not work, you can proceed to the next one or whichever you think works for your situation best. We have arranged the fixes from the simplest to the most challenging, so we recommend that you follow the order. Here you go:
Fix #1: Restart your computer
When was the last time you restarted your computer? Perhaps you already forgot. Yes, you may easily get into the habit of just leaving your computer in sleep mode when you are not using it. That way, you can just wake it up quickly and pick up from where you left off.
However, not restarting your computer regularly has drawbacks. It can reduce your device’s efficiency, resulting in slowdowns and errors, like the error code 0x8007025d.
Rebooting your computer from time to time keeps it in optimal condition and fixes errors you may be having.
Here’s how to restart your computer:
- Press the Windows button to go to the Start menu.
- Click the Power button.
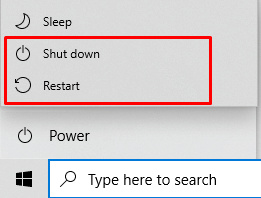
- Select Restart from the list of options to restart your computer or Shut Down if you want to switch it off completely.
Fix #2: Unplug other external peripherals
Sometimes, you may need to disconnect all connected USB devices, such as printers, scanners, and headphones. There are times when the installation of Windows does not push through because there are problems with the drivers of these devices. It could be the case of either corrupted hardware drivers or outdated drivers.
Fixing Corrupted Drivers
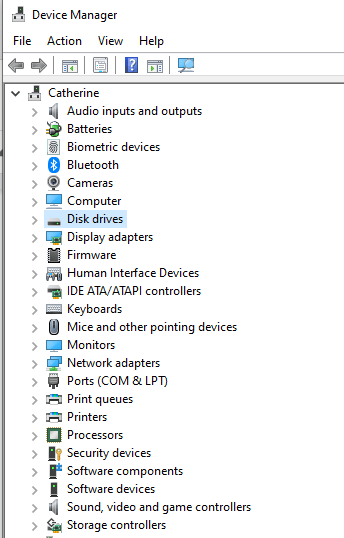
- Press the Windows key and search for Device Manager.
- Tap the Enter button to access Device Manager.
- Right-click on the device whose driver is corrupted and choose Properties.
- Navigate to the Driver tab and select Driver Version.
- Choose Uninstall Device.
- Now, visit the OEM’s website. Find and install the driver version that is compatible with your device.
Updating Out-of-Date Drivers
- Type device manager into the search box.
- Click on the most relevant search result.
- Choose a category and right-click on the device whose driver you want to update.
- Select Update Driver and then click Search automatically for drivers.
- Follow the on-screen prompts to complete the update process.
Fix #3: Reduce the size of your HDD or SSD disk space
To install Windows 10/11, you need to have at least 20 GB of free disk space. And in addition, experts suggest reducing the installation partition to about 125 GB. By doing this, you can prevent copying corrupted files into the partition.
To reduce your disk space, simply click the Extend option after choosing to custom install Windows 10/11. However, before you do that, you also have to ensure that your hard drive is in a healthy state, meaning it should not have any issues in any way.
Now, if you are doing a clean install, be sure that you format the partition where you are going to install Windows 10/11. This will fix any bad sectors and files in the partition. To do that, proceed to install a customized Windows 10/11 OS and select Format. Lastly, agree to the terms.
Once you are done, try running the installation process once again.
In addition, you can clean up your HDD or SSD by removing any unnecessary folders and files from your system. For this, you may use a third-party PC repair tool such as Outbyte PC Repair. Once you have it installed on your computer, simply run it and let it do the job.
Fix #4: Download the Windows 10/11 ISO image file manually
Another possibility that we should look into is that you may have downloaded a corrupt ISO image file that could not be decoded by your system. This is entirely possible, especially if you have downloaded the ISO file from a third-party source.
To download a working Windows 10/11 ISO image file once again, you need to create USB installation media and use it to retry the installation. Here’s how to proceed:
- Get the official Windows 10/11 ISO image file from Microsoft.
- On the website, find the instructions on how to use it to create installation media.
- Use it to install Windows 10/11.
- While installing, be sure that you check the Recommended Windows settings option and see if the error is gone.
Fix #5: Write the ISO image file onto another USB device
If your USB drive is corrupt or has an unreadable sector, the buffer technology will flag it and give you the 0x8007025D error.
To get rid of the issue, you have to use another USB drive. Create installation media using such a drive and install Windows 10/11 again.
If you used a USB 3.0 port when the error occurred, try using a USB 2.0 port instead because it uses another technology for reading data.
Fix #6: Use the Reset PC Function
Some users have successfully gotten rid of the error by using the PC Reset function. To perform this fix, you need not provide a product key. Just follow these steps:
- Open the Start menu and go to Settings.
- Select Update and Security.
- Choose Activation to check your activation status.
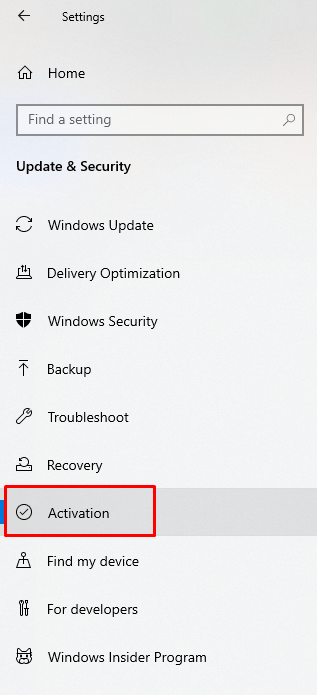
- Go back to Update and Security and select Recovery.
- Navigate to the Reset This PC option and click Get Started.
- At this point, choose to remove everything or keep your files.
- Next, click Reset.
- Windows will now restart.
- Depending on the number of files you have on your system, the process may take a while.
- Once done, restart your computer.
Fix #7: Perform a memory diagnostic
If all else fails, perhaps the problem is not with your external peripherals but with your computer. In that case, you need to run a memory diagnostic. This fix has worked for many affected users.
Windows 10/11 will not install on your device if it detects faulty RAM. In case you have two RAM sticks, try removing either and then try installing Windows 10/11.
If the error persists, continue by checking your RAM for errors. You have to perform a memory diagnostic test for this.
Follow these steps:
- Switch your computer off and press the corresponding function key to enter the BIOS setup window.
- Use the arrow keys to select Diagnostics.
- Go to Memory Test.
- Hit Enter to start the test.
- Take note of the errors.
- Retry the installation.
It is noteworthy that some users also reverted the BIOS settings to their original configurations and succeeded in getting rid of the issue. You can try doing it as well and check if it resolves the problem.
Conclusion
The Windows error code 0x8007025d may seem challenging to handle, but in fact, it can be resolved. While it may take some time to completely get rid of it, with patience, you can eliminate the error for good.
You can start with basic troubleshooting steps like restarting your computer and unplugging your external peripherals. Some minor communication issues with the devices that are connected to your computer may be the culprit in your case.
If none of them does the trick, reduce your HDD or SSD’s disk space or install Windows 10/11 manually. You can even create new installation media using another USB drive. Another solution is to use the Reset This PC function on Windows 10/11. Lastly, try performing a memory diagnostic test.
Let us know other ways to get rid of the 0x8007025d error code on Windows 10/11 in the comments section below!