
Encountered the Windows 10/11 update error code 80240020? You’re not alone. Many users face this issue, and we have the solutions you need. Relax and read on.
To begin with, what is this error all about, and what does it mean?
What Is the Windows 10/11 Update Error 80240020?
The Windows 10/11 Error Code 80240020 is one of the many Windows Update installation errors you may encounter. However, this error is different from the typical Windows Update errors. Why? It is because it does not suggest any issue with your Windows 10/11 installation.
The Windows 10/11 Update Error 80240020 is an error message that you get when you run an older Windows version while upgrading to Windows 10/11. It simply tells you that once the upgrade starts, user interaction might be necessary. It also informs you that the upgrade is not totally ready, so you may have to wait a couple of seconds more.
Expert Tip: For smoother PC performance, consider using a PC optimization tool. It handles junk files, incorrect settings, and harmful apps. Make sure it's right for your system, and always check the EULA and Privacy Policy.
Special offer. About Outbyte, uninstall instructions, EULA, Privacy Policy.
According to affected users, the Windows 10/11 installation error 80240020 likely appeared in 2015 when Microsoft rolled out the latest Windows 10 version at that time: Windows 10/11. As a result, many users were confused and thought that the Windows 10/11 Update failed 80240020 error was associated with their devices.
Shortly after the appearance of the error 80240020 on Windows 10/11 devices, Microsoft’s representatives cleared the issue on forums. They said that the error appears for a reason. They also clarified that it isn’t really an error. Instead, it’s a notification that the Windows 10/11 upgrade will begin very soon and that users must prepare for it.
Simply said, the Windows 10/11 error 80240020 does not indicate any issue with your upgrade. It’s not a notification of file corruption or any similar problem either. It is just Microsoft’s way of telling you that you need to upgrade to Windows 10/11 very soon.
How to Check If You Have Encountered the Windows 10/11 Update Error 80240020?
Most of the time, Windows will tell you if there is a problem upfront. But it’s not always the case with the Windows 10/11 update error 80240020. Sometimes, you may need to manually check for it.
Here’s how to manually check if you have encountered the update error 80240020:
- Open the Windows Update window.
- Select the View Update History option.
- Click the Failed to Install section to know what update errors you have encountered.
How to Deal With the Windows 10/11 Code 80240020
Now, even if the Windows update error 80240020 is suggesting that users should wait, there are still some things you can do to get the update and resolve the error once and for all. We’ll discuss them below.
Method #1: Modify Your Registry
Some users suggest modifying your registry if you wish to get rid of the Windows error code 80240020. However, you don’t want to play around with it. Incorrectly modifying a registry entry will cause corruption, which is what we are trying to avoid in the first place.
But wait, what is the Windows registry? This is where settings and information for hardware devices, programs, operating system configurations, and user preferences are stored.
For instance, if you install a new application, a set of instructions will be generated and added to the registry. These instructions will be called upon by other programs that may interact with them. They may also be accessed by programs that need more information about the new app.
To access the registry, you need to use the Registry Editor. It is a free registry editing tool that comes pre-installed in every Windows version.
Now, before you make any changes in the Windows registry, it is advised that you create a backup first.
Here is how to perform a manual registry backup:
- Go to the Start menu.
- Click on the search field and type regedit.exe.

- Hit Enter to launch the Registry Editor. You may be asked to enter your admin username and password to confirm your action. Type them and proceed.
- Once the Registry Editor opens, find the registry entry that you wish to back up.
- Next, go to File and click Export.
- In the dialog box that appears, choose the location where you want to store the backup. And then give it a name.
- Click Save to save your changes.
Assuming that you have already created a backup of your registry, proceed with these steps to make changes to your registry and get rid of the error:
- Press the Win + R shortcut to launch the Run dialog.
- Type regedit into the Run field and click OK. Click on the top result.
- Next, navigate to this path: HKEY_LOCAL_MACHINE\SOFTWARE\Microsoft\Windows\CurrentVersion\WindowsUpdate\OSUpgrade
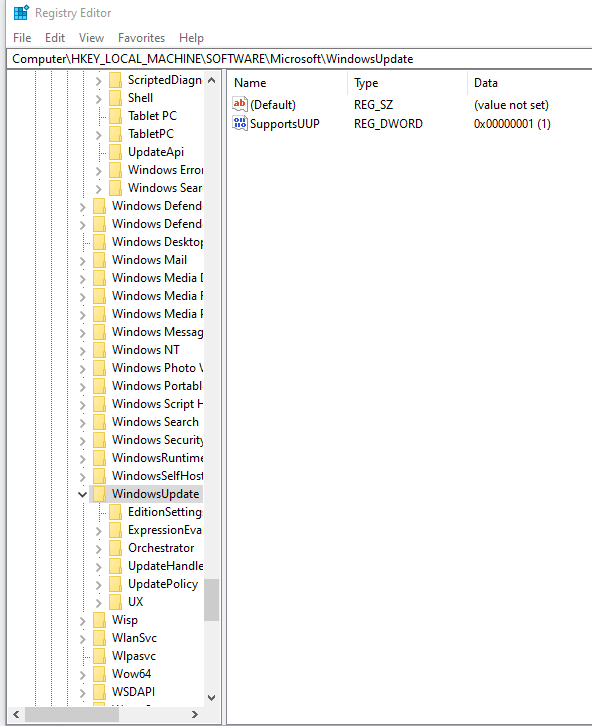
- If you see a message telling you that OSUpgrade does not exist, right-click on the Windows Update folder and create a new folder. Name it OSUpgrade.
- After that, right-click on the left pane and choose New DWord (32-bit) value.
- Rename it AllowOSUpgrade.
- Set the value to 0x00000001.
- Exit the Registry Editor and restart your PC.
- Try pushing the update once again.
Method #2: Delete Everything in the Download Folder
Another option you can try involves deleting all the contents of the Download folder. By doing this, we can give the update process a fresh start.
This method begins by restarting the Windows Update service, a critical service required in the entire update process. Here’s a step-by-step guide to help you:
- Press the Windows key + S to open Search.
- Type cmd into the text field.
- Right-click on the top result and select the Run as Administrator option.
- At this point, the Command Prompt will open. Into the command line, type the net stop wuauserv command and hit Enter. This will execute the command and stop the Windows Update service.
- Next, go to this location: C:\Windows\SoftwareDistribution\Download. Take note that if Windows is not installed in this location, you have to navigate to the appropriate one.

- Delete the contents of the folder.
- Now, go back to the Command Prompt window and type the net start wuauserv command. This will start the Windows Update service once again.
- Try installing the Windows update. Check if the error still shows.
Method #3: Change Your Proxy Settings
For some users, changing their proxy settings has resolved the problem. So, you might want to give it a try, too.
Proxies are generally configured by network administrators to filter or block inbound and outbound web traffic. While they’re useful most of the time, they may also trigger error messages to appear. One is the Windows error 80240020.
If you wish to give this method a try, follow these steps:
- First, open the Command Prompt window. Type cmd into the search field, right-click on the top result and select Run as Administrator.
- And then, launch the Windows Firewall. You can do it by pressing the Win + R combo, typing firewall.cpl, and clicking OK.
- Next, navigate to the Turn Windows Firewall On or Off section.
- If you are using a private network, we suggest turning off your Windows Firewall. We also suggest doing the same with public networks. Once done, click OK.
- Now, access the Command Prompt.
- Into the command line, type this command: netsh winhttp import proxy source=ie.
- Hit Enter to execute the command.
- Once done, you will see the Direct access (no proxy server) message.
- Finally, restart your computer and try installing the update.
Method #4: Run Third-Party PC Repair Software
Although not many have tried it, some users found success by using this method. We recommend downloading and installing Outbyte PC Repair to get rid of junk files that may be messing with the Windows update process.
By running a quick scan using this PC repair software, you can remove files that your system no longer needs. Plus, you can optimize your computer’s performance and keep it running at its best.
Method #5: Seek Help from Microsoft Professionals
If none of the methods above has worked for you, you can contact Microsoft’s support team and ask for suggestions on how to resolve the error. You can reach out to them via the contact page on Microsoft’s website. You can also get in touch by calling Microsoft’s toll-free hotline in your country. And if you’re lucky enough, they might even resolve the problem for you by accessing your computer remotely.
Alternatively, you can check online forums to find out if there are other users out there who have the same experience. Read what others have advised and what methods worked for them.
Wrapping Up
Again, the Windows Update error code 80240020 is not an error that suggests something is wrong with the installation. It is just Microsoft’s way of informing you that an upgrade is ready and that you may need a bit more time to download it.
Now, if you really want to get rid of the error, there are a couple of methods that we suggest. First, you can modify your registry, which is very tricky. One wrong step and you may end up messing up your whole operating system. Another method is deleting all the contents of the Download folder. If that does not work, changing your proxy settings is another solution you can try.
If you suspect that your computer’s state is causing the problem, then use a PC repair program. We recommend Outbyte PC Repair as it is designed to give your system a noticeable boost by resolving performance-related problems.
Lastly, if you have exhausted all the means you know, then reach out to professionals. They sure know how to deal with the problem.
Let us know your thoughts about the error code 80240020. Did the solutions above successfully resolve the problem for you? Do not hesitate to comment below!