
Windows 11 comes with Bing search as a built-in feature in its Start menu. This integration merges results from both the Internet via Bing and your computer’s local files. For users seeking to modify this feature, this guide provides clear instructions on:
- Method 1: Using the Local Group Policy Editor (specifically for Windows 11 Pro & Enterprise versions)
- Method 2: Adjustments within the Windows Registry
- Method 3: Complete removal of Bing from Windows 11
- Method 4: Disabling the Bing AI Chat functionality in Windows 11 Search
By following the outlined methods, you can tailor your search experience to your preference.
Safety Precautions: Before Making Any Changes to Your System
- Before you make any changes to your system, make sure to save a copy of your important data. That way, if something doesn’t go as planned, you can get everything back to how it was.
- Caution: Editing the Windows Registry has potential risks. Any incorrect changes can result in significant computer issues, including rendering it non-operational. Only proceed if you have a clear understanding of these steps and their implications, and always create a backup or system restore point before making changes.
Method 1: Turning Off Bing in Windows 11 Pro & Enterprise Using Local Group Policy Editor
- Open the Run Box:
- Press the Windows logo key on your keyboard and the letter R simultaneously. This will open a small box at the bottom-left of your screen.
- Enter the Editor:
- Type in
gpedit.mscand hit theEnterkey.
- Type in
 Access the Right Settings Menu: In the window that opens, look for and click on the following folders in order:
- Computer Configuration
- Administrative Templates
- Windows Components
- Search
- Adjust the Web Search Settings: Find and double-click on “Do not allow web search.” In the window that pops up, click on ‘Enabled.’ Then, click on the ‘Apply’ button and finally ‘OK.’
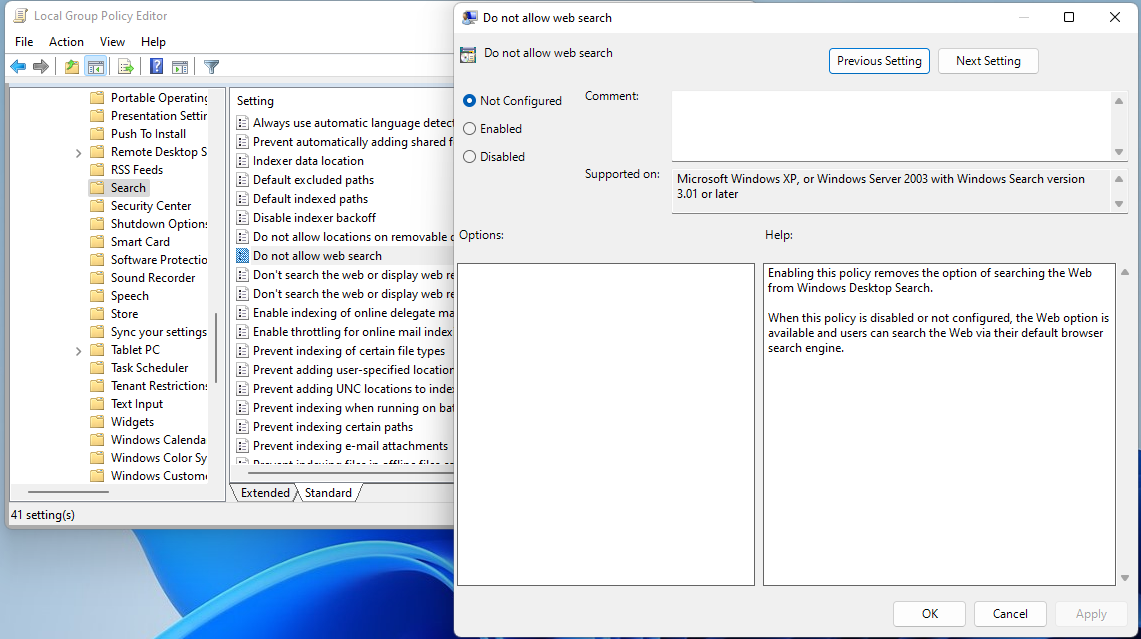
- Refine the Search Results: Just like the previous step, find and double-click on “Don’t search the web or display web results in Search” and set it to ‘Enabled.’
- Finalize Your Changes: Restart your computer. This makes sure the changes you made are applied.
Method 2: Turning Off Bing Using the Windows Registry
- Access the Registry Editor: Click on the Start menu (it’s the Windows logo at the bottom-left of your screen). Type in
regedit. When you see a prompt asking for permission, click ‘Yes’ or ‘Accept.’
- Go to the Relevant Registry Location: In the Registry Editor window, navigate to the following path by clicking on each folder sequentially:
- Computer
- HKEY_CURRENT_USER
- Software
- Microsoft
- Windows
- CurrentVersion
- Search
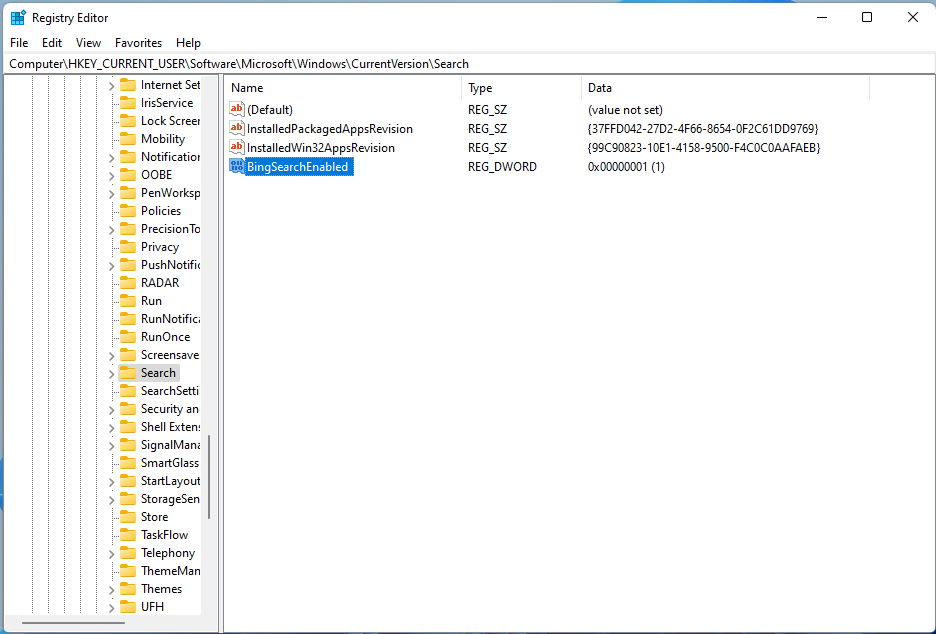
- Make a New Setting: Once you’re in the ‘Search’ folder, right-click on an empty space. From the menu, hover over ‘New,’ and then click on ‘DWORD (32-bit) Value.’ A new setting will appear, name it “BingSearchEnabled.”
- Set the New Setting’s Value: Double-click on the “BingSearchEnabled” setting you just made. A box will open. In the ‘Value data’ section, type
0, and then click ‘OK.’ - (Optional) If You Change Your Mind Later: If you decide to turn Bing search back on, simply go back to the same ‘Search’ folder and delete the “BingSearchEnabled” setting.
Method 3: Removing Bing Completely
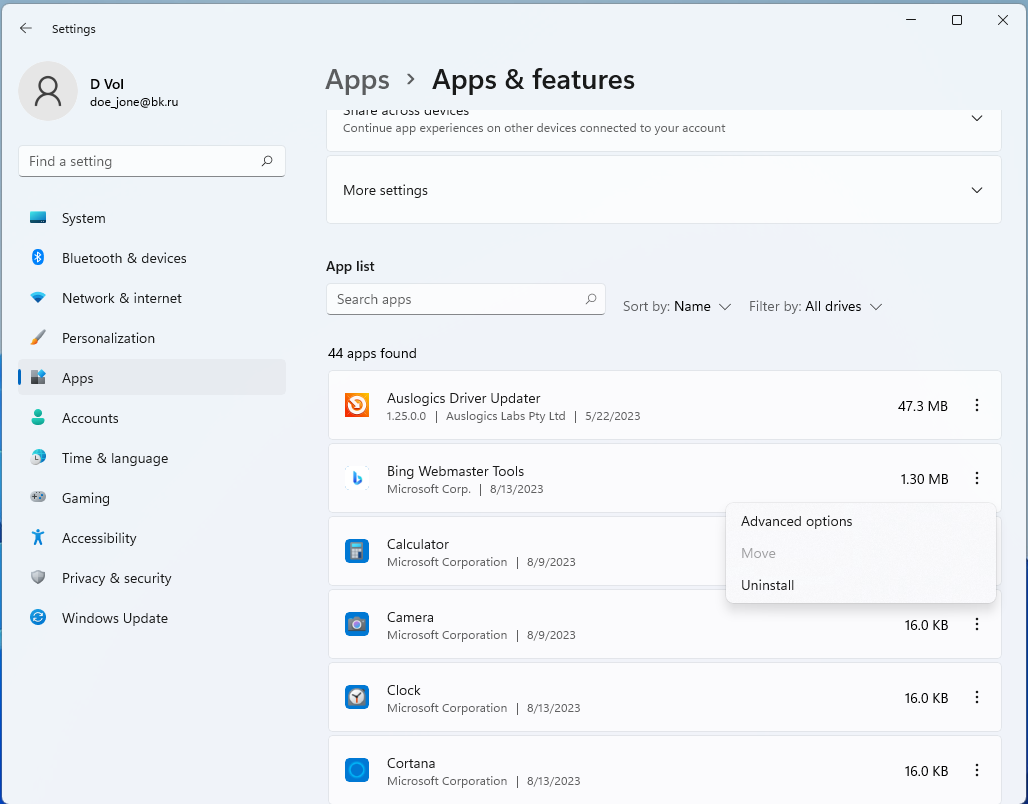
- Access the Settings app.
- Navigate to the “Apps” section.
- Locate “Bing”, click on it, then select “Uninstall.”
Alternative uninstallation methods include Control Panel (locate Bing under “Programs & Features” and uninstall) or the Command Prompt with the command: wmic product where name=”Bing” call uninstall.
Method 4: Disabling Bing AI Chat in Windows 11 Search
Microsoft’s Bing AI Chat enhances the search experience in Windows 11. To disable:
Expert Tip: For smoother PC performance, consider using a PC optimization tool. It handles junk files, incorrect settings, and harmful apps. Make sure it's right for your system, and always check the EULA and Privacy Policy.
Special offer. About Outbyte, uninstall instructions, EULA, Privacy Policy.
- Access the search feature by clicking the Bing AI Chat icon on the taskbar.
- Navigate to the feature’s settings and disable it.
For Edge users, Bing AI Chat can be toggled off within the browser’s settings.
Additional Tips & Notes
- Some users prefer using REG files to automate the registry process. Ensure you inspect any REG file before running it.
- After major Windows updates, ensure that your preferred search engine and browser remain default.
- For users interested in exploring options beyond Bing, there are various browsers and search engines available.
- As technology progresses, Microsoft might introduce more AI integrations in its products. Stay updated and adjust settings as per your comfort and needs.
- If you encounter issues with the Windows 11 search feature, consult official support documentation or expert forums.
Feedback & Considerations
User experiences may vary. Some reported challenges finding the registry path or still encountering Bing even after making changes. As technology and systems evolve, always keep an eye out for updates or newer methods to ensure optimal system customization. Always consider reliable tech sources and understand potential impacts before making any system changes.
Final Note & Disclaimer
As you’ve worked through the steps provided in this guide, remember that making changes to your system, especially edits within the Windows Registry, come with inherent risks. If at any point you felt unsure or hesitant:
- Double-check your steps: Before locking in any changes, revisit the instructions to ensure you’re on the right path.
- Consult with a tech friend or professional: If you’re feeling uncertain or something doesn’t seem right, it’s a good idea to get a second opinion from someone knowledgeable.
- Back up and be ready: Always maintain a system restore point or have a backup ready. If anything goes sideways, this ensures you can get your computer back to its earlier state.
Thanks for being cautious. Always prioritize your computer’s health and stability when making changes.