After setting up a new Windows 10/11 rig with dual monitors, you might encounter an issue where the desktop icons on the primary display keep rearranging. This can be an inconvenience that disrupts your desktop organization.
Well, fret not. Many Windows 10/11 users have had the same issue. That is why in this article, we aim to help you identify the possible cause of the problem and provide you with potential workarounds that could mitigate the issue.
Why Do Desktop Icons Keep Moving Randomly?
This issue commonly occurs when you are trying to extend to an external monitor. In this setup, Windows is trying to calculate the desktop icons’ positions. Your system is trying to interpret the changes in your primary display.
How to Fix Desktop Icons That Keep Rearranging in Windows 10/11
Here’s how you can solve the desktop icon problems in Windows 10/11.
Expert Tip: For smoother PC performance, consider using a PC optimization tool. It handles junk files, incorrect settings, and harmful apps. Make sure it's right for your system, and always check the EULA and Privacy Policy.
Special offer. About Outbyte, uninstall instructions, EULA, Privacy Policy.
Fix #1: Disable the Align icons to grid option and auto arrange them.
This fix is pretty straightforward and can be done in a few minutes. Here’s how:
- Right-click on your desktop. Choose View and untick the Align icons to grid option.
- Reboot your computer and see if the problem has been resolved.
Fix #2: Try changing the Icon View.
Some Windows 10/11 users have successfully resolved the problem by simply changing the Icon View. Here’s what they did:
- Right-click on any blank space on your desktop. Select View and switch your current view to another. For instance, if you are using Small Icons as your display, change it to Medium Icons.
- Now, revert to your preferred view. Say, select Small Icons again.
- You should then see the changes on your desktop. By doing this, the icons should no longer rearrange themselves.
Fix #3: Clear your Icon cache.
Caches can make things easier and quicker for you. But there are times when they mess up with your system. The same applies to your icons cache. So, it’s worth trying to clear your Icon cache every now and then. This could possibly fix the problem.
Here’s how to clear your Icon cache:
- Be sure to save all your work before closing your active apps and windows.
- Open Task Manager by pressing the CTRL + Shift + Esc keys.
- Right-click on Windows Explorer and click End Task.
- Select File and choose the Run new task option.
- Into the text field, input cmd.exe, and hit OK.
- Next, enter the following command:
CD /d %userprofile%\AppData\Local
DEL IconCache.db /a
EXIT - Hit Enter.
- Close the Command Prompt.
- Now, launch Task Manager again and go to File > Run new task.
- Into the text field, input explorer.exe, and hit OK. This will restart Windows Explorer and hopefully fix your desktop icons problem.
Fix #4: Uninstall your graphic card drivers.
There are instances when problematic graphic card drivers trigger issues with your Windows 10/11 display. If this happens, your best solution is to uninstall them.
Here’s how:
- Press the Windows + R keys to launch the Run utility.
- Into the text field, input devmgmt.msc, and hit Enter. This will open the Device Manager.
- Now, expand the Display Adapters section.
- Right-click on your current graphics card and choose Uninstall.
- When asked to confirm, click Yes.
- Next, press the Windows + X keys. Choose Control Panel.
- Select Uninstall a Program.
- Choose uninstall everything related to your device driver.
- Reboot your PC to save the changes.
- Finally, download the setup files of your device driver from the official manufacturer’s website.
Fix #5: Set a custom scaling size.
Windows usually chooses a default scaling size for your display, and this choice depends on the display’s native resolution and specifications. For instance, if you have a 15-inch laptop display with a 1920 x 1080 resolution, then the automatic default scaling is 125%. This size means that Windows will have to upscale everything digitally to ensure that the text and graphics are visible, and this includes the icons on your desktop.
When you have an external display, Windows may select a scaling size of 100% or less than the default one. Hence, in some cases, you may notice that your desktop icons move or change their positions.
To fix this, set a custom scaling size that is the same for both the main and secondary display. By doing this, Windows will no longer change the scaling size every time you connect an external display.
To set a scaling size in Windows 10, do this:
- Press the Windows + R shortcut keys to open and launch the Run applet.
- Then input this command: ms-settings:display-advanced.
- At this point, a new page will open. Here, look for the Custom Scaling option and input 120 into the text field.
- Hit the Apply button.
- Sometimes, Windows will ask you to sign out and re-login for the changes to apply. So, click Sign Out Now to sign out. Then try to log in once again to activate the new custom scaling size.
For Windows 11 devices, this is how to set custom scaling:
- Hit the Windows + R keys and input this command into the Run applet: ms-settings:display-advanced. This will take you to the Display section of the Settings window.
- Then go to Scale & Layout and select Scale.
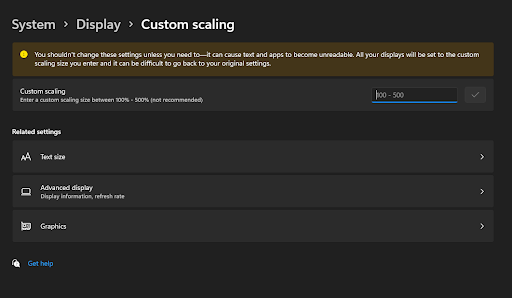
- Next, navigate to the Custom Scaling section and input 120% into the blank field. After that, hit the check mark button beside it.
- Windows will now ask you to sign out to apply the changes. Hit the Sign Out button and log in again.
Fix #6: Install a third-party app to manage desktop icons.
You can also try installing third-party apps to manage the moving desktop icons. These apps can save the resolution settings of the connected display. They can also restore the position of your desktop icons whenever you try to switch the display or disconnect it.
Here are some of the free software apps you can use:
![]()
- Nimi Places – It is a free software program used to organize desktop icons in different customizable boxes or containers. It allows you to organize icons by adding folders to your desktops as boxes. All these boxes can be customized in varying rectangular dimensions and themes.
- Stick – It is another free software that organizes your desktop icons in a retractable tab. Such a tab can be expanded as customizable windows, where your desktop icons are shown and organized.
- FSL Launcher – It allows you to organize your desktop. This app has a feature that allows you to sort folders, files, and applications according to the groups they belong to.
- ToolBox – It lets you create boxes for organizing desktop icons. However, the boxes have a limited number of tiles for displaying icons.
Wrapping Up
Hopefully, what we have shared above has fixed or stopped Windows from rearranging your desktop icons. While some of the recommended Windows 10/11 repair solutions may sound technical, as long as you follow the steps carefully, you should get by.
Do you know other solutions that can keep Windows 10/11 from rearranging your desktop icons when connected to an external monitor? We’d love to know. Share them below.
Thank you it works for me..
Thanks! A good solution to a frustrating problem.