
Discovering your computer powering on by itself after shutting down can be unsettling. Picture leaving your PC switched off at the end of the workday, only to find it mysteriously powered on the next morning. Fear not, it’s not a supernatural occurrence.

A lot of users have also been experiencing the same scenario where their computer turns on after shutdown without them doing anything. It can be confusing at first, but this issue has something to do with your computer’s power management settings, causing involuntary startups.
The users who encountered this issue reported that their computer turns on randomly in the middle of the night and the only way to keep it turned off is to cut off the power source (remove the battery or unplug from the wall). Doing this every single day has made a lot of affected Windows 10/11 users frustrated.
Why Does My Computer Turn on by Itself After Shutdown?
 When a computer boots up after shutdown for no reason at all, the first thing you need to look at is the device’s power settings. The default settings might have been changed or they might have been tampered with.
Expert Tip: For smoother PC performance, consider using a PC optimization tool. It handles junk files, incorrect settings, and harmful apps. Make sure it's right for your system, and always check the EULA and Privacy Policy.
Special offer. About Outbyte, uninstall instructions, EULA, Privacy Policy.
A lot of users who reported this error noted that the problem started after installing some updates. It is possible that the updates have changed or affected some of the power-related settings on the system, causing the Windows 10/11 computer to turn on by itself.
It is also possible for the user to accidentally make the changes without even knowing about it. For example, when the system prompts you to edit the power settings while you’re playing a game to maximize the gaming experience, you might be unknowingly affecting the overall system settings and the changes translate outside the game.
Why My PC Turns on by Itself?
Among the notorious causes of the problem, you’re experiencing have something to do with the Windows fast startup settings. However, some elements like malware and junk files may also trigger the problem.
Other scenarios where your computer turns on by itself are as follows:
There is ongoing scheduled maintenance and update.
Your Windows 10/11 operating system may have tasks scheduled to run automatically. To resolve this, inspect the Task Scheduler utility of your computer.
You have set wake timers or there are shutdown issues.
Shutdown problems can be triggered by various factors including an incompatible driver, conflicting applications, and damaged hardware components. As a result, your device reboots itself automatically. In this case, you may need to change the Choose What the Power buttons do option.
Incorrect BIOS settings or issue.
There may be a BIOS issue that needs to be fixed. Enter the BIOS mode to deal with them.
What to Do When Your PC Turns On by Itself After Shutdown
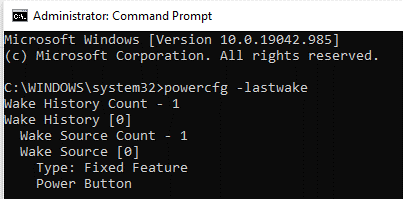
 If your computer keeps on waking up or booting up by itself, what you need to do is understand what triggered it. To find out what woke up your computer, you can run a few commands using the Command Prompt.
To do this:
- Press Windows + X and choose Command Prompt (Admin) from the menu. This will allow you to open an elevated Command Prompt with administrator rights.
- Type in the following command, then press Enter: powercfg –lastwake. This command will show you the last device that woke your computer up.

- Next, type in this command, followed by Enter: powercfg –devicequery wake_armed. This command will show you a list of all the devices that can wake up your computer.

- Exit the Command Prompt.
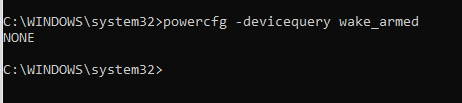
If your computer is turning itself on because of your mouse or keyboard, the quickest solution is to disconnect these devices after shutting down your computer. But if your problem is caused by a software issue, the solutions below will hopefully resolve this for you.
Here’s a tip: Regularly run your antivirus software and clean up any junk files. Tools like Outbyte PC Repair could assist in making sure that no unwanted elements are interfering with your computer’s power management settings.
Fix #1: Disable Fast Startup.
The Fast Startup mode is a Windows feature that allows Windows 10/11 computers to wake up faster than the traditional startup process. This mode does not totally turn off your computer and keeps it in a sleep-like state, so you can turn it back on faster. Disabling this mode can help resolve the problem with your computer turning on by itself.
By default, Microsoft has enabled the Turn on Fast Startup feature in the Windows 10/11 operating system. To disable it, follow the steps below:
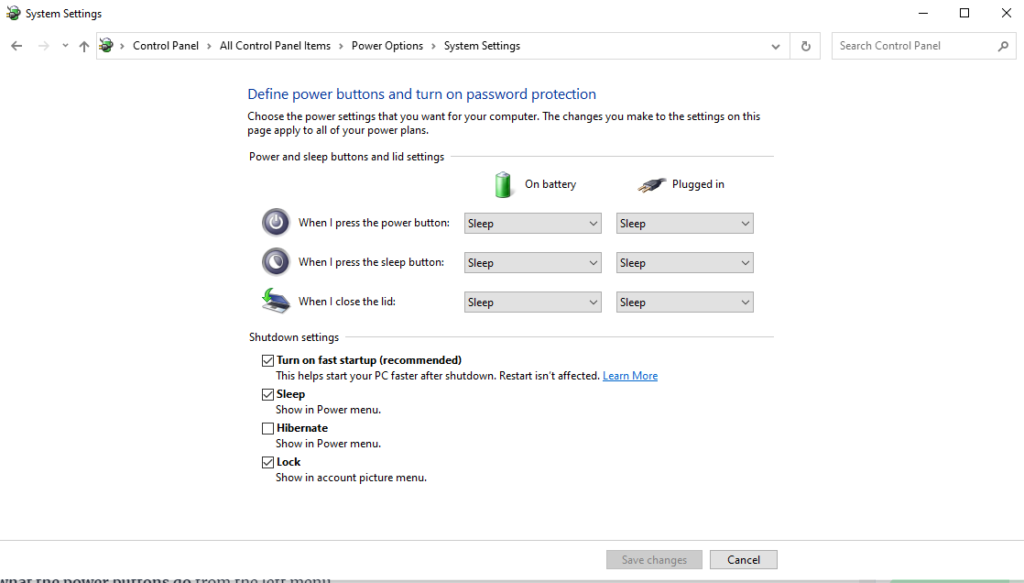
- Click the Power icon in the notification area of your taskbar. Choose More Power Options. This will open the Power Options window. You can also type control panel into the search box and click on the most relevant result to launch the Control Panel window and then select Power Options.

- Click Choose what the power buttons do from the left menu.
- Next, click Change settings that are currently unavailable.
- Under Shutdown settings, you will notice that the Turn on fast startup (recommended) is ticked off.

- Uncheck this option.
- Click OK and restart your computer.

Alternatively, you can disable fast startup via the registry editor. Here’s how:
- Go to the Windows 10/11 search box and type registry. This will launch the registry editor.
- Navigate to this location: HKEY_LOCAL_MACHINESOFTWAREPoliciesMicrosoftWindowsSystem.
- Right-click in any space in the right pane and select New DWORD.
- Rename it HiberbootEnabled.
- Set the value to 0.
- Close the registry editor and you have already disabled fast startup.
Fix #2: Try the Power Troubleshooter.
Windows 10/11 has a built-in troubleshooting utility to fix common Windows problems, including power issues. To run the troubleshooter, follow the instructions below:
- Click Start and type troubleshooting into the search box.
- Click Troubleshooting from the search results.
- Click View all from the left menu.
- Scroll down and look for Power options, right-click on it, and choose Run as administrator. If prompted by the UAC, click OK to proceed.
- Follow the on-screen instructions to run the troubleshooter and fix any power problems your computer might be experiencing.
Fix #3: Change Advanced Power Settings and Disable the Allow Wake Timers Option.
Sometimes, power problems are more of a software issue than a hardware issue. If you are using Scheduled Task to run some of your tasks at a scheduled time within the day, it may be causing your computer to wake up to be able to complete these tasks.
You can either delete those tasks or set up Windows to ignore those tasks when the computer is in Standby or Hybrid mode.
To change your settings:
- Open Power Options by following the instructions above.
- Click Change Plan Settings.
- Choose the power plan you want to use, then select Change advanced Power settings.
- Look for the Sleep category and expand it.
- Find the Allow Wake Timers option and disable it.
- Click OK to save changes.
Reboot your computer to apply the new settings. This fix will make sure that none of your apps can wake your computer up when it is in sleep mode or shutdown mode.
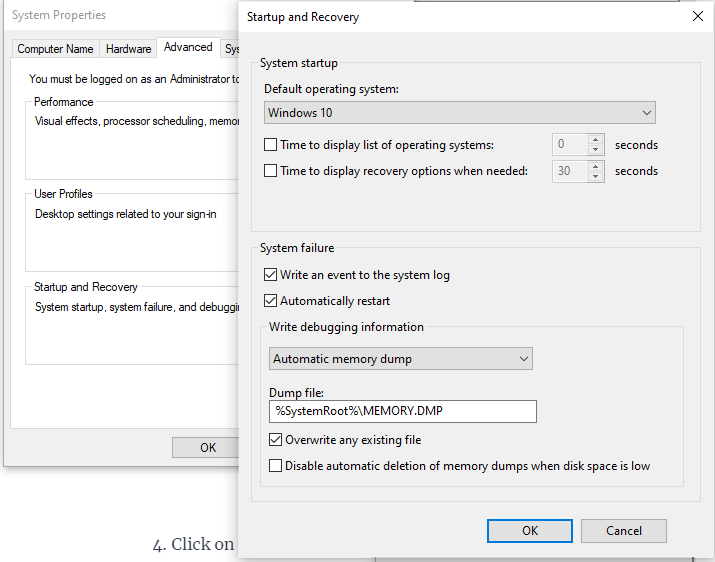
Fix #4: Turn Off Automatic Restart.
When your computer crashes, Windows, by default, is set to automatically restart by itself. So, if you left your computer on standby and a problem occurs, your computer will restart until the issue has been resolved.
To disable Automatic Restart, follow the steps below:
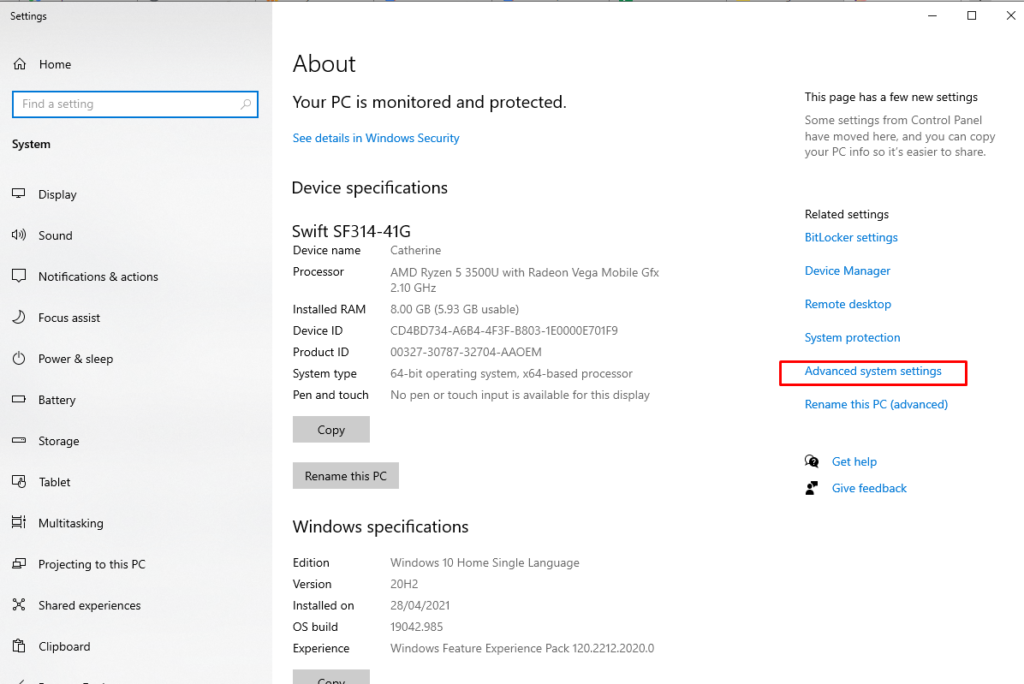
- Click Start and type System in the search box.
- Click on System Properties from the results.
- In the System Properties window, choose Advanced system settings from the left.

- Click on the Advanced tab.
- In the Startup and Recovery window, click Settings.

- Uncheck Automatically Restart.
- Click OK to apply the new settings.
Fix #5: Prevent Your Keyboard or Mouse from Waking Up Your Computer.
Some pieces of computer hardware, such as your keyboard and your mouse, are often designed to wake your computer up. A single keystroke or a slight movement of the mouse can bring your computer back to life.
You can individually edit the power management settings of these devices, to make sure they won’t wake up your PC unintentionally.
To edit these settings, follow these steps:
- Press Windows + X on your keyboard, then hit M to open Device Manager. This will show you a list of all the hardware on your computer.

- In the Device Manager window, choose the device you want to configure.
- Right-click on the device, choose Properties and go to the Power Management tab.
- Uncheck the Allow this device to wake the computer option.
- Click OK to save your changes.
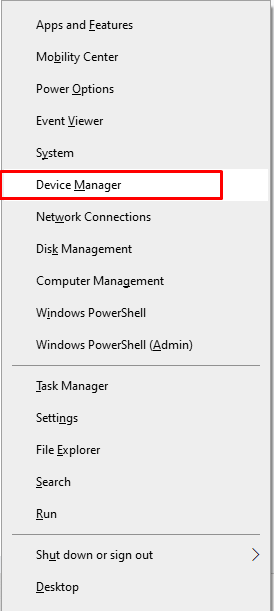
Repeat the steps above for all the devices that are causing your Windows 10/11 device to wake up.
Fix #6: Disable Scheduled Windows Update and Automatic Maintenance.
Windows Update and Automatic Maintenance modes are usually set to run during your downtime hours. To prevent these tasks from waking up your computer, you can either change their schedule or disable some settings.
To do this:
- Open the Settings app, then click on Windows Update and Security > Windows Update.
- Choose Active Hours.
- Search for Automatic maintenance in the search box.
- Change the time beside Run maintenance tasks daily at.
- You can also uncheck Allow scheduled maintenance to wake up my computer at the scheduled time.
- Save your settings and restart your Windows 10/11 computer for the changes to apply.
Another way to disable automatic maintenance is by using Control Panel. Below is a guide on how to use it:
- Press the Windows + R keys on your keyboard to launch the Run utility.
- Type control panel into the search box and hit Enter.
- Set the Control Panel view to Category.
- Select System and Security.
- Go to Security and Maintenance and click Maintenance.
- Next, click Change Maintenance Settings.
- Untick the Allow Scheduled Maintenance to Wake Up My Computer at the Scheduled Time.
- Hit OK to save your changes and disable automatic maintenance.
Fix #7: Inspect the Task Scheduler Utility
If there are tasks that are scheduled to run automatically, then your computer may boot up on its own. So, inspect the Task Scheduler utility to tick off this possibility.
- Go to Start and click the Search box. Type System Tools.
- Navigate to Scheduled Tasks.
- If you have set it to check for updates every day at a certain time, change the time. Also, consider changing the frequency of automatic updates.
Fix #8: Repair Any BIOS Issue
You can easily enter the BIOS mode by restarting your computer and pressing the Delete key repeatedly. Once you’re in this mode, do the following:
- Select Power Option.
- Scroll down to the Wake On LAN section and disable it.
- Press F10 and continue by choosing Yes or hit Enter.
- Your computer will restart automatically.
Another method you can take is as follows:
- While in the BIOS mode, go to Power Management and select Wake On LAN or Wake Up on Alarm.
- If it is set as a daily trigger, disable it.
- Press the ESC key to exit the BIOS mode.
Fix #9: Check If There Are Shutdown Problems
If your PC turns on by itself and you suspect that incompatible drivers and conflicting applications exist on your system, then this could trigger shutdown issues, which then lead to your computer rebooting by itself. To resolve this, do the following:
- Disable the Restart on System Failure feature. Click Settings, go to Properties and open the Advanced tab.
- Navigate to the Startup and Recovery section and select Settings.
- Go to System Failure and untick the Automatically Restart option.
- Click Save.
Summary
When your Windows 10/11 computer turns on by itself from sleep mode without pressing the Power button, don’t freak out because it is a common problem.
If you don’t like your computer waking up all of a sudden after shutdown, simply follow the fixes outlined above. You can also try unplugging your computer just to be sure.
You may also use the Power Troubleshooter utility or set Windows to ignore scheduled tasks. If that doesn’t wake the computer, you can turn off the automatic restart of Windows.
If you still find that your computer turns on by itself or if you have other fixes that worked, then feel free to comment below.
My computer is waking up everytime what to do now
My Pc same . When i press shut down from start he wake up in the next second. Next time when i shut down all good. What can i do ?
HI, i did all those things what you specified… still my system got switch on automatically