Wouldn’t it be best if we could stream our favorite TV shows or the latest flicks without buffering? This has been made possible by Streamlink. Instead of visiting various online streaming websites, Mac users are able to watch their favorite video content using one utility, which is Streamlink.
Streamlink works like a scraper of online video content from different affiliated streaming websites. From there, the utility gathers the video content that is then delivered to the users. The best thing about this tool? It is ad-free. So if you’re tired of having to skip video ads on YouTube or DailyMotion, particularly the in-video ads, then this is perfect for you.
Using Streamlink is pretty easy — you just need to type in the commands in the Terminal to instruct the utility where to get the video and how you want to play them. The stream you have chosen should open automatically using your default media player. Sounds simple, right?
Unfortunately, some Mac users find the process more complicated than it should be. Some of them reported having trouble trying to install streamlink on their Macs. This can be a headache for Mac users who are not tech-savvy or those who have no idea about programming and coding. The affected users have tried the different methods of installing Streamlink, but they are unsuccessful. The cause of errors are different for each one, making it difficult to diagnose what the cause of the problem is. Some of them even downloaded various packages and tried installing the software required for Streamlink, but to no avail.
Pro Tip: Scan your Mac for performance issues, junk files, harmful apps, and security threats
that can cause system issues or slow performance.
Special offer. About Outbyte, uninstall instructions, EULA, Privacy Policy.
Because they are unable to install Streamlink, they are not able to access the video content that they want to watch, which can be very frustrating. If you’re one of those users who is unable to install Streamlink due to various errors, then this guide is for you. We’ll discuss what Streamlink is, what it does, how to install it on your Mac, and how to troubleshoot installation errors. This guide should pretty much cover everything you need to know about using Streamlink on macOS.
What is Streamlink?
Streamlink is an open source command-line utility used to pipe flash videos from online streaming websites to computer’s video players, such as VLC. The main objective of streamlink is to transform CPU-intensive flash plugins to a less resource-heavy format. This allows Mac users to avoid buggy plugins while enjoying various streamed content.
Streamlink was forked from the Livestreamer project, which has been discontinued a while ago. This utility was designed via a plugin system that makes it easy for new services to be added. Here are some of the streaming services supported by Streamlink:
- Dailymotion
- Livestream
- Twitch
- UStream
- YouTube
- Bloomberg
- Crunchyroll
- Reuters
- Vimeo
Streamlink is available for Windows, macOS, and Linux devices. The most stable version right now is Streamlink 1.3.1. Streamlink works best with VLC Media player, but it can also be used for other media playback apps, such as Daum Pot Player, MPC-HC, MPlayer, mpv, and OMXPlayer.
How to Install Streamlink on Mac
Installing Streamlink on Mac requires typing in commands, so you need to do it using the Terminal app. Navigate to Finder > Go > Applications > Utilities, then click on Terminal to open the tool.
To install Streamlink, you will need the following dependencies:
- Python – At least version 2.7 or 3.4.
- python-setuptools
- python-argparse – Only needed on Python versions older than 2.7.
- python-futures – Only needed on Python 2.x.
- python-requests – At least version 1.0.
- python-singledispatch – Only needed on Python versions older than 3.4.
- pycryptodome – Required to play some encrypted streams
- iso-639 – Used for localization settings, provides language information
- iso3166 – Used for localization settings, provides country information
- RTMPDump – Required to play RTMP streams.
- ffmpeg – Required to play streams that are made up of separate audio and video streams, eg. YouTube 1080p+
Most of these dependencies are automatically downloaded by the setup script, except for the Python and the python-setuptools. Make sure you have the latest version of Python installed to prevent installation errors.
There are two easy ways to install Streamlink on Mac: the Easy Install and the Homebrew Install.
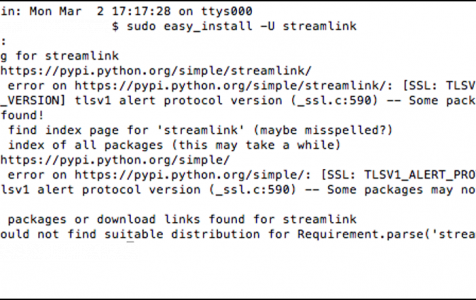
For Easy Install, launch Terminal according to the instructions above, then type in the following command:
sudo easy_install -U streamlink
Or you can try the Homebrew installation, which is the missing package manager for macOS and Linux. To do this, type in the following command in the Terminal app:
brew install streamlink
These commands should automatically download and install the required packages for installation of Streamlink. But if you’re unable to install Streamlink or you encounter any trouble during the process, you can use the third installation option, which is more complicated.
The third installation method is called PIP installation. This includes using the Python Package Installer, which requires more technical steps. This method installs the Python headers package for Streamlink to work. To perform a PIP install, type in this command into the Terminal window instead:
# pip install streamlink
How to Use Streamlink to Stream Content
Once you have installed Streamlink, the next step is to try and watch a stream to see if it works. For example, you want a watch a video from YouTube with the following URL:
https://www.youtube.com/watch?v=7wQkTV01hGU
To use Streamlink, you need to type in the command using Terminal once again. Go to Finder > Applications > Utilities and open a Terminal window. Type in the following command:
$ streamlink youtube.com/watch?v=7wQkTV01hGU
This command will instruct the utility where to find the content you want to stream. The link https://www.youtube.com/watch?v=7wQkTV01hGU is where Streamlink should extract the stream from. Notice that the https protocol of the URL is not included in the command because this format is easier to type.
After typing in the command, you should see the first argument that contains a list of available streams to choose from:
$ streamlink youtube.com/watch?v=7wQkTV01hGU
[cli][info] Found matching plugin twitch for URL youtube.com/watch?v=7wQkTV01hGU
Available streams: audio, high, low, medium, mobile (worst), source (best)
To choose a stream and initiate playback, just add the stream name as your second argument to the command:
$ streamlink youtube.com/watch?v=7wQkTV01hGU 1080p60
[cli][info] Found matching plugin youtube.com/watch?v=7wQkTV01hGU 1080p60
[cli][info] Opening stream: 1080p60 (hls)
[cli][info] Starting player: vlc
The stream you have chosen will be played back using your default media player that is compatible with Streamlink. Make sure that you have the media player installed on your Mac, otherwise you won’t have any app to stream the video with. You can also choose best to load the highest quality of the video or worst if you want to save on bandwidth.
How to Fix Streamlink Installation Errors
If you’re unable to install Streamlink, it is highly possible that you do not have the required software installed or that what you have on your Mac is outdated. Making sure that you have the latest and the right packages should help resolve this problem.
But before you do anything else, make sure to clean up your system using a Mac repair app to get rid of possible problematic files. It is also recommended that you install any pending updates for your Mac under Software Update. This is to ensure that you’re running the latest version of macOS.
Now that we’ve gotten these basics out of the way, it’s time to look at some of the errors that Mac users are getting when installing Streamlink:
For example, one user has encountered this uninstallation error as evidenced by this part of the argument:
File “/usr/lib/python2.7/dist-packages/pkg_resources/init.py”, line 2497, in requires
“%s has no such extra feature %r” % (self, ext)
pkg_resources.UnknownExtra: requests 2.9.1 has no such extra feature ‘socks’
This means that the Python package installed on the device is already outdated. To fix this problem, you need to uninstall your existing Python package, then install the latest one. For this specific error, here is a sample command you can use:
$ sudo pip install -U PySocks
<snip>
Running setup.py install for PySocks … done
Successfully installed PySocks-1.6.7
Another user also encountered an outdated pyOpenSSL with the following error message:
ERROR: Cannot uninstall ‘pyOpenSSL’. It is a distutils installed project and thus we cannot accurately determine which files belong to it which would lead to only a partial uninstall.
If you get the same error, just type this command to fix it: pip install pyOpenSSL –upgrade –user
Once done, try reinstalling Streamlink.
If you’re having issues installing Streamlink because the system-wide package conflicts with the system’s regular package manager, you can try installing it using a virtual environment instead. This virtualenv creates a user-owned Python environment to be used solely by Streamlink.
- To create a new environment, type in this command:
virtualenv ~/myenv - To activate the environment, use this command:
source ~/myenv/bin/activate - To install Streamlink in the environment, type in this command:
pip install –upgrade streamlink - To use Streamlink in the environment, run this command:
streamlink [URL of source] - To deactivate the environment, type in:
deactivate
Wrapping Up
The Streamlink utility is quite handy for streaming online videos, minus the buffering and annoying ads. It should be easy to install using the commands above. But if you come across any error, just figure out which dependency is causing the problem and update it. Or you can create a virtual environment instead by using the instructions above.