
Do you suspect that some files and processes are using more of your CPU power? Well, several users have complained of issues of unjustified power consumption. In one instance, a user using virtual desktops with the DLP version 15.0.0100.01063, mentioned that the user process brkrprcs64.exe consumed between 11% – 40% of his CPU. And the consumption was even higher when multiple instances of brkrprcs64.exe were running.
In this guide, we will show you how to remove brkrprcs64.exe from your system. But before we get to that, it is crucial to understand the nature of the brkrprcs64.exe process.
What is brkrprcs64.exe?
Brkrprcs64.exe is a Windows process that controls running the Symantec Data Loss Prevention (DLP) extension for Chrome. The process seems to be causing problems when browsing HTTPS sites using Chrome.
So, is brkrprcs64.exe a Virus?
The simple answer is that brkrprcs64.exe is not a virus per se. Instead, it is a process that is easily hijacked by malware. Sadly, most DLP Endpoint Agents are blocked when installed on computers with antivirus protection.
Expert Tip: For smoother PC performance, consider using a PC optimization tool. It handles junk files, incorrect settings, and harmful apps. Make sure it's right for your system, and always check the EULA and Privacy Policy.
Special offer. About Outbyte, uninstall instructions, EULA, Privacy Policy.
How to Stop the brkrprcs64.exe Error?
Option 1: Whitelist the brkrprcs64.exe Process on Your PC
A typical antivirus program will block the DLP Endpoint Agent because it sees it as a threat to your system. To prevent the antivirus engine from monitoring executable files and processes, try to whitelist those processes. For your case, you will need to whitelist brkrprcs64.exe in Windows.
Option 2: Reinstall the Symantec Extension
Google Chrome requires the Symantec DLP extension to be installed to function flawlessly. This extension usually downloads automatically during the DLP installation. So, if it fails to download during the installation, try this solution:
- Check if the Symantec DLP extension for Chrome is correctly installed and enabled in your browser.
- Check if the brkrprcs64.exe is running and verify if its registry key exists.
- To get the registry entry, follow this path:
HKEY_LOCAL_MACHINE\Software\Google\Chrome\NativeMessagingHosts\com.symantec.dlp - If the extension is not installed, follow this link to add the Symantec DLP extension directly from Google Chrome:
https://chrome.google.com/webstore/detail/symantec-extension/eelojgpfkmhiikmhkineneemcahoehjo. - When the Symantec Extension page appears, click on the Add to Chrome.
Option 3: Remove the Symantec DLP Endpoint Agent
First, check to see if the Symantec DLP extension for Chrome is installed and active in your browser. You should also find out if its brkrprcs64.exe process is running. After that, try to change the DLP Endpoint Agent configuration not to inspect Chrome. If that doesn’t work, it may be necessary to remove the DLP endpoint altogether. But the only challenge is that it is difficult to remove it, probably for security reasons.
Trying to delete it manually requires some advanced knowledge on PCs. The program is usually saved in the C:\Program Files\Symantec\Endpoint Agent directory. It includes the following executables:
- brkrprcs64.exe (191.16 KB)
- CUI.exe (2.34 MB)
- CUIL.EXE (31.66 KB)
- edpa.exe (331.66 KB)
Symantec usually provides a uninstall_agent64.batch with the installation files. To use this batch file, follow the steps below:
- Look for the batch file from the agent install files.
- If the agent has an uninstall password, add that information into the batch file.
- Now, copy the batch file to the client PC.
- Execute the batch file with administrator privileges.
Alternatively, you can use the Registry Editor to adjust some entries. But be warned that the Registry Editor is a powerful tool. If misused, it can render your system inoperable or unstable. What may appear to be a straightforward registry edit could paralyze your system. So, if you are afraid of messing things up, why not use a PC repair tool like Outbyte PC Repair to automate this task for you? On top of this, the tool will eliminate junk in your system, which often causes most computer errors.
How to Uninstall the DLC Extension from Chrome If It Was Installed By Your Administrator?
Google Chrome extensions that read Installed by Enterprise Policy are not always easy to remove because they were installed with elevated permissions. Even if you are not part of an organization, these extensions can find a way into your system and give themselves elevated status. If that is the case with you, try any of these methods to get rid of the problematic extension:
Method 1: Delete Group Policies
To delete group policies associated with your computer, you are not supposed to be part of a group policy where a legitimate administrator has intentionally forced these extensions on you. This method is ideal if you have been cheated into installing malicious extensions to your browser. Here is how the process goes:
- Click on the Start icon and type command into the search box. From the list of results, choose the Command Prompt option.
- Now, right-click this option and choose Run as administrator.
- Wait for an elevated Command Prompt window to open, and then enter the following commands, one at a time:
RD /S /Q “%WinDir%\System32\GroupPolicyUsers”
RD /S /Q “%WinDir%\System32\GroupPolicy”
Here is a snapshot of what these commands do:
- The RD section is Remove Directory command.
- The /S switch will remove all files and directories in the specified path, while the /Q switch will get rid of everything in quiet mode.
Once the two directories have been erased, execute the following command to update your policy settings in the Registry: gpupdate /force.
You will know that the process has finished when you see something like this: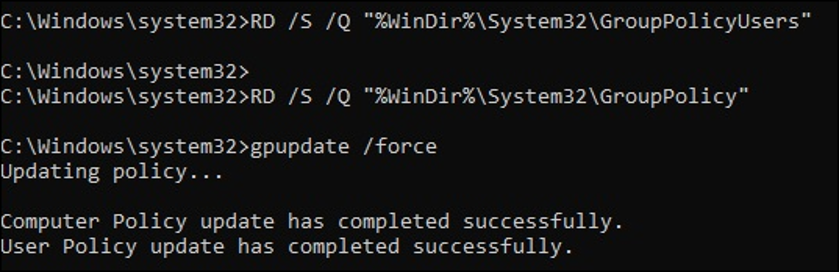
Finally, restart your device for the changes to take effect.
Method 2: Reset Google Chrome to Its Default Settings
If the problem persists, try reinstalling Chrome. You will not lose much since most of your information can be synced to your Google account, which you will get it back when you sign into Chrome.
To start off, adjust your sync settings in Chrome to disable syncing of extension to other devices. The main reason for this is to preserve the progress when you wipe Chrome clean. Here is how to do it:
- Launch Chrome, and then click on your profile picture to bring out more options.
- Navigate to the People section and click Sync.
- After that, a screen that has everything that will be synced into your account and across your other devices will appear. To manage information to sync to Chrome, you need to disable the Sync Everything option, which is enabled by default. You can then toggle the Extensions button to off to disable them.
Now that you have disabled extension syncing, you can reset Chrome to its default state. Keep in mind that you have to reinstall the extensions you had before the reset. To reset Chrome, follow these steps:
- Enter chrome://settings into your Omnibox and press Enter.
- Next, navigate to the Settings tab, and then click on Advanced at the bottom of the page.
- Under the Reset and clean up section, restore settings to their defaults.
- A warning window will pop up, informing of the repercussions of resetting the browser. You don’t have much to worry about it since this reset will only target your startup page, pinned tabs, new tab pages, installed extensions, search engine, and cookies. So, when ready, click Reset Settings.
Closing Remarks
Hopefully, after all the frustrations, your PC has returned to normal functioning. Remember to clean it up with your favorite PC repair tool for your Windows to remain clean, fast, and ready to handle more tasks.
Let us know in the comment section below if this guide was helpful to you.