We all know that modern smartphones have amazing features, such as biometric sensors and touchscreens, that allow them to sense the activities around them. However, most of these devices also have other forms of sensors that would enable them to do more than what we can imagine. Now, if you own a Samsung handset, did you know that you can take advantage of a particular feature to verify and check if all the built-in sensors of your device are correctly working? Yes, that is correct. Though unknown to most Samsung users, most Galaxy versions have a diagnostic menu that can be accessed by entering a secret code. To learn more about the diagnostic mode, read on.
How to Access Samsung’s Secret Diagnostic Menu
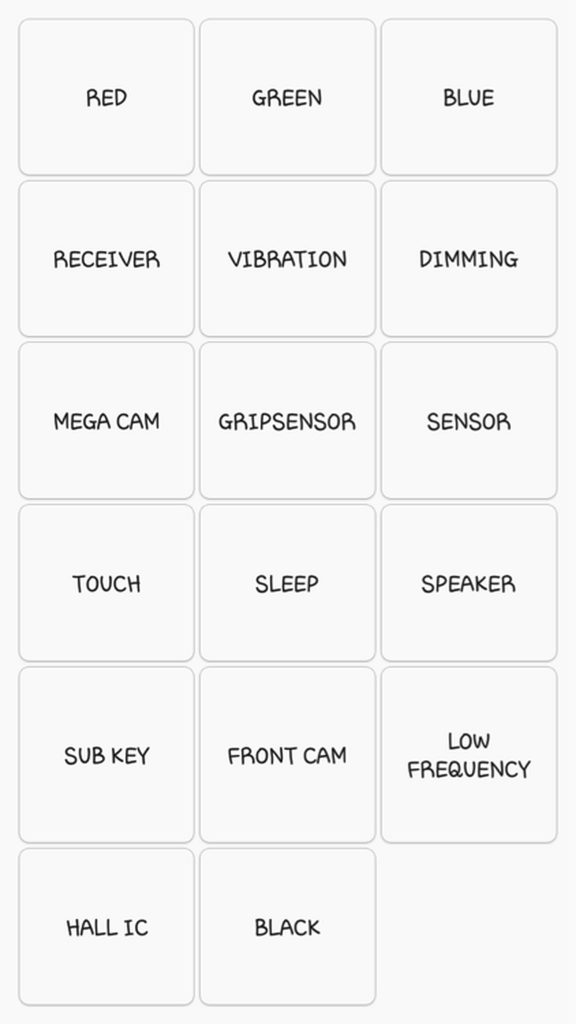
Here’s a little heads-up. The diagnostic menu is not available to all users. Certain carriers like Sprint and Verizon have blocked this menu on their Samsung tablets and smartphones. However, newer smartphones from Sprint are said to have this functionality already. To open the secret diagnostic menu of Samsung smartphones, enter the code *#0*# using the dial pad. The secret diagnostic menu will then open. Since the process is automatic, you need not tap the call button to activate the command. If you have already entered the code and nothing happened, that only means the feature is not available on your device. After you enter the code and you successfully reached the diagnostic menu, you can now perform the following Samsung sensor tests:
1. Red, Green, and Blue Screens
These tests allow you to check the red, green, and blue color spectrums of your handset by brightly showing the color you selected. To go back to the main diagnostic menu, just tap the screen.
2. Receiver and Vibration
Perform these tests to check the receiver and vibration features of your handset. When you tap the Receiver button, you will be taken to a white screen that is accompanied by an audible dial tone. Tap on the Back button twice when you are done.
To check your device’s vibration motor, tap the Vibration button on the main menu. The screen will turn black after tapping the button. It will be followed by constant vibrations. If you wish to exit, tap on the screen once. You will then be taken to the main diagnostics menu.
3. Mega Cam
To test your device’s primary camera, tap the Mega Cam button in the main diagnostics menu. To zoom in and out, use the volume buttons. To capture a photo, press the camera button at the bottom of your screen. By default, the flash is switched on, and the images are automatically saved in your device’s gallery. To exit the test, just tap the back button, and you will return to the main diagnostics menu.
4. Dimming
Once you tap the Dimming button in the main diagnostics menu, you will be brought to a red, blue, and green screen. The screen will eventually alternate between brightening and dimming whenever you tap on it. If you wish to exit to the main test page, just use the volume-up button.
5. Sensor
This test brings you to a page that hosts some sensors, including the accelerometer, barometer, proximity sensor, light sensor, gyroscope, HRM, magnetic sensor, and a fingerprint scanner. We’ll discuss these sensors in detail below:
Accelerometer
An accelerometer is a crucial sensor used to detect the current orientation of your handset. It primarily relies on the linear acceleration of movements for measurements. To test this sensor, you can either tap Image Test to check the transition of images from landscape to portrait or Graph to assess how well the accelerometer detects movements when your device is shaken up and down.
Proximity Sensor
This test will evaluate the proximity sensor of your handset, which is responsible for switching off your screen whenever your handset is close to your face, for instance, during phone calls, to prevent any accidental button touches. To test this sensor, cover your device’s screen with your hand. If the sensor is in excellent condition, the screen should turn green.
Barometer
The barometer is the feature responsible for tracking the altitude of your device to give accurate GPS locations. To test this sensor, tap Barometer Selftest. An automated test will instantly commence. It will then let you know if the sensor is working or not.
Light Sensor
The light sensor is responsible for detecting the surrounding’s light. To test this sensor, tap the Light Sensor button and expose your device to conditions with varying light brightness. There are three light levels registered, starting from Level 1 for dim lights to Level 3 for very bright lights.
Gyroscope
This sensor is in charge of measuring the rotation of your device. It works together with the accelerometer to assess general movement. To test the gyroscope, you can either perform a manual test by tapping Graph or Display or rotate your handset around and see the results in linear graph or actual numbers. Another way to test your handset’s gyroscope is to tap the Gyro Selftest. It will yield results for both the x-axis and y-axis.
Magnetic Sensor
To test the magnetic sensor of your device, tap the Selftest button. An automatic test will commence checking if your handset’s magnetic sensor passed or failed. If you wish to test this sensor manually, press the Power Noise Test button. After that, get a magnet and run it around your handset.
Fingerprint Sensor
Select this test if you want to check your handset’s fingerprint scanner. To start the test, tap Normal Scan. All the components of your fingerprint scanner will then be tested if they are working correctly. To know more about the firmware version of your fingerprint sensor, tap Sensor Information.
HRM
HRM test will check your handset’s heart rate monitor. It can be performed in two ways. You can tap the Start button under the HRM tab so you will be taken to the HRM Test page. From there, you can test the heart rate monitor of your device by putting your finger on the sensor. Another way to perform the test is through the HRM EOL test. To do that, you have to put your phone on a flat surface and keep it still. Otherwise, it will register different errors.
6. Touch
The touchscreen is one of the most important features of your handset that you have to test. To start the test and spot any dead zones, press the Touch button. Start tracing the squares shown on your screen. It should turn green if your touchscreen is working fine. Once you are done, you will be automatically brought back to the main diagnostics menu. You can also press the volume up button to exit.
7. Sleep
To test your device’s sleep feature, tap the Sleep button. Your phone will immediately be put to sleep mode. To wake your device, do as you usually would. You will then be taken back to the main menu.
8. Speaker
Test your device’s audio output by tapping the Speaker button. It will instantly play a sample song that you can listen to. As soon as you’ve verified that the speakers are in excellent condition, tap the Speaker button again, and the test will be ended.
9. Sub Key
This test will check your hardware buttons. If a switch is working correctly, the screen color automatically changes. To return to the main diagnostics page, tap the exit button.
10. Front Cam
As the name suggests, this test is designed to test your handset’s front camera. To start, tap the Front Cam button. Doing so will pull up your front camera, letting you capture a selfie. Like testing your device’s primary camera, all test photos you’ve captured will be automatically saved in your gallery. Once you are done with the test, tap the back button twice.
11. Grip Sensor
Interestingly, your Samsung handset has grip sensors that detect your grip. To test them, tap the Grip Sensor button. After that, follow the steps and release your grip when instructed. If the grip sensor is working correctly, you should see a blue screen with the message, “Working.” To end the test, tap the back button twice.
12. Hall IC
The Hall IC is a sensor that detects the magnetic fields around your device. Its most obvious function is recognizing magnetic flip covers, which automatically puts a handset to sleep once the flip cover touches the device. However, the test won’t do much. It only shows you a message telling you that the Hall IC is functioning well.
13. MST and MLC
The MST, which means the magnetic secure transmission, allows a device to use a handset as a credit card temporarily. This inventive sensor is used by payment service providers, which in the case of Samsung is Samsung Pay. On the other hand, MLC is a technology that takes advantage of your handset’s fingerprint sensors. Like the Hall IC, there is no obvious way to test these features. You will only get a message telling you that the MLC and MST features are working.
14. Barcode Emulator
To test your device’s ability to generate and read barcodes, tap the Barcode Emulator Test button. A new page with various barcodes will then pop up. From there, you can tap on a barcode and scan them with another barcode scanner. Once you are done with the test, tap the back button twice.
15. Iris Camera
This test is designed to evaluate and assess the condition of your device’s infrared iris camera. It is the feature you use to unlock your device. To test the iris camera, tap the Iris Camera Test button. The iris camera will then be pulled up. You will be prompted to align your eyes with the camera. If it has successfully scanned your iris, it will automatically close, and you will be taken back to the main diagnostics menu.
16. LED
This test is intended to check your handset’s LED notification light. To run the test, press the LED button. Tap the screen to change the color of the LED from red, green, to blue. To end the test, tap the screen again.
17. Low Frequency
Low frequency is a test that will check your device’s earpiece. To commence the testing, tap the Low Frequency button. You will then see a page with the 100 Hz, 200 Hz, and 300 Hz frequencies. Every time you select a frequency, place your ear against your device’s earpiece. Check for any low buzzing sounds. Once the test is done, return to the main diagnostics menu by tapping the back button twice.
How to Exit the Diagnostics Menu
Once you are done testing your Samsung handset’s features, you can now close the diagnostics menu. To do that, tap the back button twice, and you will be taken back to your device’s phone dialer. Exit as you normally would.
Now that you’ve verified that all your device’s sensors are in good shape, it’s time to boost your device’s performance with Android cleaner tool. This tool closes any lagging programs or apps to ensure you make the most of your Samsung device.