
Have you ever wanted to connect your Android device to a Wi-Fi network at home or your favorite coffee shop but you don’t know how? You have come to the right place. In this article, we will teach you how to connect to Wi-Fi networks using your Android device. Let’s get started.

1. Know the network SSID and the password.
To be able to connect to a particular Wi-Fi network, you will need the network SSID and the password if it is a private network. If you own the network, this should be easy because you can find the default SSID and password printed on your wireless router. However, if you are connecting to another network, you have to ask for the network SSID and password.
2. Start scanning the Wi-Fi network.
To access Wi-Fi Settings, you can follow any of the two methods below:
- Swipe down from the top of your screen. A menu bar with basic settings should show up. Tap on the down arrow to see more settings. Select the Wi-Fi network icon that resembles a piece of the pie.
- Go to Settings > Wireless & Networks > Wi-Fi.
If the Wi-Fi setting is off, toggle it to switch on. After you’ve turned it on, it will automatically scan for Wi-Fi networks within your range. It displays all the available networks as a list.
3. Connect to a specific network.
From the list of networks on your device’s screen, choose one network you want to connect. Take note that networks with a tiny key icon are secure networks that require passwords. You can connect to these networks safely and securely.
The unsecured ones, such as those in hotels, public places, and coffee shops, usually don’t have key icons. If you connect to these unsecured networks, chances are, your connection could be breached. Thus, we suggest you avoid performing any private activities, such as checking your bank account or other crucial data, if you decide to connect to such networks.
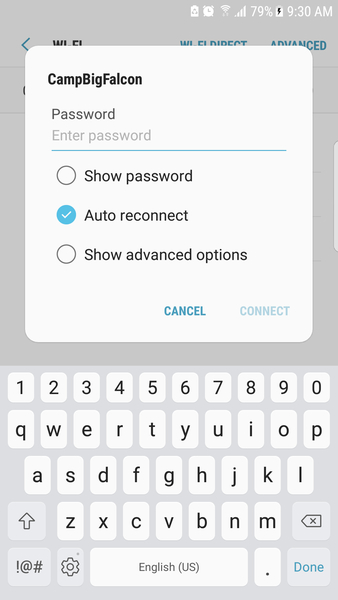
To connect to any of these networks, tap on the name of the Wi-Fi network you prefer. If you have not connected to the network before, a dialog box will pop up prompting you to enter the password. Once you have entered the password, click on the Connect button. If you have already connected to the network before, a dialog box will also pop up giving you the options to either Forget, Connect, or Cancel. If you select Forget, your Android device will discard the login information you used in the previous session.
Once you have correctly entered the password, the dialog box closes, and you will see a message below the SSID you chose. It should say “Connected”. A small Wi-Fi icon will then appear at the top-most part of your screen.
4. Connecting to a Wi-Fi network with WPS.
Wi-Fi Protected Setup or WPS allows you to connect to a secure Wi-Fi network, even without entering the SSID and the password. It is not a very reliable connection method and is only meant for device-to-device connections, such as connecting your Android phone to a printer.
Before you can proceed with establishing a connection, you have to set up WPS first. Follow the steps below:
- Configure your router for WPS by pressing the WPS button on your router.
- Now, configure your Android device so you can connect using the WPS PIN or Push Button method. Your choice depends on the requirements of your router. While the Push Button method requires you to press a specific button on your router when trying to establish a connection, the PIN method requires you to enter an eight-digit PIN. Among the two, the Push Button method is the most secure option because it needs you to be physically near to a router.
- To configure your device, change your Android Wi-Fi settings. First, go to Settings > Wireless & Networks > Wi-Fi. Next, on the top right portion of your screen, tap on the three-button options button and select Lastly, depending on the instructions provided by the router, select either WPS Pin Entry or WPS Push Button.
5. Check the status of your Wi-Fi connection.
Once your device is connected to a Wi-Fi network, you can see more details about the connection, including the signal strength, the frequency of the connection, IP address, and the link speed. To view these, do the following:
- Go to Settings > Wireless & Networks > Wi-Fi.
- Tap on the SSID of the network you are connected to. A dialog box will then pop up displaying all the necessary information about the network.
6. Check network notifications.
If you wish to be notified if there is a nearby Wi-Fi connection on a mobile phone, switch on the network notification option in your device’s settings. Do the following:
- Go to Settings > Wireless & Networks > Wi-Fi > Settings.
- Toggle on the Network Notification options.
As long as your device’s Wi-Fi is on, you will receive notifications whenever your device detects an available open network within range.
Conclusion
Now, you should be able to connect your Android device to a Wi-Fi network fast and easy! Just so your device performs well as you access the web, download Android cleaning tool. This app will ensure your device does not lag by closing unnecessary applications running in the background. It even takes care of your storage space by removing junk files so you won’t have to worry about the lack of space in the future.