Customizing your Windows 10/11 PC is easy with the wide variety of options available. From changing the desktop background to adjusting color accents, you can personalize your computer’s look and feel. This guide provides several ways to customize your Windows 10/11 experience.
Desktop
One of the easiest ways to customize your PC and add some personality to it is to change the backdrop of your desktop with an image or slideshow.
How to Change the Default Wallpaper to a Custom Image
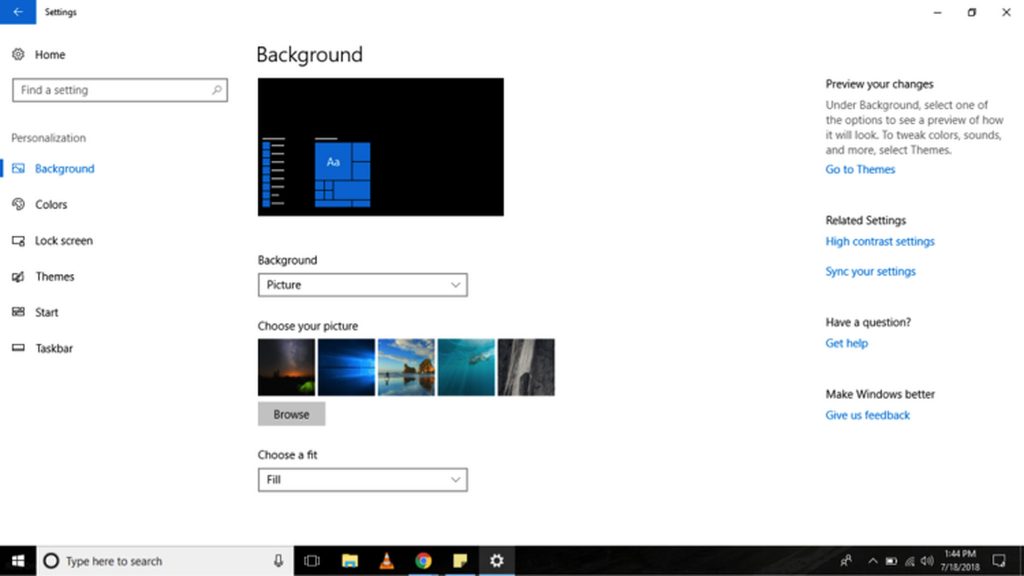
To change your default wallpaper with a custom image, follow the steps below:
Expert Tip: For smoother PC performance, consider using a PC optimization tool. It handles junk files, incorrect settings, and harmful apps. Make sure it's right for your system, and always check the EULA and Privacy Policy.
Special offer. About Outbyte, uninstall instructions, EULA, Privacy Policy.
- Go to Settings.
- Select Personalization > Background.
- Click on the Background drop-down menu and choose Picture.
- Hit the Browse button to choose an image you want to use.
- Under the Choose a Fit drop-down menu, choose a fit option that best suits the image. Your options are stretch, fill, span, tile, and center.
- That’s it! You have successfully changed your background image with a custom one.
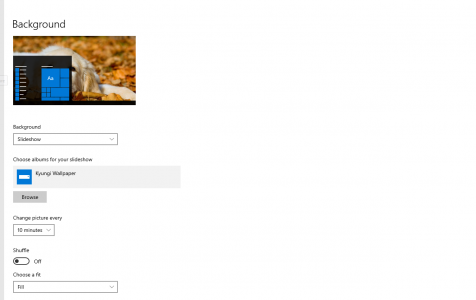
How to Change the Default Wallpaper to an Image Slideshow
If you prefer to showcase an image slideshow on the desktop, follow these steps:
- Go to Settings.
- Select Personalization > Background.
- Under the Background drop-down menu, choose Slideshow.
- Click the Browse button to choose a folder with the images you want to showcase in the slideshow.
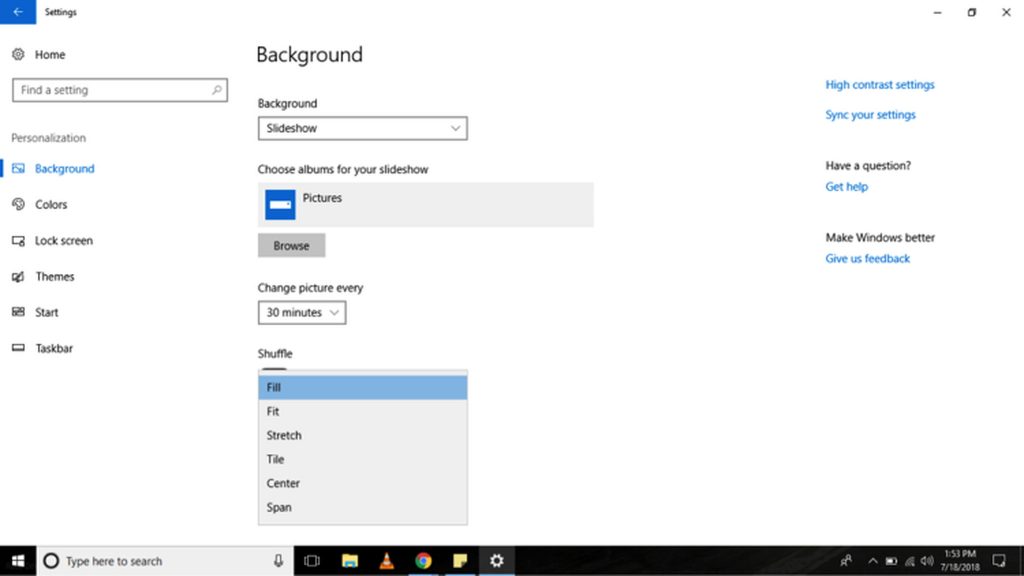
- Under the Change Picture Every drop-down menu, select how long an image will change.
- If the image order is not essential, you may turn on the Shuffle toggle switch.
- Under the Choose a Fit drop-down menu, choose a fit option that best suits your images in the slideshow. Your available options are fill, center, span, stretch, and tile.
Color
Another way to customize your computer is to change the color of your theme. Changing the color will improve the appearance of the Start button, taskbar, title bars, Action Center, Settings, and linkable texts in specific apps.
How to Apply a Color Accent
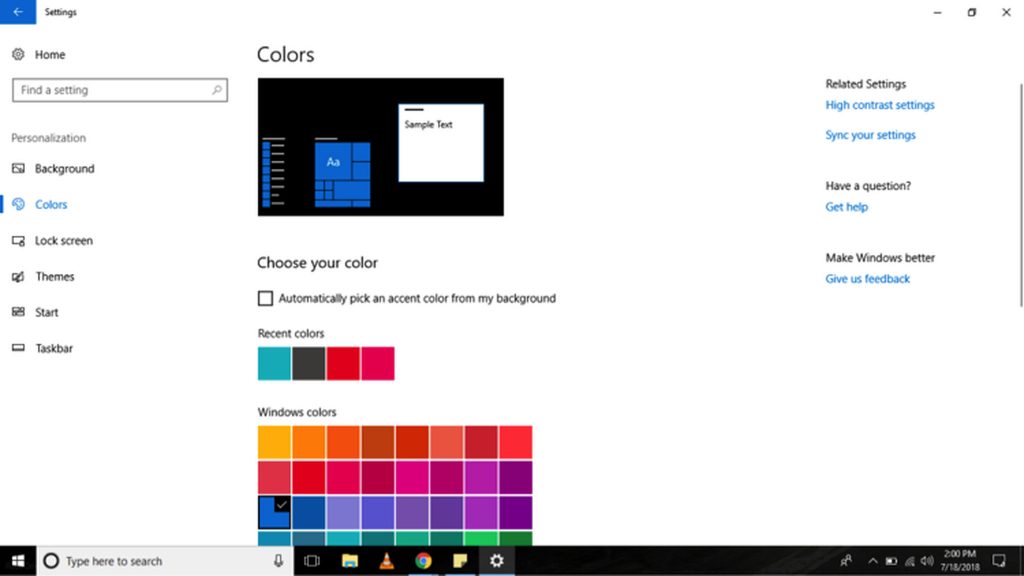
To change the default color accent of your Windows 10/11 computer, do the following steps:
- Go to Settings.
- Select Personalization > Colors.
- Choose a color accent you want to apply. If you like Windows 10/11 to decide for you which color accent is more appropriate, go to Choose Your Color and check the Automatically Pick an Accent Color from My Background.
- If the color you desire is not in the list, click the Custom Color button to choose a custom color from the palette. You can also click the More button to enter an HSV or RGB code.
- Once you have decided on which color accent to apply, click the Done button and wait until Windows 10/11 is finished using the changes.
How to Control the Transparency Effects
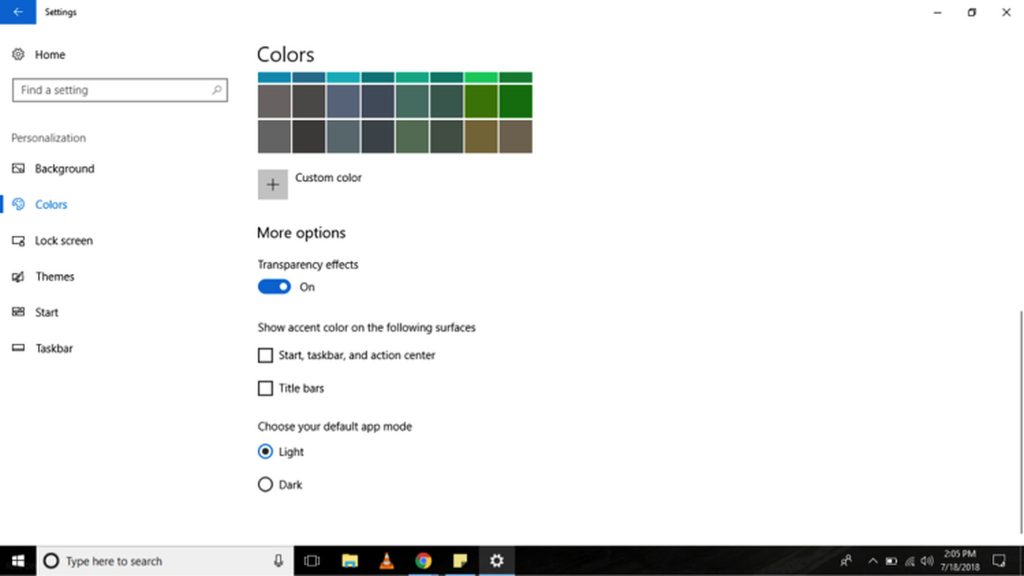
Windows 10/11 computers have elements that appear to have transparency effects with noise and blur texture, such as the Action Center, Start button, and taskbar. Although they are designed that way as part of Microsoft’s Fluent Design System, you can still disable or enable these effects by following these steps:
- Go to Settings.
- Select Personalization > Colors.
- Under More Options, use the Transparency Effects toggle switch to enable or disable the effects.
How to Add Colors to Certain Windows 10/11 Elements

By default, a Windows 10/11 computer uses a dark color scheme for the taskbar, Action Center, and the Start button. On the other hand, it uses a light color scheme for title bars. Now, if you wish to make these elements more personal, change their color accent with the steps below:
- Go to Settings.
- Select Personalization > Colors.
- Under More Options, check the Title Bars option if you want the color accent to show in the title bars of the File Explorer and individual apps. Check also the Start, Taskbar, and Action Center option if you want to apply the color accent to these elements.
How to Choose a Color Mode
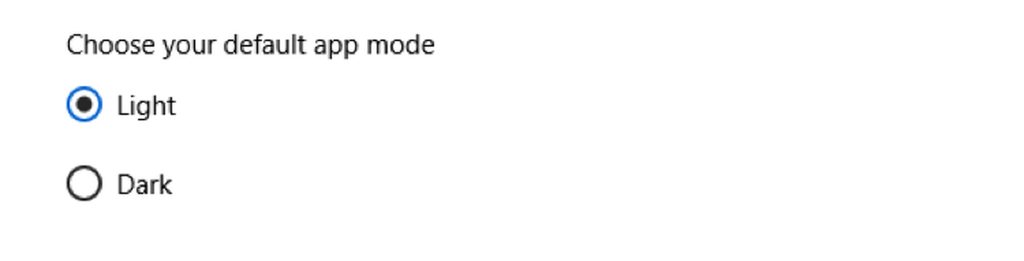
Windows 10/11 computers offer two color personalization modes: light and dark. While the light mode is the default mode and recommended for daytime use, the dark mode is an option that is perfect for a low-light setting because it features a dark color scheme in the background. To switch between these two color personalization modes, use the steps below:
- Go to Settings.
- Select Personalization > Colors.
- Scroll down to More Options and choose whether you want to use the Light or Dark mode.
Lock Screen
In a Windows 10/11 computer, you can also customize your lock screen, the screen that asks you for your login credentials. The available customization options include Windows Spotlight, the ability to set a custom image or a collection of images, and settings to control app notifications.
How to Set Up a Custom Lock Screen Image
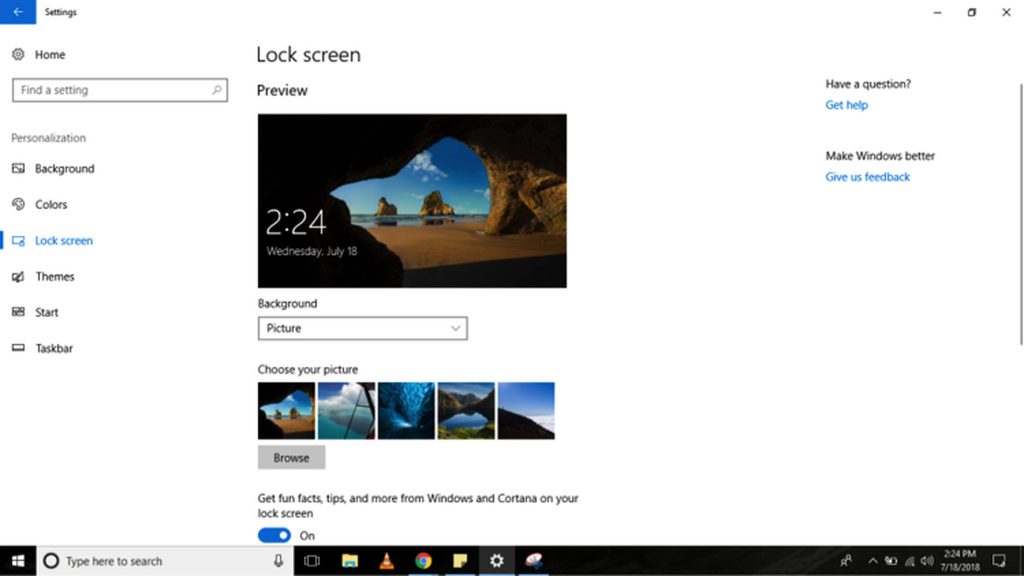
The default lock screen of Windows 10/11 devices is the Windows Spotlight. This displays a new background every time you switch on your computer. Though Spotlight gets picturesque images from Bing, you can also set any image you like. Here’s how you personalize your lock screen with a custom image:
- Go to Settings.
- Select Personalization > Lock Screen.
- Under the Background drop-down menu, select the Picture option.
- Click the Browse button to find an image you want to display in your lock screen.
How to Set Up a Lock Screen Slideshow
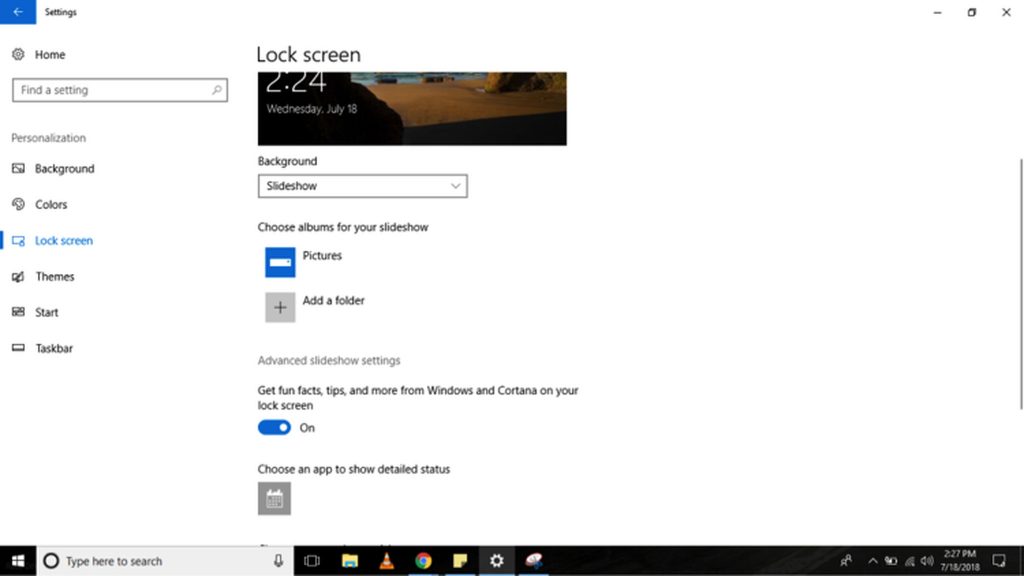
Displaying a slideshow of images on your lock screen is possible. Simply follow these steps:
- Go to Settings.
- Select Personalization > Lock Screen.
- Under the Background drop-down menu, select the Slideshow option.
- Find the folder with all the images you want to include in the slideshow by clicking the Add a Folder button.
- For more advanced slideshow settings, click on the Advanced Slideshow Settings link. You will have the option to include the images in the Camera Roll folder of your OneDrive. You can also set your computer to use only the photos that fit your screen. There is also an option that allows you to set the duration of the slideshow.
- Whatever option you select, it is a good idea to switch off the Get fun facts, tips, and more from Windows and Cortana on your lock screen option. By disabling this option, Windows 10/11 ads won’t show in the lock screen.
- Since Windows 10/11 computers show the same background on both sign-in and lock screens, you might want to switch off the Show lock screen background picture on the sign-in screen. That way, you will only see a solid color background when you sign in.
How to Control and Manage Lock Screen App Notifications
Certain apps and programs show status and details on the lock screen. To add or remove them, follow these steps:
- Go to Settings.
- Select Personalization > Lock Screen.
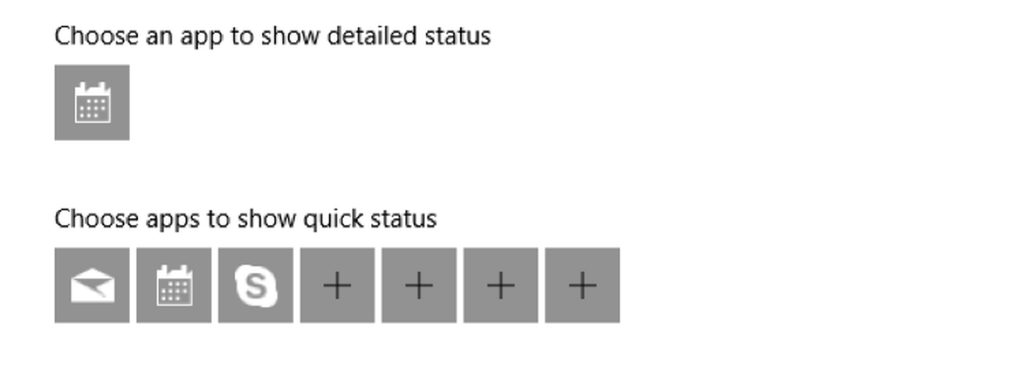
- By default, the Calendar app is set to show a detailed status. If you want to change it with another app, click the Calendar icon under Choose an app to show detailed status option. A list of available Microsoft apps will then be displayed on your screen. If you want to disable the feature, select None.
- Under the Choose apps to show quick status option, you may configure up to seven apps to display details and status on your lock screen. Mail, Calendar, and Skype are usually included in the list, but you can always add, remove, or change these apps by clicking the + button.
Theme
Windows 10/11 computers offer a wide variety of ways to personalize your experience. The most common and quickest way to do that is to use a theme. A theme is basically a package you can use to improve the look and feel of your computer. It contains one or more background images, sounds, and color accents. It is also readily available from Microsoft Store.
How to Apply a Theme on Your Windows 10/11 Computer
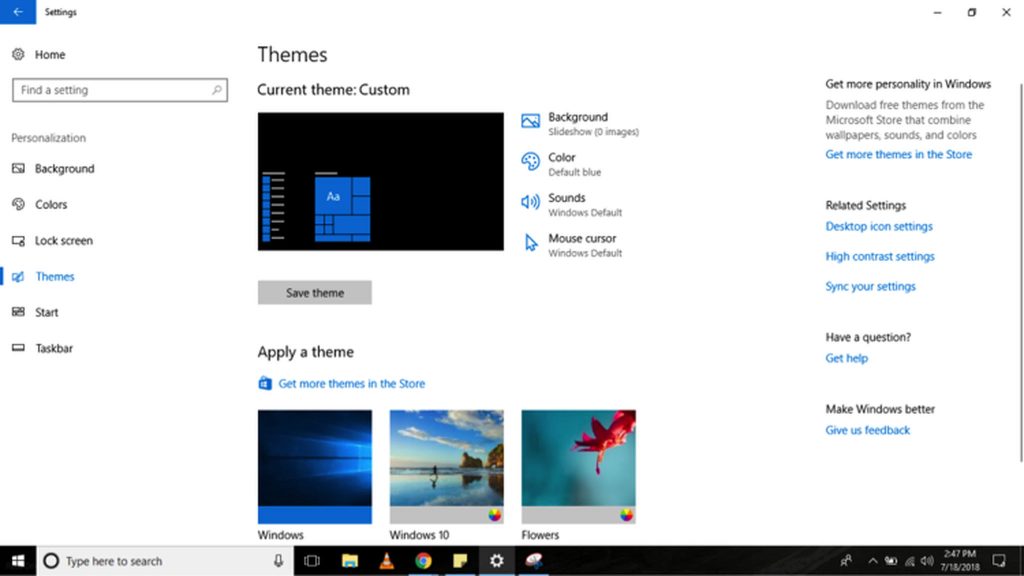
To acquire and apply a new theme on your Windows 10/11 computer, follow these steps:
- Go to Settings.
- Select Personalization > Themes.
- Click the Get More Themes link. You will then be directed to the Microsoft Store.
- Choose a theme you want and click the Get button.
Select the newly added theme to apply it.
The Start Menu
The Start Menu is one of the best and most essential features of Windows 10/11 because it is where you can find your settings, files, and apps. Like most elements of Windows 10/11 computers, there are many ways to customize the Start menu. While some options can be customized directly from the menu, others can be accessed through your computer’s Settings.
How to Change the Basic Start Menu Settings
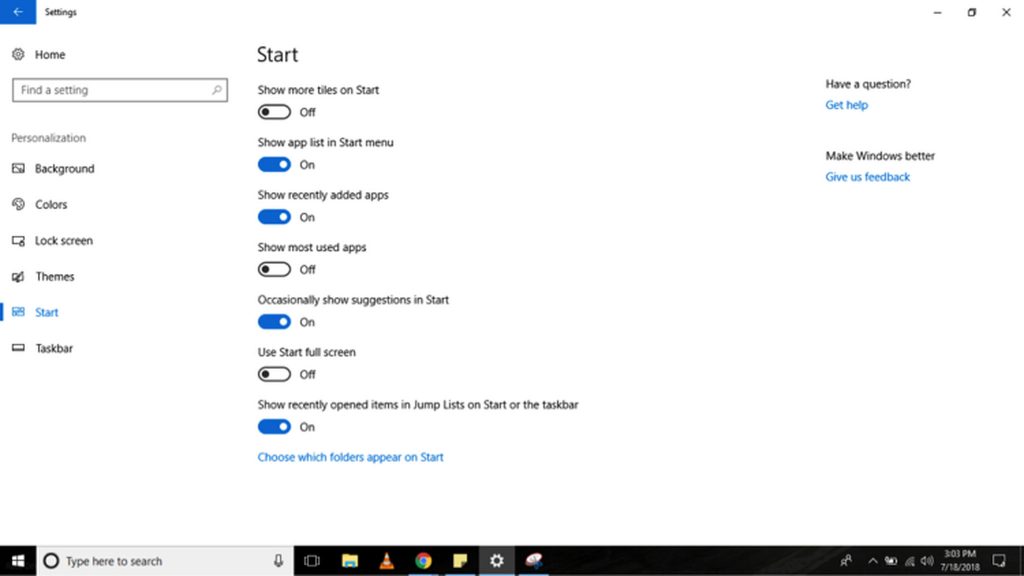
It is easier to customize everything you see on the Start menu by following these steps:
- Go to Settings.
- Select Personalization > Start.
- You will see some customization options for the Start menu, including:
- Show more tiles on Start – This allows you to add a fourth column of tiles that will fit 8 more tiles in one row.
- Show app list in Start menu – If you disable this option, all the apps in the list will be removed. You will be left with only access to your pinned Live Tiles. Don’t worry, because you will still have access to all your apps. You can click the All Apps button on the top-left portion of the menu or just type the name of the app in the Search bar.
- Show recently added apps – If you do not want to see the apps, you recently added in the list, disable this option.
- Show most used apps – The start menu will list the apps you use frequently. If you don’t want to see them, switch off this option.
- Occasionally show suggestions in Start – When you enable this option, the Start menu will display recommendations from the Microsoft Store. Many consider these recommendations as ads. To prevent seeing them, disable this option.
- Use full screen – Enabling this option activates a Windows 8.1-like experience, where the Start screen is stretched across the desktop, allowing you to see more pinned tiles without the need to scroll.
- If you want to customize the left rail button, click the Choose which folders appear on Start link. And then, switch on or off the buttons for the items you want or don’t want to see on the Start menu.
How to Customize Live Tiles
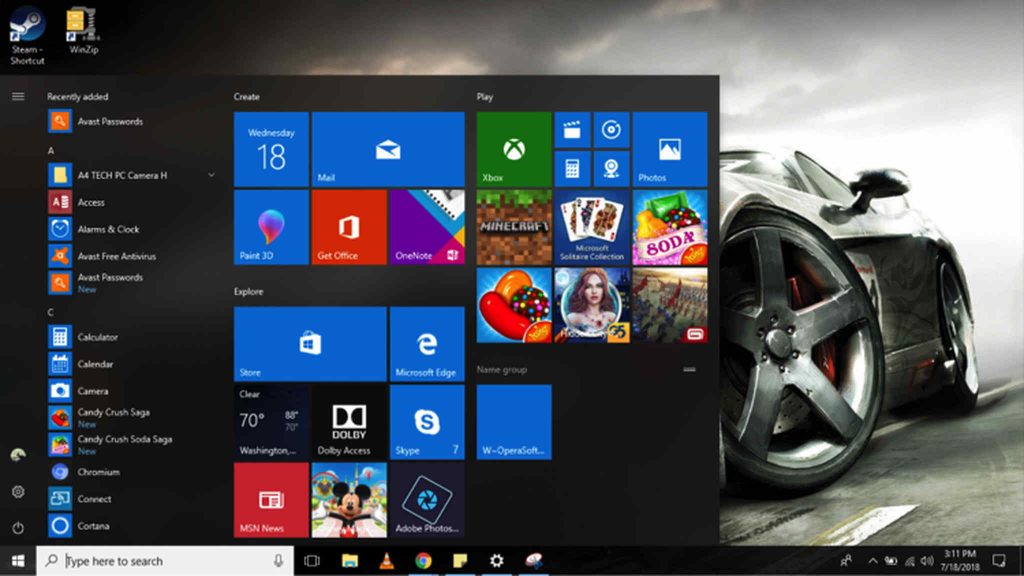
Aside from customizing your Start menu in Settings, you can also personalize the menu itself. Here’s how:
- To resize the start menu vertically or horizontally, stretch the edges inward or outward using the mouse.
- To organize your tiles into groups, drag them into an empty space. Click the header of the group to rename it. If you want to optimize the space in your Start menu, you can also sort the folder tiles. Create a new folder by dragging and dropping a tile on top of another tile. Drop more tiles into the folder to add them to the group.
- Change the size of live tiles and folders by right-clicking them and selecting Resize. Choose any of the available sizes: Small, Medium, Large, or Wide.
- To disable live updates, right-click the tile and select More. You will see an option for switching off live updates. Depending on the app you clicked, there might be added options, including the option to pin or unpin the app from the taskbar, or run it with admin privilege.
- To enable a classic Windows 7 look, just remove all the tiles.
The Taskbar
The taskbar is one of the most useful features of Windows 10/11 computers. Like the Start menu, it can be customized in many ways using the Settings app or in the taskbar itself.
How to Change Basic Taskbar Settings
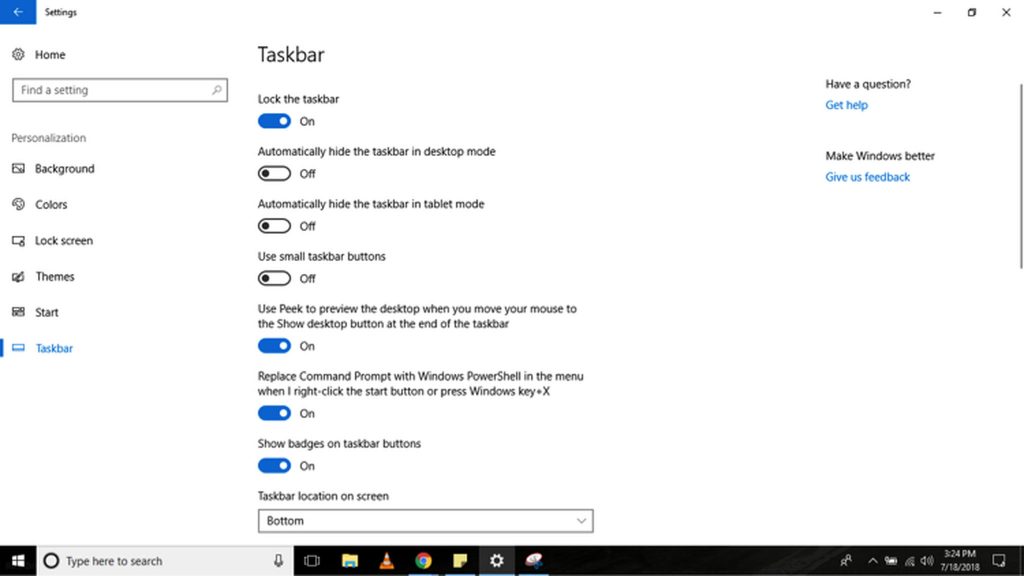
To customize your taskbar experience, follow these steps:
- Go to Settings.
- Select Personalization > Taskbar.
- Here, you will find several options, including:
- Lock the Taskbar – If disabled, you can resize or move the taskbar.
- Automatically hide the taskbar in desktop mode – If disabled, the taskbar will show when you are using your computer in normal mode.
- Automatically hide the taskbar in tablet mode – If disabled, the taskbar will show when you are using your computer in tablet mode.
- Use small taskbar buttons – This option lets you use smaller buttons in the taskbar.
- Show badges on taskbar buttons – This option allows you to enable or disable the status notifications of app buttons in the taskbar.
- Though you can change your taskbar’s location by dragging it around using your mouse, on this page, you can relocate the bar anywhere you like, be it to the bottom, left, top, or right portion of the screen.
- To personalize your experience even further, you can combine the buttons in your taskbar in three different ways. First, you have the default option, which combines and hides the labels of the buttons. The second option shows the labels and combines the buttons only if the taskbar is full. Lastly, you have the option not to combine and display the button labels. To choose which option you want, click the Combine taskbar buttons drop-down button.
- If you have a multi-monitor setup, you have more options to customize your taskbar. Under Multiple Displays, you can show the taskbar on all displays, combine buttons on taskbars, or select where the app buttons should appear.
How to Customize the Notification Area
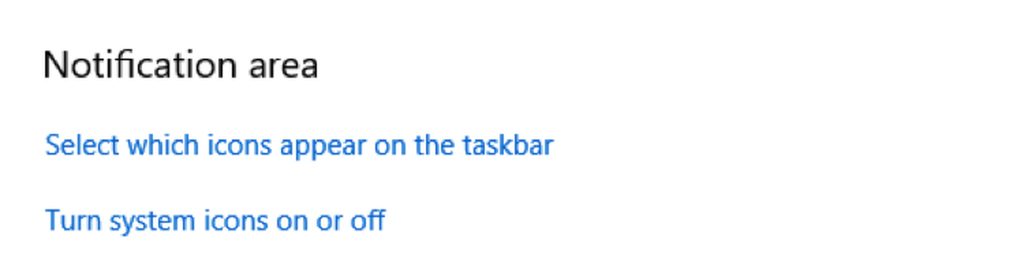
The notification area is located at the bottom-right corner of your taskbar. If this is not organized, it can quickly clutter with the app icons and your system. However, you can customize it to display only the icons you need. Simply follow these steps:
- Go to Settings.
- Select Personalization > Taskbar.
- Scroll down to the Notification Area. Click the Select which icons appear on the taskbar link.
- Switch on the toggle switch for each icon you want to appear in the notification area.
- Go back to the Notification Area and click the Turn system icons on or off the link.
- Turn on the toggle switch for every system icon that you want to appear in the taskbar.
How to Disable My People
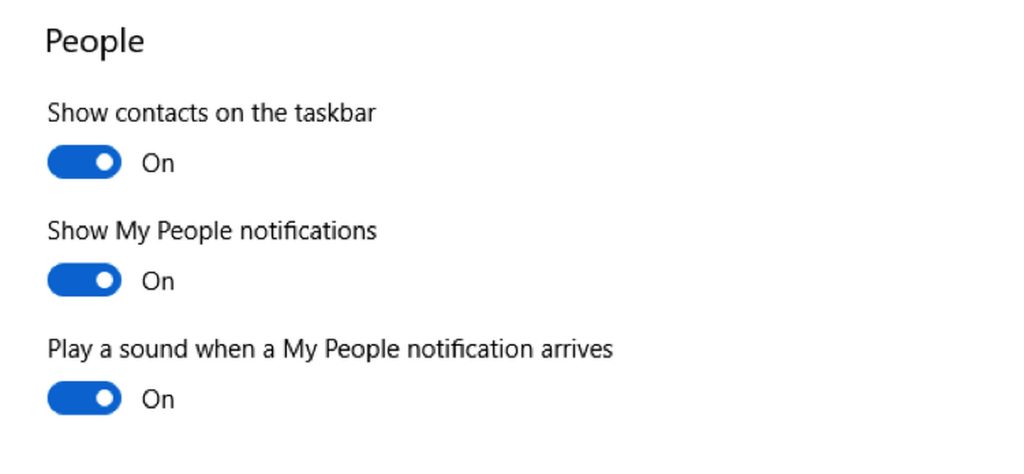
My People is a new feature that makes it convenient to connect with people you know. However, if you find this feature unimportant, you can disable it by following these steps:
- Go to Settings.
- Select Personalization > Taskbar.
- Scroll down to People option. Turn off the toggle switch of the Show contacts on the taskbar option.
How to Optimize Your Taskbar Space
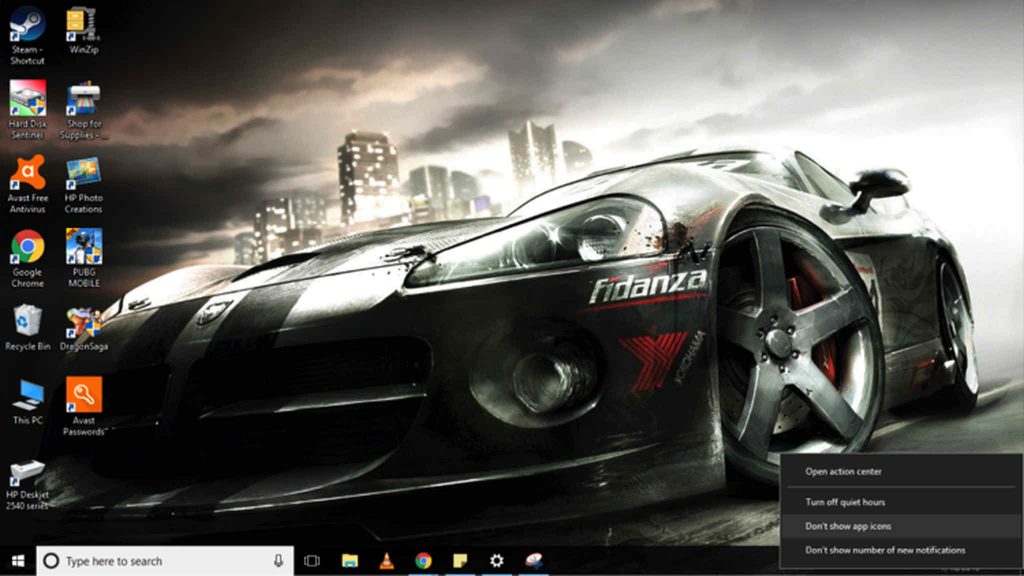
As mentioned above, you can also customize your taskbar experience from the taskbar itself. Follow the steps below:
- If you don’t find a particular app or program useful, remove it or display only a button for easier access. For instance, if you don’t use the Cortana search box often, right-click on the taskbar, choose Cortana, and click the Hidden option.
- You may also right-click on your taskbar to show or hide specific buttons, including Task View, People, and touch keyboard.
Wrapping Up
While the default settings of Windows 10/11 computers should be more than enough for most users, customizing the look and feel of a Windows 10/11 device can actually help enhance a user’s experience by only showing tools and shortcuts where you want them and adjusting aesthetics for a more visually friendly and pleasing appearance. And since we’ve been talking a lot about customizing your Windows experience, we suggest you download and install Outbyte PC Repair as well. Although it has nothing to do with changing the theme and personalizing your computer, this tool will help fix any stability and speed issues, ensuring your device runs smooth and fast at all times.