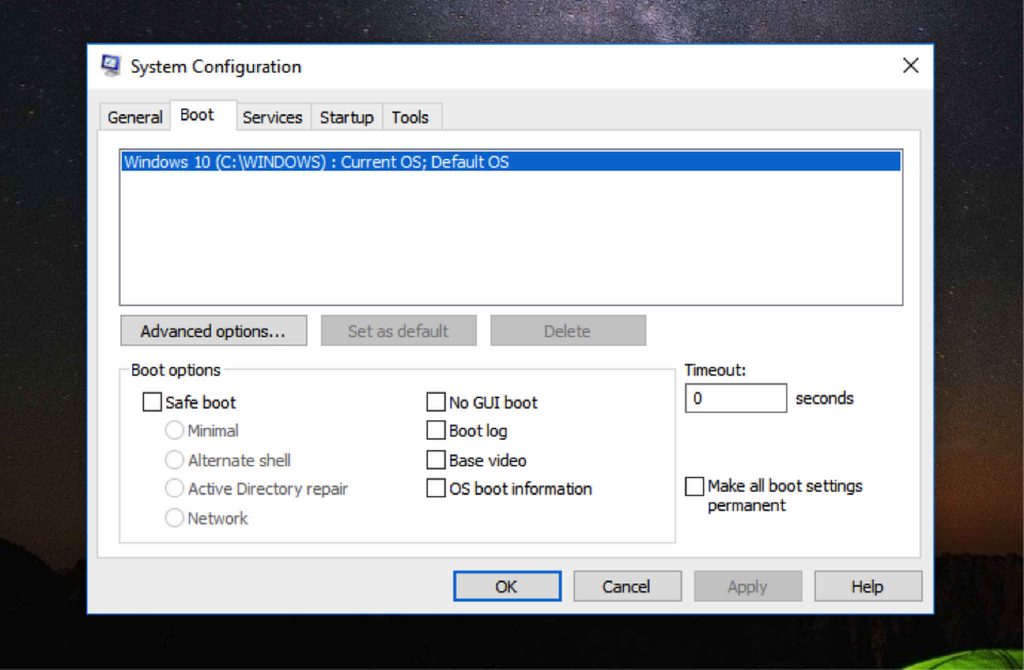
To troubleshoot issues on Windows, starting the computer in Safe Mode is often a helpful solution. In Windows 8, 10, and 11, Safe Mode can be accessed through the Startup Settings, while Windows Vista, XP, and 7 users can enter Safe Mode through the Advanced Boot Options.
Then again, depending on the degree of the problem, it might be easier and more practical to let Windows boot in Safe Mode automatically. You just have to make changes in your computer’s System Configuration. The process works for almost all Windows operating systems, including Windows Vista, Windows XP, Windows 7, Windows 8, and Windows 10/11.

Run Windows in Safe Mode via MSConfig
To make Windows boot automatically into Safe Mode by making changes to MSConfig, follow the steps below:
Expert Tip: For smoother PC performance, consider using a PC optimization tool. It handles junk files, incorrect settings, and harmful apps. Make sure it's right for your system, and always check the EULA and Privacy Policy.
Special offer. About Outbyte, uninstall instructions, EULA, Privacy Policy.
- If your computer is running on Windows 8 or Windows 10/11, right-click on the Start button and click Run. You can also bring up the Run window by using the WIN + X shortcut key combination.
- For computers running on Windows XP, click the Start button and select Run.
- In the text field, enter this command: msconfig. Click the OK button or hit Enter.
- Go to System Configuration and open the Boot tab. In Windows XP, this tab is named BOOT.INI.
- Check the Safe Boot or /SAFEBOOT option.
- Under the Safe Boot option, there are radio buttons that let you run Safe Mode in various modes. Choose one of the following options:
- Safe Mode – This starts Windows in the fundamental Safe Mode. This is your default option and often the best choice as it loads only the minimum processes necessary to start Windows.
- Safe Mode with Command Prompt – This option runs the same processes as the default Safe Mode, only that it includes those that enable networking functions on Windows computers. This is the best option if you think you need to access the Internet while troubleshooting the problem.
- Safe Mode with Command Prompt – This loads Windows with all the minimum required processes. However, instead of starting Windows Explorer, it runs the Command Prompt. Consider this an option if the default Safe Mode option does not work.
- Click OK.
- At this point, you will be prompted to Restart, which immediately restarts your computer, or Exit without Restart, which allows you to close the window and continue what you’re doing. Choosing the latter option means you have to restart your computer manually.
- After restarting, your computer will automatically start in Safe Mode. Note that your computer will continue to boot into Safe Mode automatically until you configure it again to boot normally.
- If you think you have fixed the problem already, repeat steps 1 to 5, but for the last step, you have to uncheck Safe Boot or /SAFEBOOT option.
- Next, on the General tab, choose the Normal Startup radio button and click OK.
- You will be prompted to restart your computer again, or you can choose to do it manually.
Important Tips
Be sure you don’t make any unnecessary changes in your System Configuration other than what we stated above to avoid causing more problems in your system. Take note that this utility controls many startup activities on your computer aside from those involved with running Safe Mode. And unless you are very familiar with MSConfig, it is best that you stick with what is outlined. Once you have successfully fixed your computer’s problem, make sure it does not happen again. Install Outbyte PC Repair on your Windows computer to ensure a smooth and fast computer performance