If you’ve encountered the Windows error 0x80300024, you’re not alone in your search for solutions. Users have spent considerable time scouring the web to resolve this error, which manifests in different scenarios such as update installations or app downloads. Regardless of the specific experience, the goal remains the same: finding a permanent solution to eliminate the error.
Regardless of how the Windows 0x80300024 error manifested itself in your case, know that you have come to the right place. Here, we will discuss all there is to know about the error code 0x80300024.
What Is the Windows Installation Error 0x80300024?
The Windows error 0x80300024 is one of the many Windows issues you may run into while installing a new Windows operating system version. It is often accompanied by the following error message:”Windows is unable to install to the selected location: Error 0x80300024.”
So, what causes this issue? Well, it can be either software- or hardware-related. It can be the case of insufficient disk space on a specific destination drive. It can also be a result of using corrupted installation media.
Expert Tip: For smoother PC performance, consider using a PC optimization tool. It handles junk files, incorrect settings, and harmful apps. Make sure it's right for your system, and always check the EULA and Privacy Policy.
Special offer. About Outbyte, uninstall instructions, EULA, Privacy Policy.
Thankfully, the Windows 10/11 install error 0x80300024 does not suggest that an apocalypse is bound to happen. In fact, it can be remedied easily. In the section below, we will discuss ways to resolve it.
What Causes the Windows Error 0x80300024?
There are many reasons why this error appears. However, these are the most popular:
- There is not sufficient space on the target drive.
- The installation media is damaged.
- The hard disk drive is corrupted or dying.
- There are hardware and software issues.
- You have inserted the USB drive into a faulty or wrong port.
- There is an issue between the hard drive and its driver.
Tried and Tested Ways to Resolve the Windows Install 0x80300024 Error
Without further ado, here are some proven and tested ways to fix the error code 0x80300024 on Windows 10/11:
Basic Troubleshooting
Before taking any complex measures, perform basic troubleshooting. Make sure all the required peripherals are properly connected and working and the cables are stable. Also, if you are using an installation DVD, ensure it does not have scratches.
If everything is set and checked but the error 0x80300024 persists, then proceed with other fixes.
Fix #1: Disconnect Unnecessary Drives
Are you using more than one hard drive on your computer while trying to install a new Windows OS version? Then the other drives may be interfering with the whole installation process. As a result, the installation fails, and the error code is constantly being shown.
To check whether or not an extra drive is at fault, disconnect the drives you don’t need throughout the installation. And then, try installing the operating system once again. If you succeed, then it means that one of the hard drives is causing the problem. Otherwise, try other fixes.
Fix #2: Connect the Installation Media via Another Port
Most of the time, we install new Windows versions using external installation media like USB sticks or portable hard drives. But in some cases, these external peripherals fail and disrupt the entire installation process.
So, if you are installing the operating system via a USB port, you might want to eliminate the possibility that the USB port is causing the problem. You can do that by inserting the Windows installation media into another USB port.
You can even try using a USB 2.0 or USB 3.0 port and see if it helps.
Fix #3: Ensure That the Target Drive Is First in the Boot Order
When you switch on a PC with two or more storage devices connected to it, the boot order will define which device to use for booting the system. Now, if your target drive is not first in the boot order, you may see the error code 0x800300024. To resolve this problem, you have to change the boot order and ensure that your target drive is the priority. Here’s a step-by-step guide to help you:
- Restart your computer.
- The moment it powers up, you will see a screen that tells you to press certain keys. Press the key that lets you enter the BIOS menu.
- In this menu, check your computer’s boot order. You can see this under the Boot tab.
- Change the boot order and make sure your target drive is at the top.
- Also, ensure that you choose UEFI as the boot mode. This can be accessed in the Boot section as well.
- Save the changes and exit the BIOS menu.
- Restart Windows and try installing the update.
Fix #4: Format the Installation Location
You may also want to consider the fact that the issue may be caused by a corrupted or faulty installation location. This usually happens when you try to install a new operating system to a location that has been used many times before. It’s not surprising why experts always recommend formatting the installation location first before installing a Windows operating system to it.
To format the installation location of Windows 10/11, here’s what you should do:
- Insert Windows 10/11 bootable installation media into your device and restart your computer. If you don’t have installation media yet, you need to create it.
- When your device boots up, choose to boot from your installation media.
- Configure your keyboard layout, language, and other preferences.
- Select Custom as your preferred installation option.
- Next, you will be asked where you wish Windows to be installed. Select Drive Options (Advanced).
- Click the hard drive partition where you want to install Windows. And then, select Format.
- Confirm your action and wait for the formatting process to be completed.
- Click Next to proceed with the installation.
- If it does not resolve the problem, click on the concerned drive and hit Delete instead. Doing this will automatically convert the drive into free storage space that you can allocate to other resources.
- Create the partition once again and try installing the Windows OS on it.
- If the issue still appears, hit the Delete button once again and keep it as unallocated space.
- Now, boot from your installation media and select the unallocated space for the Windows installation.
- Check if the problem persists.
Fix #5: Get a Hard Drive Replacement
Another possible reason why you are seeing the error is that your hard drive is dying. A dying hard drive is a notorious cause of Windows update installation errors. Therefore, you may want to try replacing your hard drive with a new one. Hopefully, it gets rid of the error.
If your computer is still under warranty, it may be easier for you to secure a hard drive replacement. Otherwise, you may need to prepare a hefty sum as hard drives nowadays are quite pricey depending on the model.
Fix #6: Use the DiskPart Command
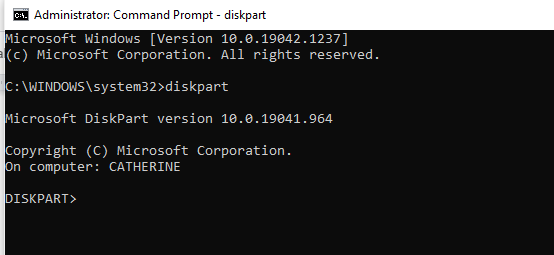
Although it rarely happens, the error code can also be triggered by corrupted partition tables on your drive. And to fix this, you will have to use the DiskPart command. Follow the steps below to use the diskpart command properly:
- Take note of your operating system’s current partition.
- Launch Command Prompt with administrator rights.
- Next, press the Shift and F10 keys.
- Into the command line, type diskpart.

- Then type the list disk command. This will show all the partitions on your drive.
- Now, type Select Disk (the number of the partition). For example, if it is 0, then type Select Disk 0.
- After that, type the clean command and hit Enter.
- See if the error is gone.
Fix #7: Make Sure There Is Sufficient Disk Space
If the drive you are trying to install Windows on is loaded with data, you may encounter the error because there may no longer be enough space for the new installation files. So, try deleting all those space hogs and see if it resolves the error.
There are several ways to free up disk space on your Windows device. We’ll share them below.
Delete Files Using Storage Sense
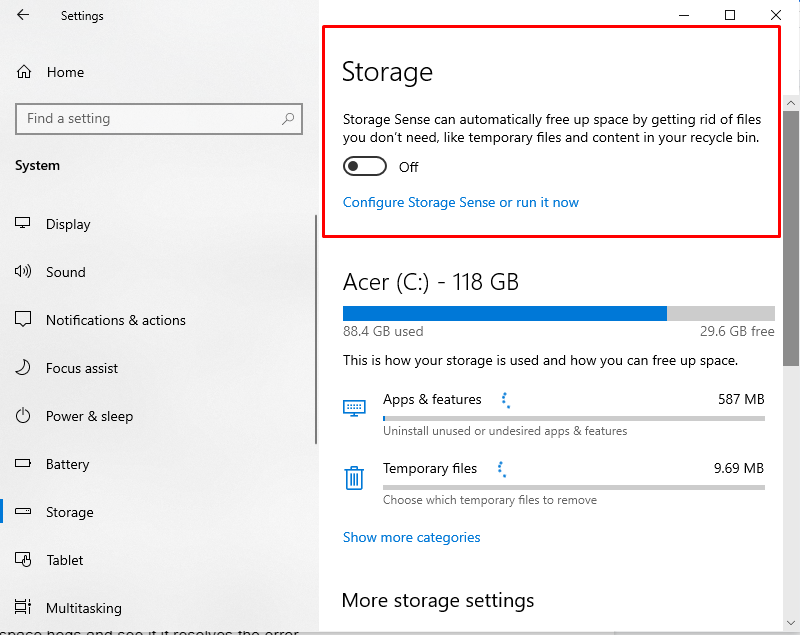
- Go to the Start menu and select Settings.
- Navigate to System and select Storage.
- Next, enable Storage Sense to let Windows delete all unwanted files automatically.
Delete Files via the Apps and Features Menu
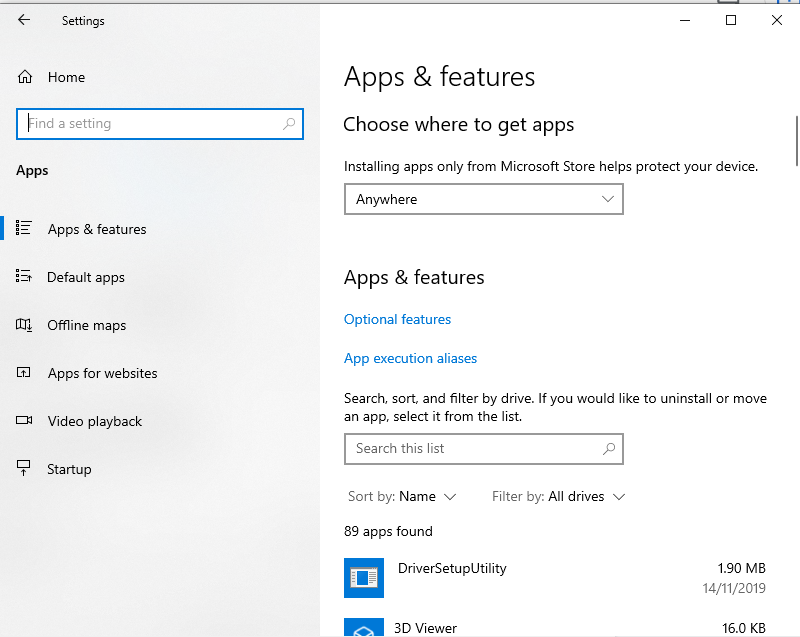
- Go to the Start menu and click Settings.
- Click Apps and go to Apps and Features.
- Find the app you don’t need and click on it.
- Click the Uninstall button.
Use Third-Party Software
Alternatively, you can clean up your drive and improve its performance using Outbyte PC Repair. This program will help you identify unused temporary and cached files and remove them from your drive to ensure it stays in tip-top shape.
What’s amazing about this PC repair software program is that it does everything for you. Once you have it downloaded onto your device, all you need to do is run a scan and let it do its job. And then, you simply have to wait for the tool to give recommendations on which files to get rid of.
Summary
The Windows error code 0x80300024 may be frustrating to deal with, especially if you badly need to install a new version of Windows. However, as long as you take the right steps, you can resolve the error in no time.
First things first, you have to perform basic troubleshooting. Check the cables of the external peripherals. Make sure they are connected properly and that their connections are stable. Also, if you are using an installation drive, make sure it doesn’t have scratches as they may interfere with the installation process. If the error keeps on showing, then proceed with the more technical fixes.
Disconnect all drives that are not needed for the installation. You may also try connecting the installation media through another port. If it does not do the trick, be sure that your target drive is first in the boot order. You can also consider formatting the installation location of the OS and using the diskpart command.
While all the above methods sound complicated, they’re definitely worth trying. But if you feel you need assistance from a professional, do not hesitate to seek help.
What other fixes have worked for you to resolve the error code 0x80300024? Please share them in the comments section below!


