The Windows Update utility is one of the most essential components of the Windows operating system. Not only does it allow you to install the latest system updates, but it also ensures your system is healthy and free of errors.
Unfortunately, it isn’t perfect all the time. Sometimes, it fails to do what it is supposed to do. Worse, it may become the cause of many frustrating errors, like the error code 0xc190020e.
According to many Windows users, they get the error 0xc190020e while trying to install an update. Others say that random error messages pop up telling them that the update installation has failed. Some don’t get any message at all. They just get stuck in the middle of the update process with no clue as to what is wrong.
The good news is that no matter how frustrating the Windows 10/11 Update error 0xc190020e is, it can be fixed. So, there is no reason to panic. In the succeeding sections, we will discuss everything there is to know about this error code, from its causes to the different ways to resolve it.
Expert Tip: For smoother PC performance, consider using a PC optimization tool. It handles junk files, incorrect settings, and harmful apps. Make sure it's right for your system, and always check the EULA and Privacy Policy.
Special offer. About Outbyte, uninstall instructions, EULA, Privacy Policy.
What Is the Microsoft Error Code 0xc190020e?
Based on the experience of some affected Windows 10/11 users, the 0xc190020e error code is quite an annoying issue. However, it’s pretty easy to resolve. It only suggests that you don’t have enough disk space to download and install the latest Windows 10/11 update.
Aside from insufficient disk space, there are other known triggers to this error:
- Multiple Windows Updates in the Queue – In some cases, the error appears because there is more than one Windows update pending to be installed. When that occurs, restarting your computer and reinstalling the problematic update can eliminate the error.
- Corrupted Update Files – Deleting corrupted or damaged Windows Update files may sometimes resolve the problem as well. However, to delete these files, you may have to reboot in Safe Mode.
- Problems with External Peripherals – An external peripheral may be messing with the entire Windows Update process. Try disconnecting your peripherals one at a time and see if the update process completes.
- Driver Issues – Are your device drivers outdated? Are there missing drivers? If so, you may need to reinstall them via the Device Manager or using a third-party driver updater tool. After that, you can reinstall the update and see if the error is gone.
- Malware – It is also possible that malware entities have successfully penetrated your device, resulting in problems with the Windows Update process. Make sure your computer is malware-free by running a malware scan. You can also use Windows Defender to keep your computer free of malware. Alternatively, you may download and install a third-party antivirus solution.
Ways to Resolve the Windows 10/11 Update Error Code 0xc190020e
Because not everyone can invest in a larger disk to resolve the problem, let’s focus on other ways to fix the Windows Update error 0xc190020e. Here they are:
Fix #1: Use Storage Sense
Storage Sense is a handy tool that can be used to perform disk cleanups and delete unnecessary files related to Windows updates and previous Windows installations. It can also be used to clean the Recycle Bin and get rid of any temporary files. As long as it is configured properly, you can take advantage of it and manage disk space.
Here is a detailed guide on how to use Storage Sense:
- Right-click on the Windows Start
- From the list of options, select System.
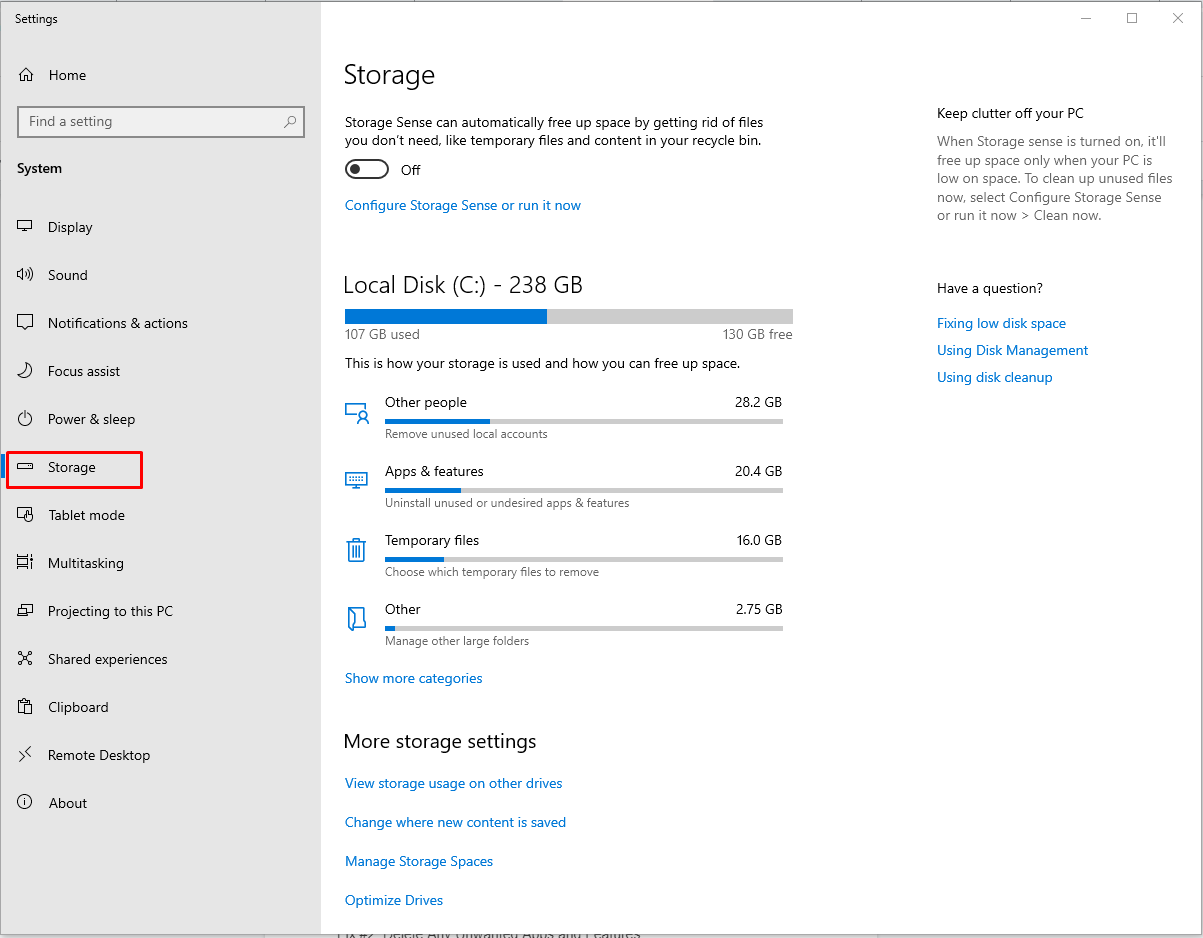
- Now, in the window that appears, navigate to the left pane and find Storage.
- Next, check the Local Storage section to see how much available free space you have. Here, you should also see how many hard drives your system has and how much free space each of them contains. But for the sake of resolving the error 0xc190020e, we will only be looking at the C: drive, where all system files are stored. Make sure you don’t close this window.
- After that, go to the Storage section and toggle the switch to On.
- Scroll down the list and be sure to tick all the sections that are more than 250MB.
- Click the Remove Files button and wait for the process to complete. Depending on how much space the tool needs to free up, the process may take a couple of minutes. Do not interrupt it.
- Once done, reinstall the update and check if the error still shows.
Fix #2: Delete Any Unwanted Apps and Features
If you suspect that the error is triggered by insufficient disk space, then you would want to free up more disk space by deleting or uninstalling any unnecessary apps and features. To do so, just follow these steps:
- Right-click on the Start
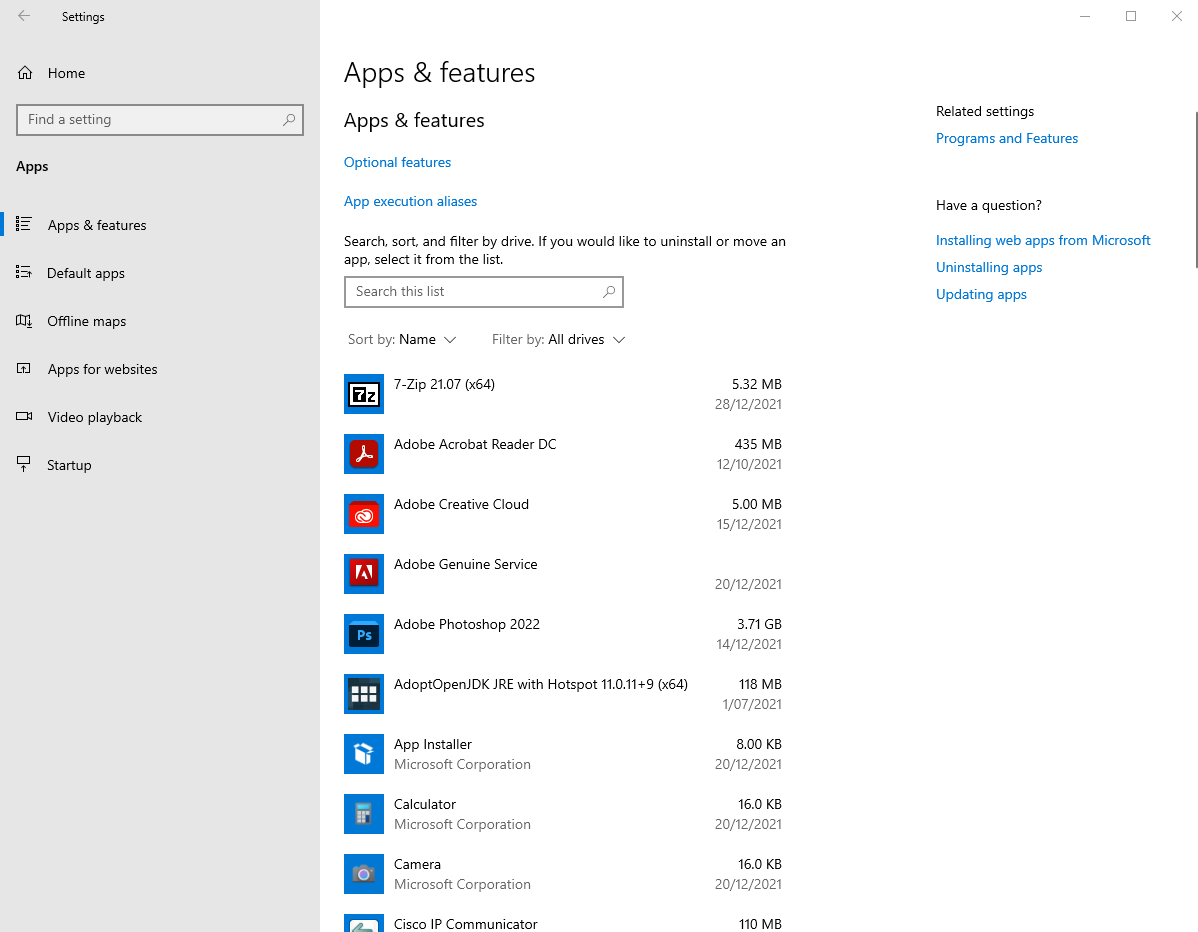
- From the list that appears, choose Apps and Features.
- In the Settings window, go to the Sort by: Select Size.
- Now, take the time to check the list and uninstall the space hogs you no longer use.
- And then, retry the Windows update process. If the error is gone, congrats! Otherwise, you still have more work to do.
Fix #3: Disable Hibernate Mode
Hibernate mode is a Windows power state where snapshots of your system are taken. Windows will then use these snapshots to speed up boot times. While it is quite a handy feature, it may consume several gigabytes of disk space, hence the need to disable it in some scenarios.
If you feel you can’t benefit from this feature, disable it by following these steps:
- Right-click on the Start
- Check the list and find the Command Prompt (Admin)
- Into the command line, type the exe /hibernate off command and hit the Enter key.
- Next, type exit and press Enter once again. Alternatively, you can just close the Command Prompt
- Depending on how long you’ve had such a setup, doing this can free up gigabytes of disk space. After this, restart your computer and apply the first fix.
Fix #4: Move Files and Programs from the Boot Drive
Do you use many different programs and applications? If that is the case, you may want to move them to another drive. While this may suggest reinstalling some programs, it also means that Windows will have more freedom to do what it needs with the drive it’s installed on.
If you have a spare hard drive, you can move programs from your C: drive to it. You can move the programs that consume large amounts of disk space by dragging and dropping them via Windows Explorer.
Fix #5: Use the Disk Cleanup Tool
Disk Cleanup is a maintenance tool created by Microsoft. It can scan your drive for files you no longer use, such as cache files, temporary files, and files in the Recycle Bin. It can also be used to resolve errors like 0xc190020e.
Here’s a guide on how to use it:
- Press the Windows logo + S shortcut and input Disk Cleanup into the text box.
- Click Disk Cleanup and choose the drive that you want to clean.
- Click OK to proceed and see if the error code still appears.
Fix #6: Empty the Microsoft Temp Folder
Although many think that the Temp folder is quite intimidating, this folder is actually safe. It contains launch configurations and other cached data needed by applications. And like other storage spaces, this folder also consumes significant disk space, hence the need to free it up regularly.
To empty this folder, follow these steps:
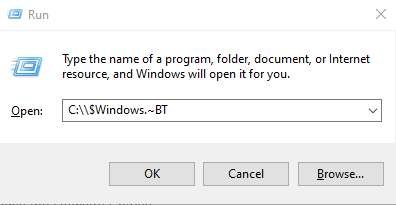
- Press the Win + R shortcut to open the Run
- Type C:\\$Windows.~BT into the text box and click OK. Make sure you change the value of C: to the actual drive where your operating system is installed.
- Next, remove everything from this folder.
- Check if the Windows Update error still appears.
Alternatively, you may consider using a PC repair tool to get rid of any unwanted temp files on your device. There are plenty of tools available for download out there. Make sure you choose one from a trustworthy source.
Fix #7: Modify Certain Registry Entries
Registry entries are basically container objects in the Windows operating system. They work similarly to folders. And for many advanced Windows users, modifying some of these entries can resolve errors associated with the Windows Update tool. Here’s a guide on what to do:
- Press the Win + R shortcut to launch and open the Run
- Type regedit into the text box and press the Enter key on your keyboard.
- In the window that appears, click File and select Export.
- Now, select a location on the left pane.
- Input a file name into the File Name field and click the Export
- Once the backup file is created, go to this location: DHKEY_LOCAL_MACHINE\\SOFTWARE\\Microsoft\\Windows\\Current Version\\WindowsUpdate\\OSUpgrade.
- And then, right-click on any empty space and choose New > DWORD (32-bit) Value.
- Rename it AllowOSUpgrade and change its value to 1.
- Close the Registry Editor now and restart your Windows computer.
Fix #8: Install the Update Using Windows 10/11 Installation Media
If you are having a hard time installing a certain update because of the error, you can install the update using Windows installation media. Once you have bootable installation media, do the following:
- Connect the installation media to your device and restart your computer.
- Press any key to start booting your device from the installation media.
- Choose your preferred language, currency, time, and input method.
- Select Next to continue.
- Click the Install Now button and choose the type of operating system you want to install.
- Follow the instructions that appear on your screen to complete the update installation process.
Fix #9: Run the Windows Update Troubleshooter
The Windows Update Troubleshooter is a tool developed by Microsoft for troubleshooting Windows update issues. To run it, follow these steps:
- Download and install the Windows Update Troubleshooter from the official Microsoft website.
- Run the tool that you have downloaded and follow the on-screen prompts to finish the troubleshooting process.
Fix #10: Disable Your Antivirus Suite
Sometimes, Windows cannot install new updates because your antivirus suite is interfering with the update process. In this case, you can temporarily disable your antivirus and see if the error is still there. If the problem is fixed, consider looking for another antivirus tool.
Fix #11: Update Your Device Drivers
You may also get the error message if you are using outdated device drivers. So, make sure you regularly check your drivers. Keep them up to date to ensure your computer is protected against unwanted issues.
And because we know most users don’t have the luxury of time to do manual checks all the time, we recommend that you use a third-party driver updater tool like Outbyte Driver Updater instead. Download and install the software and just let it do its job. It’s that easy! Plus, you don’t need to worry about installing incompatible device drivers that may only cause more issues.
The Error Code 0xc190020e: Wrapping Up
The most common cause of the error 0xc190020e is insufficient disk space, but other potential culprits need to be taken into account, too. The problem could be the result of a malware attack, or perhaps it is due to corrupted system files. Regardless of what’s causing it, there are many solutions that are worth trying.
While some fixes are quite straightforward, others require a bit of technical knowledge. But as long as you take the steps one at a time, the error should be resolved easily.
The goal of most fixes above, like using Storage Space and Disk Cleanup, is to free up significant disk space by deleting space hogs like temp and cached files. Other fixes suggest installing the latest Windows updates and making sure you are using updated device drivers.
If you know of other ways to resolve the error 0xc190020e, please let us know by commenting below.


