Error code 0x80072af9 is a common issue faced by Windows 10/11 users during update installations or syncing the Mail app. It is often accompanied by the error message “No such host is known.” This error has been reported to hinder the installation of new Windows builds by affected users.
In the sections below, let’s find out more about this error.
What Causes the Windows Update Error 0x80072af9?
Based on reports, the Windows Update error appears in different scenarios. However, we have pulled together a list of situations where error code 0x80072af9 is triggered:
- There is a network connection failure or a third-party interference within your machine and the Windows Update service.
- Tablet Mode is enabled while an update is being installed.
- A malware entity has caused corruption within important system files.
- A third-party antivirus or firewall is overly protective and doesn’t allow connections to go through.
- System files have been corrupted or broken due to external factors. In this case, a system restore is the most effective solution.
How to Fix Error 0x80072af9 on Windows 10/11
Are you trying to install a Windows update, and it’s failing because of the 0x80072af9 Windows Update problem? Then this article is for you. Below are some fixes that worked for some affected users. Follow them in the recommended order to achieve better results.
Expert Tip: For smoother PC performance, consider using a PC optimization tool. It handles junk files, incorrect settings, and harmful apps. Make sure it's right for your system, and always check the EULA and Privacy Policy.
Special offer. About Outbyte, uninstall instructions, EULA, Privacy Policy.
Fix #1: Use the Windows Update Troubleshooter
Before you proceed with the more complex fixes, let’s begin with the easy fix: use the Windows Update troubleshooter. Some users said that the issue got resolved using Microsoft’s in-built Windows Update troubleshooter. This utility is designed to scan any inconsistencies in the Windows Update utility and apply the recommended fixes automatically. Using the Windows Update troubleshooter is easy. Here are step-by-step instructions on what to do:
- Press the Windows + R keys concurrently to start the Run utility.
- Type ms-settings: troubleshoot into the text area and hit Enter. The Settings app will open, and you will be taken to the Troubleshooting tab right away.
- Scroll down and find the Get up and running section.
- Click Windows Update and then select the Run the Troubleshooter button.
- The initial scan will begin. Wait until it is complete.
- Hit the Apply This Fix button if a fix is recommended.
- Once the fix is applied, exit the troubleshooter and restart your computer.
- Upon reboot, install the problematic update once again and see if it installs without a problem.
Fix #2: Install the Problematic Update in Tablet Mode
Tablet mode is a new feature in Windows 10/11 that allows you to interact with your PC using touch. For instance, if you set up your device so that the mouse pointer is hidden when it’s not being used, tablet mode makes the pointer visible again when you tap or click on the screen.
For some users, using this mode allows them to install any Windows update without any problem. Here’s how to install a Windows update using the tablet mode:
- Click the notification tray on the bottom-right corner of the screen.
- Select Tablet Mode to enable it.
- Now, press the Windows + R keys to launch the Run window.
- Type ms-settings: windows update and hit the Enter key on your keyboard. This command will open the Windows update menu.
- Click the Check for Updates button and follow the instructions on your screen to install the failed update.
Fix #3: Uninstall Any Third-Party Security Software
Are you using a third-party antivirus or firewall? It is possible that it’s causing the 0x80072af9 update error. Some users reported that the error was only fixed after uninstalling their third-party security software. There are several ways to uninstall a security software program on Windows 10/11. We’ll share them with you below:
Via App Settings

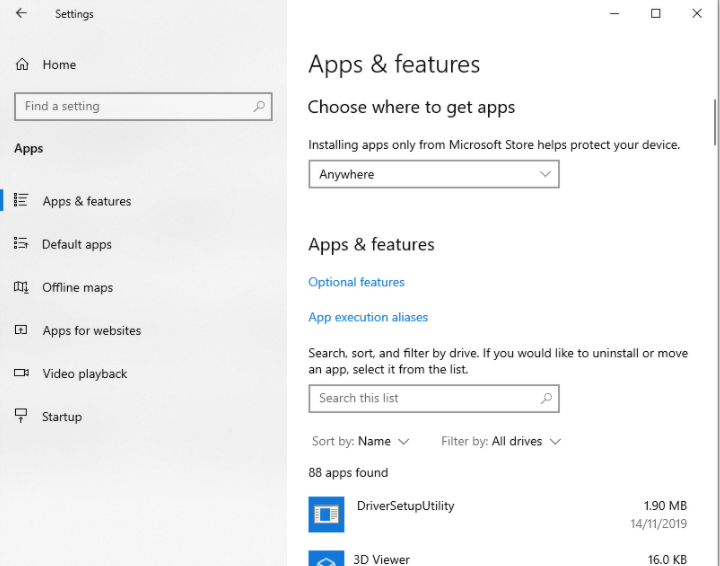
Open Settings > Apps > Apps and Features. You will then see a list of programs you can uninstall. Find the security program here and click on it. And then, select Uninstall.
Via Control Panel
You can also uninstall a program via Control Panel. Click the Start button and locate the Windows System folder. Switch to the Icon view and find Programs and Features. Find and right-click on the program you want to remove. Hit the Uninstall button.
Via the Start Menu
Another way to uninstall your security software program is by using the Start menu. Hit the Start button and locate the program that you wish to remove. Right-click on the problematic program and choose Uninstall. Confirm your action, and the program should be uninstalled.
Fix #4: Check If Your Files Are Corrupted
Windows Update files are stored in the system partition. And sometimes, malware attacks these essential system files. Once a malware attack occurs, these files may get corrupted, or worse, deleted. So, it is worth checking whether the error is caused by file corruption within the system partition.
Good thing Microsoft created a built-in tool on Windows that can be used for checking corrupt files. It’s called System File Checker. The SFC utility allows you to scan your computer for corrupted Windows files and replace them with fresh copies from the Windows installation sources. Here’s the way to use it:
- Press the Windows + X keys at the same time to open the WinX menu.
- Choose Command Prompt (Admin).
- Into the command line, type the sfc /scannow command and then press Enter.
- An SFC scan should start. The process will take about 15 minutes. Make sure you don’t interrupt it.
Fix #5: Free Your Computer of Junk Files
Junk files are the worst. They build up over time on your hard drive, slowing down your computer and sometimes even causing crashes. Fortunately, it’s quick and easy to clear out all the junk files on Windows 10/11 with a few clicks.
You can access Disk Cleanup by opening up File Explorer and navigating to This PC > Local Disk (C:) > Windows > Temporary Internet Files. From there, just click Clean Up System Files in the menu, and all junk files will be eliminated from your device.
You may also use third-party junk file remover tools of your choice. Be careful in installing a tool, though. Make sure you download only from a reputable source.
Fix #6: Use System Restore
If you are still getting the error 0x80072af9, you can try to fix it by using System Restore. This tool allows you to revert to a previous working state without losing any files or settings that have been changed since then. This is especially useful if your computer starts to act up or if you see an error while installing new software or updates on your computer.
To use the System Restore utility, do the following:
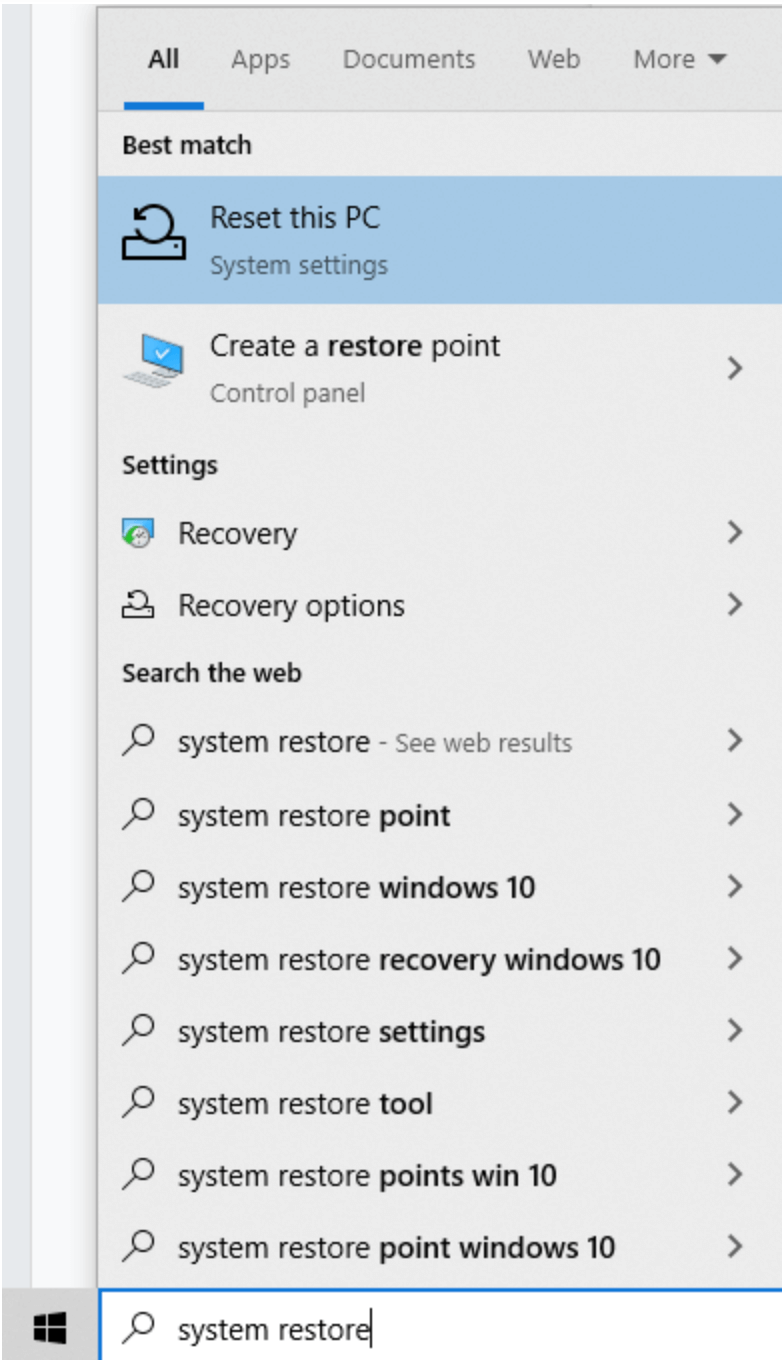
- Press the Windows + S keys together, and type system restore into the search field.

- Select the Create a Restore Point item from the search results.
- Now, the System Properties window will open. Hit the System Restore button.
- When the System Restore wizard opens, hit Next.
- Click Show More Restore Points to see all available restore points.
- Select a restore point created before the error appeared.
- Hit Next to continue.
Follow the instructions on your screen to complete the system restore process.
Fix #7: Refresh Your Windows Device
If the above methods did not resolve the 0x80072af9 error, consider performing a PC refresh. This procedure will not remove or delete your personal files. It will also not change your settings. What it does is remove any third-party applications you have installed.
In the process of refreshing your PC, Windows will display what applications or programs will be removed. You can take note of these programs so you can reinstall them when needed.
If you wish to perform a PC refresh, here are some steps to follow:
- Press and hold the Shift key while right-clicking on the Start menu.
- In the next menu, choose Shut down, then Restart. Don’t release the Shift key until you finish this step.
- At the next startup, you will see the Windows Repair/Recovery Environment. Select Troubleshoot and choose Refresh PC.
- Once the process is done, your computer will restart, and the problem should be fixed.
Fix #8: Perform a Malware Scan
If you suspect that the Windows Update error is caused by a malware infection, perform a malware scan right away. Luckily, Windows 10/11 devices are equipped with a built-in malware scanner that you can use to get rid of malicious software. This program is called Windows Defender.
To use Windows Defender to scan for malware, here’s what you should do:
- Click the Windows Defender Security icon in the notification tray.
- After that, hit the Virus and Threat Protection button in the Window that appears.
- Next, click the Quick Scan button.
- Windows Defender will now start scanning your computer for any threats.
Fix #9: Install Any Pending Windows Update
Perhaps there is a Windows update that you still need to install; that is why you’re seeing the error. Install the update by following the easy steps provided below:
- Go to the Windows search field and type Windows Update.
- Click the Check for Updates button.
- If an update is available, Windows will automatically install it for you.
Conclusion
Error 0x80072af9 is a common Windows error, and it’s usually caused by faulty Windows updates or corrupt operating system files. In this article, we have provided you with a few solutions that should help you get rid of error code 0x80072af9 on Windows. If you have any other fixes to add to the list, please share them in your comment below!

