This guide outlines steps to identify key hardware in your computer—CPU, GPU, motherboard, and RAM—organized into focused sections for easy navigation.
How to Check Processor (CPU) Information
Determining your computer’s CPU type is a quick and simple process.
- Right-click on the Windows Start Menu icon located at the bottom left-hand corner of your screen.
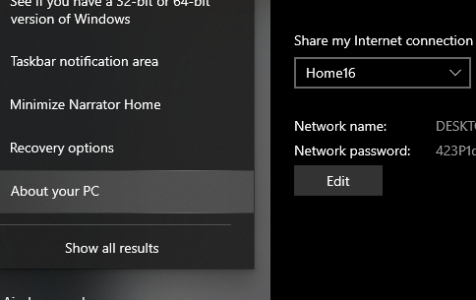
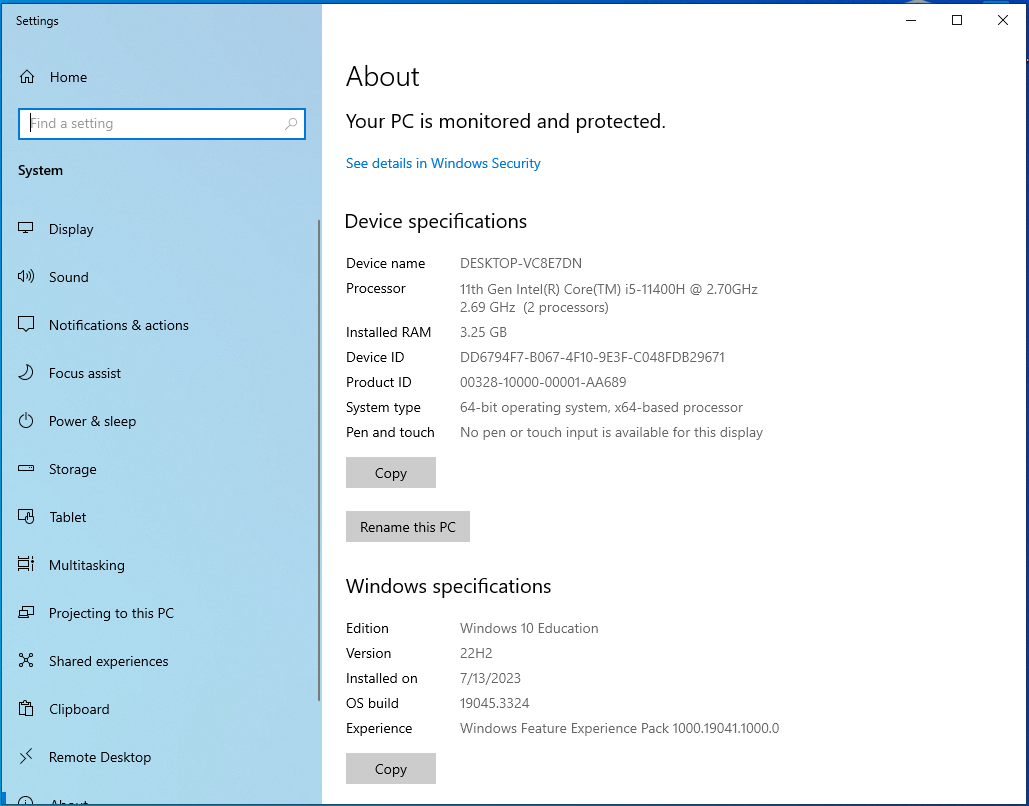
- Click on ‘System’ from the context menu that appears.
- Your CPU type will be displayed next to the ‘Processor’ label.

How to Identify Graphics Card (GPU)
For your graphics card details, the process is slightly more extensive but still manageable.
- Right-click on the Windows Start Menu icon.
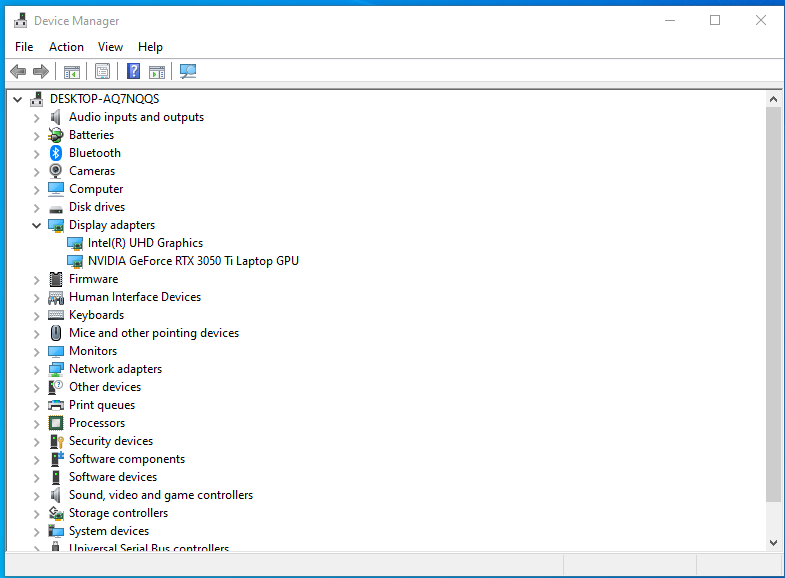
- Select ‘Device Manager’ from the context menu.
- Click the arrow next to ‘Display Adapters’ to expand the tab.
- Your graphics card information will be displayed there.
If two options are listed under ‘Display Adapters’, it usually signifies that both integrated and dedicated graphics cards are present. The dedicated graphics card, often the second on the list, is the more powerful one.
Expert Tip: For smoother PC performance, consider using a PC optimization tool. It handles junk files, incorrect settings, and harmful apps. Make sure it's right for your system, and always check the EULA and Privacy Policy.
Special offer. About Outbyte, uninstall instructions, EULA, Privacy Policy.

Note:
If your computer uses an Intel processor, the integrated graphics may be labeled something like ‘Intel HD Graphics 4000.’ On the other hand, a dedicated card might be labeled as an NVIDIA GeForce or AMD Radeon model. For more detailed information, refer to the dedicated graphics card’s label.
How to Find Motherboard Details
Finding motherboard details is a different process than the CPU and GPU. This can be done without opening your desktop or laptop.
- Type ‘System Information’ in the Windows search bar and open it.
- Scroll down until you find ‘Motherboard Manufacturer’ or ‘BaseBoard Manufacturer’ in the System Summary tab.
- Information next to ‘Motherboard/BaseBoard Manufacturer’, ‘Motherboard/BaseBoard Model’, and ‘Motherboard/BaseBoard Name’ will provide you with the details you need.
At times, the details about your motherboard might not be comprehensive but should still indicate the manufacturer.
Checking Your Computer’s Storage Drive (HDD/SSD)
Another essential component to be aware of is your computer’s storage drive, where all your files are saved.
- Open ‘This PC’ by searching it in the Windows search bar.
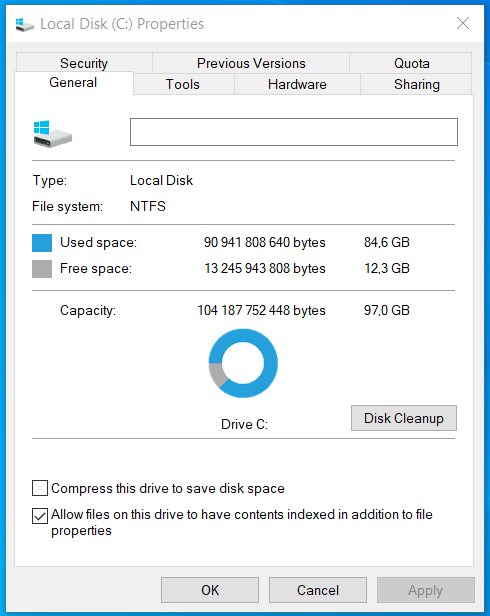
- You will see devices and drives. Right-click on the drive you want to check (often named ‘C:’).
- Select ‘Properties’.
- A window will pop up showing you the capacity, used space, and free space of the drive.

Identifying the Operating System Version
Knowing the operating system version can be important for compatibility reasons.
- Right-click on the Windows Start Menu icon located at the bottom left-hand corner of your screen.
- Click on ‘System’ from the context menu that appears.
- Scroll down to ‘Windows specifications’, where you can find details such as Edition, Version, and Installed date.
Checking Network Adapter Information
Internet connectivity is often determined by your network adapter.
- Open ‘Device Manager’ by right-clicking on the Windows Start Menu icon.
- Locate and expand the ‘Network adapters’ tab.
- Your network adapter information will be displayed there.
Verifying Power Supply Unit (PSU) Information (Desktops Only)
Although this requires physically checking your computer, the Power Supply Unit (PSU) is critical for system stability.
- Turn off and unplug your computer.
- Open the computer case.
- Look for a label on the power supply that provides its specifications.
Effective Tools for Hardware Monitoring
While the above methods give you basic details about your computer hardware, third-party tools can provide additional insights. The following tools are recommended for monitoring hardware performance:
- CPU-Z
- Camomile
- Speccy
- HWMonitor
How to Check PC Specs Without Logging In
To view computer specs without login credentials, restart the machine and press the designated BIOS key during boot-up, commonly DEL, F2, F10, F12, or ESC. Once in BIOS, navigate to find hardware details.
Once in the BIOS, you can navigate through the menus to find information on the computer’s hardware, including CPU type, RAM size, and sometimes even the graphics card. If your machine was purchased after 2016, it’s likely a 64-bit system, as pointed out in this Microsoft Community thread.
Remember that BIOS interfaces differ across manufacturers, so you may need to consult your computer’s manual or search online for specific instructions related to your make and model.
Limitations and Compatibility
Before considering a hardware upgrade, it’s essential to understand that your current components will influence the compatibility of new parts. For example, older motherboards may not be compatible with the newest processors. Always ensure compatibility before making any hardware changes.
FAQ Section
In this section, we address some of the most commonly asked questions that users have when checking their computer’s hardware specifications.
Why doesn’t my CPU match the sticker on my laptop?
You may observe a mismatch between the CPU information in your computer’s ‘System’ settings and the information on your laptop’s sticker. Several factors could contribute to this discrepancy:
- System Update: Your operating system may have updated to recognize new features of your CPU that weren’t initially advertised.
- Manufacturers: Sometimes, the sticker represents a range of possible CPUs, and your specific unit may have one that varies within that range.
- Upgrades: If you or someone else upgraded the CPU, the sticker would no longer be accurate.
How do I update my graphics card driver?
Updating your graphics card driver ensures you’re getting the best performance and support for new software and games. Here are the general steps for updating it:
- Find Your Graphics Card Model: Follow the steps outlined in the ‘How to Identify Graphics Card (GPU)’ section of this article.
- Manufacturer’s Website: Visit the manufacturer’s website (e.g., NVIDIA, AMD) and locate the ‘Drivers’ or ‘Support’ section.
- Download the Driver: Select your graphics card model and download the latest driver.
- Install the Driver: Open the downloaded file and follow the installation instructions. You may need to restart your computer to complete the installation.
How can I find out if my RAM is upgradable?
Before planning a RAM upgrade, you should first determine whether your system can support additional RAM and the specific type required. Here’s how to find out:
- Find Existing RAM Info: Use a third-party tool like CPU-Z or go to ‘System Information’ on your computer to check the existing RAM size and type.
- Check Motherboard Specs: Locate the maximum RAM capacity and supported RAM types in your motherboard’s manual or on the manufacturer’s website.
- Check Open Slots: If you have a desktop, you can open the case to see if you have available RAM slots. For laptops, check the manual or manufacturer’s website for this information.
Summary
By following these added steps along with the initial ones, you’ll gather a complete profile of your computer’s hardware and software. This will aid you in future upgrades, troubleshooting, or if you’re looking to sell your computer.
Feel free to include these sections in your article to offer more comprehensive guidance to your readers.


