If you need to alter your username on your Windows 10 device, perhaps due to a name change or just to personalize your account, you’ve come to the right place. This article specifically provides a step-by-step guide on how to change your user name in Windows 10. By following these instructions, you will be able to change your username using several methods, such as the Settings app, Control Panel, or the Run dialogue box. The guide covers each step in detail, providing clear instructions to make the process straightforward and easy to follow.
Preliminary Insights
Before beginning, it’s important to note that altering your username does not influence your email address or your user folder name. If you’re logging into Windows via a Microsoft account, this modification will permeate through all Microsoft services connected to your account, for instance, OneDrive or Outlook.
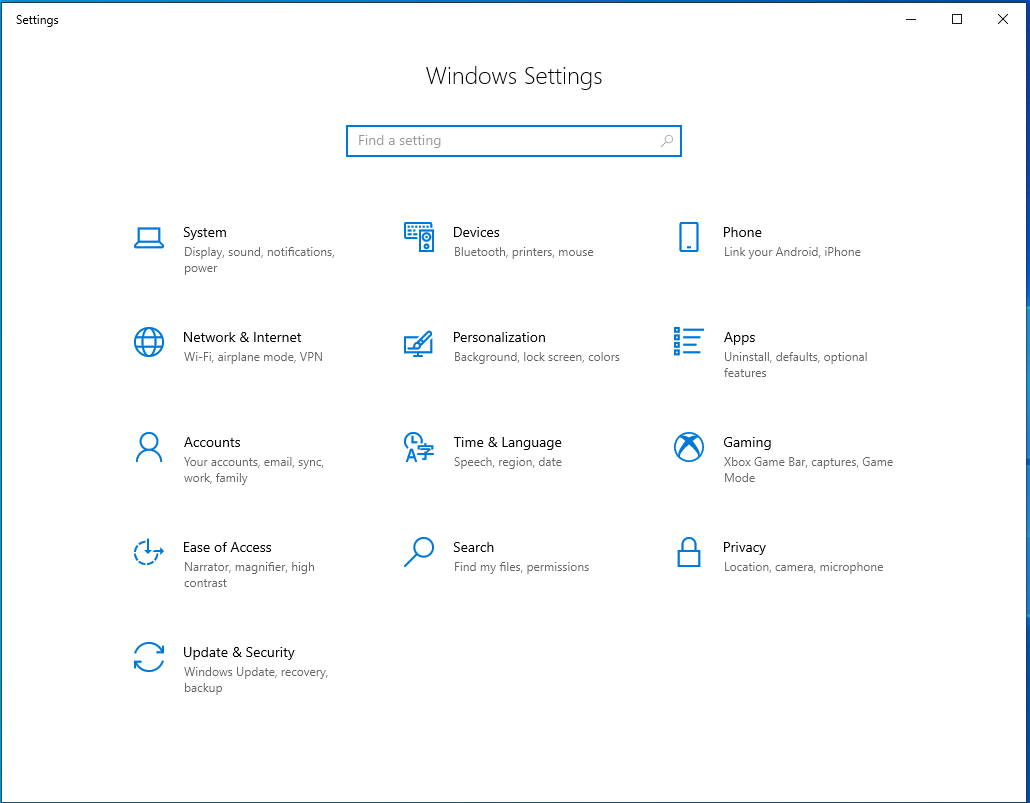
Launching the Settings App
Open the Settings App
- Locate the Start menu, which is at the bottom-left corner of your screen. Click on it.
- Find the gear icon in the Start menu, which represents the Settings app. Click on this gear icon to open the Settings app.

Alternate Methods:
- Utilize the Windows key + I shortcut on your keyboard to open the Settings app directly.
- OR, type “Settings” into the search bar next to the Start menu. Click on the Settings app when it appears in the search results.
- OR, right-click on the Start menu. From the dropdown that appears, select “Settings”.
Accessing Accounts
- Within the Settings app, find and click on the “Accounts” section. This action will display a list of all active user accounts on your Windows 10 device.
For Microsoft Accounts:
- Please note, if you have a Microsoft account, signing in with your Microsoft credentials is necessary before proceeding with the username change.
Important Note:
- Renaming your user account will not have any impact on your files, settings, or other data. Your data remains secure and will still be accessible under the new username.
Updating Your Info
- Once you are in the “Accounts” tab of the Settings app, locate the section titled “Your info”. This section is typically found below your profile picture and display name.
- The “Your info” section includes options for modifying your account details, like your name. Here is where you can alter your Windows 10 account name.

Expert Tip: For smoother PC performance, consider using a PC optimization tool. It handles junk files, incorrect settings, and harmful apps. Make sure it's right for your system, and always check the EULA and Privacy Policy.
Special offer. About Outbyte, uninstall instructions, EULA, Privacy Policy.
Editing Your Account Name:
- If you wish to change your account name, look for the “More Actions” dropdown and select “Edit Profile” from the available options.
- This action will take you to a new page where you can modify your name among other profile details.
- Access Your Microsoft Account: In the “Your info” section, find and click on “Manage my Microsoft account”
Sign in to Your Microsoft Account
- Open Settings: Click on the Windows logo, followed by the gear icon. This will open the Settings app.
- Navigate to Accounts: From the Settings menu, proceed to the “Accounts” section. Then, select “Your account”.
- Access Microsoft Account Settings: Click on the “Manage my Microsoft account” link. This will take you to the main page of your Microsoft account.
- Edit Name: Under your profile picture, you will find an “Edit name” option. Click on this.
- Input New Name: Type in the name you prefer in the designated field.
- Save Changes: Click on “Save” to finalize the changes.
- Restart Your Device: For the changes to take effect, you need to reboot your device.
Note: If you’re currently using a local account, you can switch to a Microsoft account and repeat the above steps.

Adjust Name
Here’s a clear and structured way to change your name on the Microsoft account:
- Access Microsoft Account: Begin by navigating to your Microsoft account.
- Find ‘Edit Name’: Look for the option labeled “Edit Name” and click on it.
- Enter New Names: Proceed to enter your preferred first and last names in the respective fields provided.
- Save Changes: Once you’ve inputted your new name, confirm the change by clicking “Save”.
Note: After modifying your name on your Microsoft account, the new name will reflect on your Windows 10 login screen as well as on any other Microsoft services you use. This change might take a few minutes to fully propagate. For the changes to take immediate effect, consider logging out and then logging back into your account.

Input New Name and Save
To ensure your new username is properly set, follow these steps:
- Access Account Preferences: Begin by opening the account preferences page in your web browser.
- Locate ‘More Actions’: Navigate to the dropdown labeled “More Actions” and from there, select “Edit Profile”.
- Edit Name: On the profile editing page, you’ll see an option to “Edit name”. Click on it.
- Input New Username: Here, you’re able to input your new username. Do this in the “First name” and “Last name” fields provided.
- Confirm Changes: After you’ve entered your new username, confirm your changes by clicking “Save”.
Conclusion
In conclusion, this guide has walked you through the process of how to change your username in Windows 10 using several approaches, including the Settings app, Control Panel, and Run dialogue box. Whether you’re doing this due to a name change or to customize your account, you should now be able to perform this task with ease. Remember, this procedure will not affect your account’s email address, user folder name, or any saved files and settings. If you run into any issues, don’t hesitate to reach out to Microsoft support for assistance. With your new username, your Windows 10 account should now feel even more personalized and secure.
