
Windows 10/11 users have experienced a common issue where their screens briefly turn black, followed by a return to normal display. Some users also observe distortion in the displayed content prior to the black screen occurrence. However, after this temporary disruption, users can continue their work without further interruption.
Now, you may think this is just a result of a glitch or a power outage. However, this isn’t always the case. When the affected users check their event logs, they wonder why they are getting the “Display Driver Nvlddmkm Stopped Responding and Has Successfully Recovered” error.
If you have been in the same situation, fret not. This article is made just for you. Below, we will explore everything there is to know about this error: what it is, what triggers it to appear, and how to resolve it.
What Is Nvlddmkm?
The Nvlddmkm, which stands for Nvidia Windows Longhorn Display Driver Model Kernel Mode, is a Windows display driver. It is a software program that allows Windows to communicate with your display peripheral, which in this case, is created by Nvidia.
Expert Tip: For smoother PC performance, consider using a PC optimization tool. It handles junk files, incorrect settings, and harmful apps. Make sure it's right for your system, and always check the EULA and Privacy Policy.
Special offer. About Outbyte, uninstall instructions, EULA, Privacy Policy.
This display driver tells your monitor how to make images, draw your desktop, and show your open applications. It’s what turns pixels into pictures and videos. Like other device drivers, the Nvlddmkm display driver often encounters issues, and we’ll discuss one particular detail in full detail in the next section.
About the “Display Driver Nvlddmkm Stopped Responding and Has Successfully Recovered” Error?
Nvlddmkm.sys is a Windows kernel-mode driver that handles the use of graphics hardware, such as video cards and displays. When it encounters a problem, it will throw error messages like the “Display Driver Nvlddmkm Stopped Responding and Has Successfully Recovered” error message.
In most cases, users see a black screen for a couple of seconds. But after a few seconds, things get back to normal. It’s as if nothing has happened. That is the reason some of them think it’s just sort of a display glitch caused by an unsecured cable or due to a quick power outage.
To clear things out, let’s tackle the different causes of the error below.
What Causes “Display Driver Nvlddmkm Stopped Responding and Has Successfully Recovered” Error?
This error may occur when your computer system is experiencing incompatibility issues with one or more devices connected to it. The most notorious component that causes this issue is the display adapter. However, there are other possible causes including power issues, overheating, malware infections (such as viruses), etc.
If you’re experiencing the “Display Driver Nvlddmkm Stopped Responding and Has Successfully Recovered” error on your PC, then read on for troubleshooting steps to resolve the issue.
How to Fix “Display Driver Nvlddmkm Stopped Responding and Has Successfully Recovered” Error?
If you are faced with this error message, feel free to try the solutions we have recommended below. You don’t need to try everything. Find one that helps resolve the problem.
Solution #1: Remove the Aura iCUE Plugin
According to some affected users, the error can be triggered by a plugin designed for ASUS motherboards: the iCUE plugin. When the EVGA x1 software program is launched, the error message appears. And then, the screen would turn off for a few seconds and turns on as if a glitch has just appeared.
By removing the Aura iCUE plugin, the issue can be resolved. Here’s how to do it:
- Launch iCUE.
- Go to the Settings tab.
- Navigate to the Vengeance RGB PRO section under Device Settings.
- Tick off the Enable Full Software Control option.
- Check if this resolves the problem.
Solution #2: Change the Power Management Mode
One of the common causes of the error is the power supply. It is possible that less power is being delivered to your video card or display driver, resulting in this problem.
Make sure your display driver is receiving enough power through the hardware by making sure the cables are properly connected. Also, try changing the power settings of your device and see if it makes a difference.
Here’s a detailed guide on how to do it:
- Press the Windows + R keys to launch the Run utility.
- Type control panel into the text field and hit Enter.
- In the Control Panel window, click Large icons.

- Now, select Power Options from the list.
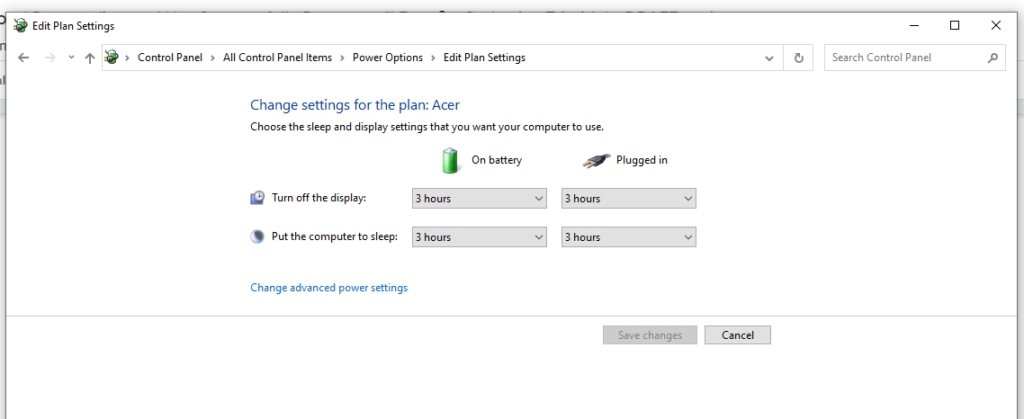
- Go to the Change Plan Settings section.
- Click the Change Advanced Power Settings option.
- Find PCI Express in the list of options. Click on it to expand it.
- Next, find the Link State Power Management Be sure that the options here are set to “Off“.
- Hit the Apply button to save your changes.
- Close Control Panel.
- Restart your computer to apply the changes.
- Check if the error persists.
Solution #3: Update the Display Driver
A display driver is the software program that controls the graphics card and monitors what you see on your computer monitor. Display drivers are needed to make sure your graphics card can properly process all of the information it needs to be able to create a picture for you.
The most common type of display driver used today is called an open-source driver, which means that anyone can download and modify the code if they need or want to. This also means that there are many different versions available with varying levels of quality and compatibility, so it’s important to research which one will work best with your specific hardware before installing anything new onto your system.
As with other software programs, display drivers receive regular updates to fix issues that are plaguing them. Failing to install these updates may often result in errors like the one you’re facing now.
To resolve your display driver not responding problem, try to update your graphics card driver. Here’s how to update display drivers via Device Manager:
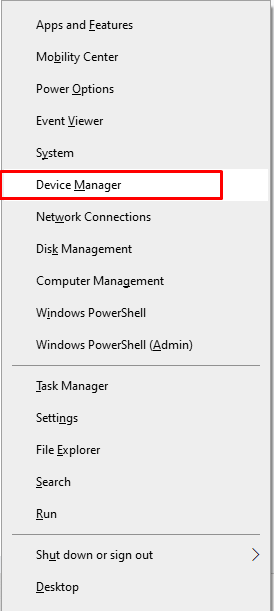
- Press the Windows + X keys together to launch the WinX menu.
- Select Device Manager.
- Go to the Display Adapters section and find the display driver that you are currently using.
- Right-click on it and select the Update Driver Software option to start the update process.
- Wait for the process to complete before restarting your computer.
- Once your computer has successfully rebooted, check if the error still shows.
If you want to update your display driver the easy way, then you can use a third-party driver updater tool. Using such a tool will allow you to prevent compatibility issues. Also, it saves you time by looking for the right driver that works for your computer.
Solution #4: Rollback to a Previous Display Driver Version
Another way to resolve the problem is by rolling back to a previous display driver version. There were two particular display driver versions that were known to cause the issue: 451.48 DCH and 451.67 DCH.
Simply roll back to an older display driver version that was working before the error message appeared. Below is a detailed guide on how to do it:
- Go to the Start menu.
- Select Device Manager and click on the topmost result.
- Navigate to the Display Driver section and find your current display driver version.
- Right-click on it and select Properties.
- Open the Driver tab.
- Hit the Roll Back Driver button.
- Choose a reason why you want to roll back to a previous driver version.
- Click the Yes button to confirm your action.
- Restart your computer to apply the changes.

Solution #5: Uninstall and Reinstall Your Display Driver
If rolling back to a previous driver version does not work, try to uninstall then reinstall it. Uninstalling and reinstalling your display driver is quite a straightforward process. Just follow the instructions below:
- Press the Windows + R keys altogether to launch the Run utility.
- Type devmgmt.msc into the search field. Hit Enter.
- Click on the most relevant search result.
- Find the Display Adapter section and double-click on it to see a list of devices in that category.
- Right-click on the problematic display driver you want to uninstall.
- Select Uninstall.
- Once the display driver has been uninstalled, what you want to do next is to reinstall it.
- Visit the official manufacturer’s website of your display driver. Make sure you know your computer’s serial number, make, and model. You can check this by typing winver into the search field and hitting Enter. This will display a window that contains your computer information.
- Now, on the manufacturer’s website, find the display driver model that matches your computer’s requirements.
- Download and install it.
- After the installation process, restart your computer.
- Upon reboot, see if the error persists.
Solution #6: Replace Your Graphics Card
Make sure that you get your graphics driver from your device manufacturer. Most devices have OEM or Original Equipment Manufacturers graphics cards. This means installing other incompatible graphics cards may affect your device’s performance.
To replace your display driver with a new one, do the following:
- Turn off your computer.
- If you are using a desktop, make sure to switch off the power supply as well.
- Remove the side panel of your CPU by carefully removing the screws.
- Find the PCI-e slot clip.
- Slowly remove your GPU by pulling out the card.
- Insert the new graphics card over the PCI-e slot.
- Carefully push down the graphics card to slide its connection into the slot. Make sure the lock clicks to secure it.
- Screw the rear bracket again.
- Reconnect any PSU cables you may have removed.
- Reattach the side panel.
- Power on your computer and see if it works.
Solution #7: Change Your Computer’s Theme
If you have installed and used the Windows 10/11 Aero theme, you might want to change it. According to some affected users, this theme is known to trigger the error. It’s even known to cause the Discord black screen error on Windows 10/11.
To change your computer’s theme, right-click on your desktop and go to Properties. And then, select another theme except for the Aero theme.
Solution #8: Install Any Available Windows Update
Updates and patches are a necessary part of the computer world. Windows updates, for example, fix bugs in the operating system, improve security features and more. These updates can be downloaded automatically through Windows Update or manually by downloading them from Microsoft’s website.
Below, we give a step-by-step guide on how to get an update on your computer:
- Go to the Start menu and select Settings.
- Choose Update and Security.
- Select Windows Update.
- Click the Check for Updates button.
- Wait for the update to be installed.
- Once done, restart your computer.
Solution #9: Remove and Replace Your Device’s RAM
A computer’s RAM, or Random-Access Memory, is a key component of every device. Without it, the computer would not be able to function at all. A computer’s RAM operates as both a workspace and temporary storage for programs running on the system. As its name implies, this type of memory can access data randomly which allows it to pull information from different places quickly without having to wait to process one file before looking for another.
Ultimately, this is what keeps your machine running smoothly so that you get a quick response when typing something or opening an app on your phone or tablet. If anything goes wrong with the RAM, users may encounter error messages like the “Display Driver Nvlddmkm Stopped Responding and Has Successfully Recovered.”
Most of the time, if a problem is encountered by the RAM, replacing it will do the trick. But if you are not that tech-savvy, we highly discourage not replacing the RAM on your own. Let professionals do the hard work for you.
Solution #10: Invest in Better Cooling Devices
One trick that worked in resolving the error involves using cooling components. In some scenarios, the issue is a result of overheating. So, installing new fans or considering other computer cooling hacks have resolved the problem.
Solution #11: Install the Default Graphics Drivers
Problematic display drivers are also among the known causes of this error. In case you don’t know, drivers are the primary driving force behind most hardware components connected to your device. Once they become corrupted or they are outdated, they can cause various error messages to appear.
Sometimes, if a display driver is problematic, installing the default versions can resolve the issue. Here’s a detailed process on what to do:
- Boot your computer into Safe Mode.
- Once in Safe Mode, right-click on the Windows menu and select Device Manager.
- Next, expand the Display Adapters section and right-click on your display hardware component.
- Choose Uninstall Device. A pop-up menu will show asking you to confirm your actions. Hit OK to proceed.
- Restart your device and see if the problem has been fixed. If not, proceed to the next step.
- Go back to the main Device Manager window.
- Select Update Driver.
- Choose the Search Automatically for Updated Driver Software option.
- Wait as Windows finds a display driver that is compatible with your device.
- Restart your computer once again and check if the issue is gone.
Solution #12: Add Registry Keys
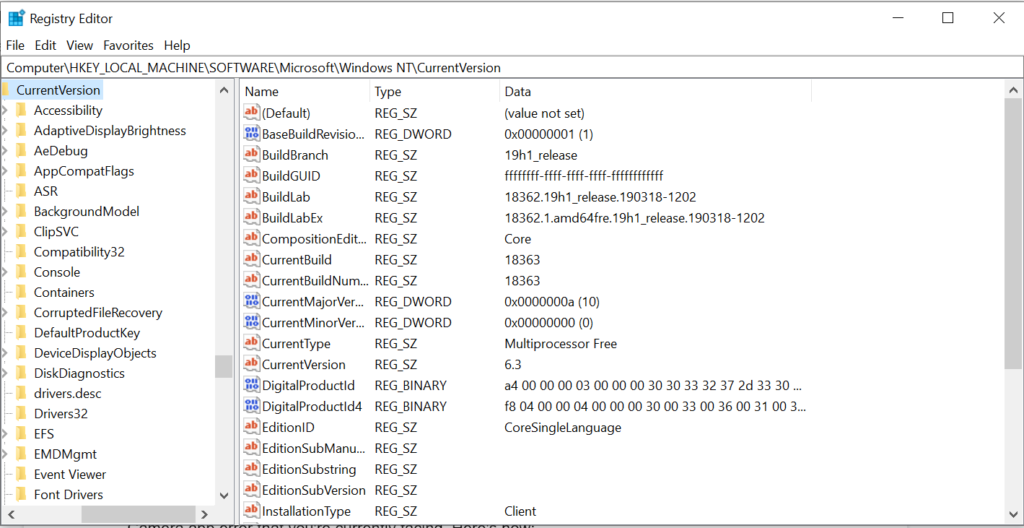
If none of the above solutions worked for you, try adding two registry keys to this location: HKEY_LOCAL_MACHINE/SYSTEM/CurrentControlSet/Control/GraphicsDrivers.
But before you make any changes to the registry, it is recommended that you back it up first. The Windows registry is a system that stores configuration data for the software on your PC. The registry contains every setting and option available to you, including how often your computer should restart automatically after a crash, what type of security mode it operates in, and which browser it uses by default. So, if anything wrong happens to this, expect to experience a more serious problem.
Assuming you have already backed up your registry, here’s how to add display driver keys:
- Press the Windows + R keys at the same time. This will open the Run utility.
- Into the text field, type regedit and hit OK. This launches the Registry Editor.
- Find this location and click on the folder: HKEY_LOCAL_MACHINE\SYSTEM\CurrentControlSet\Control\GraphicsDrivers.
- Navigate to the right pane and go to the Edit menu.
- Right-click on any blank space.
- Hit New and select DWORD (32-bit) Value or QWORD (64-bit) Value, depending on your system architecture.
- Type TdrDelay under the Name value.
- Hit Enter to proceed.
- Next, double-click on the newly created key and input 20 for the Value Data option.
- Repeat steps 5 to 9. But this time, name the DWORD key TdrDdiDelay and add 20 for the Value Data.
- Restart your computer to apply the changes.
Conclusion
The “Display Driver Nvlddmkm Stopped Responding and Has Successfully Recovered” error is quite generic and may be triggered by different factors. If none of the above solutions worked, take your device to a technician. It is possible that your computer has a different configuration. A certified and authorized technician can inspect your computer and be able to pinpoint the cause.
Now, if you feel you are up for the exciting troubleshooting journey, then do not hesitate to use our guide. Remove any unnecessary plugins, change the power settings of your computer, update your drivers, install the latest Windows updates, invest in new hardware components, or even play around with your registry. As long as you follow the instructions carefully, there should be no problem.
Let us know if you have encountered the same error before. How did you resolve it? Write your comments below.