
Windows 11 users may face the Valorant Error Code Van 1067, which can occur during or after installation. Fixing this frustrating error requires some technical knowledge.
Lucky for you, there are quite a few ways to resolve this issue so that you can get back to enjoying Valorant again!
What Is Valorant?

Valorant is a third-person shooter video game that was released in November 2004 for Xbox and PlayStation 2. Players are able to create their own maps for additional content. It features two campaigns, played from a first-person perspective. Each campaign features three difficulty levels: Easy, Normal, and Hard.
Expert Tip: For smoother PC performance, consider using a PC optimization tool. It handles junk files, incorrect settings, and harmful apps. Make sure it's right for your system, and always check the EULA and Privacy Policy.
Special offer. About Outbyte, uninstall instructions, EULA, Privacy Policy.
There are seven weapons available in both campaigns, including a pistol, machine gun, shotgun and rocket launcher. The other four weapons – grenade launcher, flamethrower, sniper rifle and plasma gun – are only available in single-player mode.
Multiplayer mode allows players to play as either humans or aliens (the latter being playable only via cheat device). There are five multiplayer modes available: Deathmatch (Free For All), Team Deathmatch (Team vs Team), Capture The Flag (Capture The Flag), Assault (King of the Hill) and Siege (Domination).
In addition to the standard multiplayer mode, there is also a cooperative mode called Survival, where players must fight off increasingly difficult waves of enemies together; each wave gets progressively harder until all players die.
What Causes Valorant Error Code Van 1067 on Windows 11?
The error code van 1067 on Windows 11 is generally caused by TPM 2.0 and Secure Boot not functioning or turned off properly. These two components usually malfunction when disabled or having problems. Normally, when this issue appears, you have no choice but to exit the game.
Another possible reason you are seeing the Valorant TPM 2.0 error on Windows 11 is that you are using an outdated Windows or Discord version. In this case, updating Windows and Discord will get rid of the problem.
How to Fix Valorant Error Code Van 1067 on Windows 11
Follow these simple steps and your problem with the Valorant Windows 11 TPM 2.0 error will be solved in no time. If you’re not an advanced user, make sure to first backup all of your files before moving forward.
Fix #1: Uninstall and Reinstall Valorant
The Valorant error code van 1067 on Windows 11 may be triggered by a faulty or outdated version of the game. To confirm whether or not this is your problem, you need to uninstall then reinstall Valorant.
For most programs on Windows 11, uninstalling should be easy. Simply do this:
- Go to Control Panel and select Programs. Next, choose Uninstall will do.
- If that doesn’t work, try checking online for specific instructions. Many Valorant players share hacks and tactics on how to uninstall the game effortlessly.
- If you’re still having problems after trying both of these solutions (and restarting your computer in between), there may be something more at play.
Fix #2: Check for Recent Valorant Game Updates
As with Windows, game manufacturers also roll out regular updates to resolve bugs, glitches, and errors reported by users. So, if you have been playing Valorant for months now, make sure to update it.
If you don’t know how to run an update, simply follow these steps:
- Open My Computer (Windows 8) or This PC (Windows 7).
- In the window that opens, locate your main hard drive where you installed Valorant.
- Then right-click and select Properties.
- Now, go to the Games tab and check if any new updates are available.
- Click the Refresh button and wait until it checks for updates. It will automatically update once they are available.
Fix #3: Run System File Checker (SFC)
Do you think corrupted or missing system files are causing the error? Then run a scan of your computer’s system files using the SFC repair tool. To perform an SFC scan, refer to the SFC guide below:
- Type Command Prompt into the Start Search and right-click on Command Prompt. Make sure to choose Run as administrator.
- In the black box that appears, type: sfc /scannow .
- When finished, reboot your computer.
- Note: If no errors are found, restarting your PC will be sufficient for repairing most problems (though not all). If errors are still present after rebooting, try other fixes.
Fix #4: Update Your Graphics Drivers
Graphics drivers are software that allows your computer to communicate with its hardware. If an old driver is in use and you’re having problems, try updating to see if that fixes it.
Most of the time, graphics drivers come bundled in a package deal with other drivers so make sure to update them all. The easiest way to update graphics drivers is to use your computer’s built-in update mechanism—located in Control Panel under Device Manager—and then choose Update Driver Software. However, if you don’t want to go through Microsoft’s website or be forced into installing other unnecessary drivers, there are alternatives like GeForce Experience (which requires signing up for free) and Nvidia’s own Download Center.
When updating your drivers manually, be sure to choose those from official websites only – malware and malicious programs tend to target outdated software. For added security and safety, get updates from well-known software vendors such as Intel and AMD.
Fix #5: Scan for Malware
Since Window error codes like Van 1067 are most often caused by malware or other software bugs (though there are some exceptions), one of your first troubleshooting steps should be scanning for malware. The best way to do that is with an antivirus scan.
If you already have antivirus software installed and configured, give that a try before going out and buying more security software. There are plenty of free options out there—you can even check if your browser has built-in antivirus features—and running multiple programs at once isn’t always ideal.
You can even use Windows Defender to perform a quick scan and find threats that may be causing the error to show up.
Fix #6: Restore Backups
Fixing the error code van 1067 can be frustrating and time-consuming. But if you are in a hurry, restoring a previous backup will bring your computer back to normal instantly. If you’re using Time Machine or another data backup application, then make sure your last known good backup is restored (that way if something goes wrong again, you won’t lose any files).
If not, then download one of our free professional-grade backups. Either way, restoring your backups should quickly resolve van 1067 errors.
Fix #7: Disable Your Antivirus Software
If your antivirus software is interfering with Windows 11 updates, it could be causing problems like the Van 1067 error. But don’t worry; it’s an easy fix. All you need to do is disable your antivirus software and reboot your computer. Once that’s done, run windows update again. For most antivirus software packages on Windows 11, all of these settings will be found in a different place but just look around until you find them.
- Now, if you are using Windows Defender, the below steps can be used instead.
- Go to Control Panel > System and Security > Administrative Tools.
- Double-click MSE then go to the Action Center tab.
- Click Change Action Center Settings. On that window, check Disable system scanning and use the notifications only box then press the Save Changes button.
- When done restart your PC once again but before doing that make sure you disconnect the internet connection from the PC if it’s connected via LAN or WIFI.
Fix #8: Clean Boot Windows
Try doing a clean booting before proceeding with the next fix. Here’s how:
- Shut down your computer.
- Press and hold down F8 when your computer restarts. Continue holding F8 until you see a menu of options.
- Use your arrow keys to highlight Safe Mode or Safe Mode with Networking, then press enter.
- Restart.
- If all goes well, use Internet Explorer and search Google for Valorant error code van 1067. Under these circumstances, there are usually some fixes that people have worked out.
Fix #9: Restart the VGC Service
There are services in Windows that play a critical role in certain applications and programs. And for Valorant, the VGC service is one. If this service is stuck or having problems, it can result in the Van 1067 error. To fix problems with the VGC service, simply restart it. Here’s how:
- Press the Windows + R keys to launch and access the Run applet.
- Into the blank field, type services.msc.
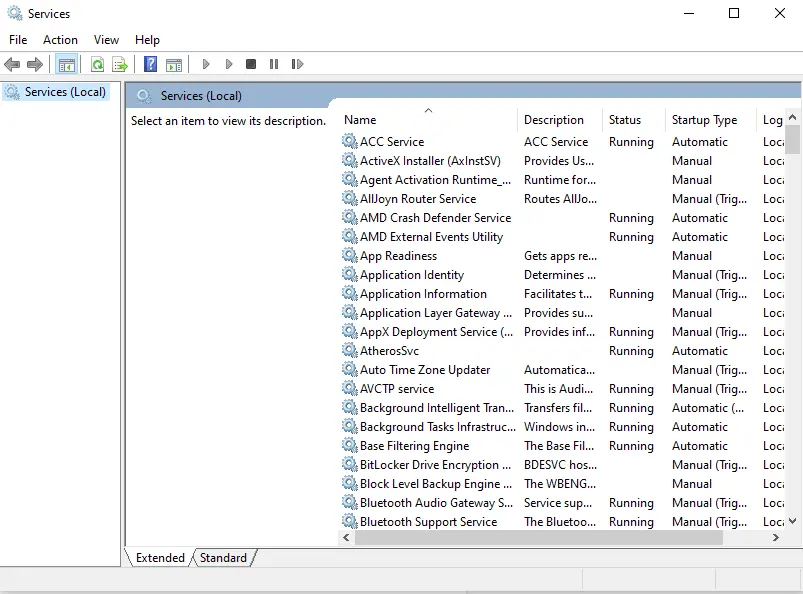
- Then hit OK to launch the Services window.
- Now, find VGC and double-click on it.
- On the menu that appears, select Start.
- Lastly, set the Startup type to Automatic and save your changes by hitting Apply then OK.
Fix #10: Enable TPM 2.0 and Secure Boot
This may be a challenging and technical fix, but it’s definitely worth a try since many affected players have resolved the error by doing this. Here’s how to enable TPM 2.0 and Secure Boot on Windows 11:
- Press the Shift key while restarting your PC. This will reboot Windows 11 to Windows Recovery Environment.
- Select Troubleshoot and click Advanced Options.
- Then choose UEFI Firmware Settings.
- Navigate to the Security tab and find the Trusted Platform Module (TPM) option. Enable it.
- Next, find Secure Boot and enable it, too.
Fix #11: Check for Available Windows Updates
Installing pending Windows updates may also resolve the error at times. Here’s how to install these updates:
- Press the Windows key on your keyboard and type Check for Updates into the search field.
- Then select the top-most result.
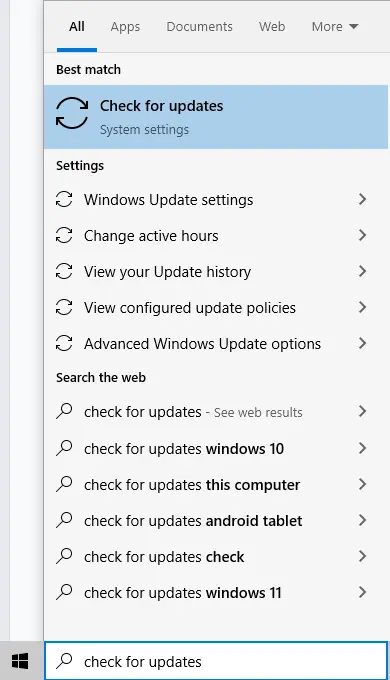
- A window will now open showing if there are pending updates that need to be installed.
- Proceed to install them and reboot Windows.
Fix #12: Disable Discord
Disabling Discord may also do the trick. To disable Discord, here are the steps:
- Launch Discord and open the Settings section.
- Click Windows Settings.
- Toggle off the switch next to Open Discord.
- Close the window and restart your device.
Fix #13: Free Your System of Space Hogs
As you use your device every day, cache files are created. These are temporary files that your device downloads and stores in your system to save time in the future. For instance, when you go to a website, your browser will automatically download the media files on that page and save them in a cache folder. The next time you visit them, your system will just pull up these files to save time.
But as you can see, these cache files are not really necessary. And sometimes, they only consume space that could have been used for more important files. Worst is that they may cause errors as they intervene with important processes.
That is why we suggest deleting them regularly. Sure, you can do this manually. However, that can be time-consuming. We recommend using a third-party PC repair tool instead. This way, you don’t miss out on anything.
Fix #14: Perform a System Restore
In some cases, System Restore might come in handy and fix your problem. However, the problem with System Restore is that, sometimes, computer errors are caused by corrupted files. So, if you restore to an earlier point in time before those corrupted files were installed, then they’ll be reinstalled and will likely cause more problems. Therefore, we suggest using System Restore as a last resort.
Should you wish to perform a System Restore, follow these steps:
- Press the Windows Start button and type control panel into the blank field.
- Select the top-most result.
- Next, navigate to the Recovery section and click Open System Restore.
- Hit Next.
- Then choose a restore point. Ideally, you have to choose a restore point that was created before the error appeared.
- Once you have selected a restore point, hit Next then Finish.
In Summary
Windows 11 has been out for just over six months now, and while it’s generally been well-received by consumers, it seems that the upgrade to the new operating system isn’t without its problems. One error you may be seeing right now is Valorant error code Van 1067. Fortunately, this issue has straightforward solutions and fixing it just takes a little know-how and some patience.
Have you encountered the Valorant error code van 1067 before? How did you fix it? Let us know below!