
If you’re using a Mac, then you probably use the default web browser, Safari, most of the time. And if you’re a Windows user, you likely prefer the built-in Microsoft Edge browser.
But even though these browsers are the default for their respective operating systems, nothing beats Google Chrome. It is the most popular web browser that can be used on both Macs and PCs, as well as mobile devices.
Chrome is a free web browser officially introduced by Google last December 11, 2008. It is a feature-packed browser designed for speed and functionality. Its features include synchronization with all your Google services and accounts, automatic translation, tabbed browsing, and spell check of web pages. It also has an integrated address bar or search bar, called the omnibox, for hassle-free searching.
Chrome works seamlessly with Google websites and services, such as YouTube, Google Drive, and Gmail. It also handles its system resources differently compared to other browsers. It is equipped with a V8 JavaScript engine that was developed from scratch by Google. This technology improves the user experience on heavily scripted web pages and applications. It is the reason why the things you do on the internet are faster.
Expert Tip: For smoother PC performance, consider using a PC optimization tool. It handles junk files, incorrect settings, and harmful apps. Make sure it's right for your system, and always check the EULA and Privacy Policy.
Special offer. About Outbyte, uninstall instructions, EULA, Privacy Policy.
Google Chrome offers extensive customization options, allowing users to control their user experience to a level that most other browsers don’t. This is largely thanks to Chrome extensions. A Google Chrome extension or add-on is a software modifier that can do a lot of things for you. It can block ads, manage your browser’s theme, translate languages, and so much more.
Chrome might seem like a simple browser on the surface, but it can be a tool that’s both powerful and easy to use once you customize it with extensions.
If you want to set Google Chrome as your default browser on your Windows computer, here’s what you need to do:
The instructions for setting Google Chrome as your computer’s default browser will differ slightly depending on which Windows version you are using.
For those using Windows 8 or older:
- Click the Start menu located at the bottom of the screen.
- Click Control Panel > Programs.
- Select Default Programs > Set your default programs.
- On the left-hand menu, select Google Chrome, then tick off Set this program as default.
- Click OK to apply your changes.
For those using Windows 10/11 or later:
- Click the Start menu represented by the Windows logo.
- Click Settings or the gear icon.
- Click either System or Apps, depending on whether you’re running the Original or Creators version of Windows.
- Choose Default apps.
- Under Web browser, click your current browser.
- In the Choose an app screen, click on Google Chrome to set it as your default browser.
What Is ERR_CONNECTION_REFUSED Error in Chrome?
There are various types of Google Chrome browser errors that occur when a user is connecting to the internet. One of the more popular errors users often encounter is the connection closed issue that pops up in the browser with the “Err_Connection_Closed” or “Err_Connection_Refused” notification.
This problem generally happens in Chrome when there are invalid configurations in the network devices or there are mismatched server certificates that cause this error. Fortunately, there are several ways to fix the connection refused error by following the simple steps instructions listed in this article.
Chrome shows the “Err_Connection_Refused” error message, indicating that the site can’t be reached due to several reasons. It won’t be possible for you to continue with what you’re doing when this message pops up on the browser.
When you go to a website using the Google Chrome browser and encounter this error message, it indicates that your attempt to connect was refused. This error message also appears in other browsers, but in different forms.
You might encounter a similar message saying “DNS_PROBE_FINISHED_NXDOMAIN” error on Chrome, a DNS error that signals the requested domain name does not exist.
This also happens on Mozilla Firefox, but you will see the “Firefox can’t establish a connection to the server at domain.com” error instead. In Microsoft Edge, it will simply show as “Hmmm… can’t reach this page. Make sure you’ve got the right web address: domain.com.” This isn’t very helpful.
What Causes ERR_CONNECTION_REFUSED Error in Chrome
The ERR_CONNECTION_REFUSED error can be triggered by a wide range of factors. It can sometimes be caused by a server-related problem, instead of an issue with your attempt at connection. This is usually nothing serious and can be easily fixed by reloading the webpage. It could also simply be the result of incorrect server or firewall settings. In rare cases, it can be a sign that something has seriously gone wrong, such as a malware infection or unexpected downtime. But most of the time, an unreliable internet connection is usually the culprit behind this error.
As with most error messages, the ERR_CONNECTION_REFUSED notification lets the user know that something has gone wrong without bothering to elaborate on why it happened. This means that it’s up to the user to find and resolve the root problem.
So if you’re one of those unlucky users who encountered this error, we’ve listed down the steps to make it easier for you to troubleshoot.
How to Fix ERR_CONNECTION_REFUSED Error in Chrome
Although the range of potential triggers of this error can make troubleshooting quite tricky, it is definitely possible to resolve the ERR_CONNECTION_REFUSED error. We’ll walk you through some of the steps you can take, starting with the methods that are most likely to work.
Fix #1: Check whether the website is down.
 The first thing you should do is to check the status of the website you are trying to visit. As mentioned earlier, the ERR_CONNECTION_REFUSED issue can sometimes be caused by the website’s server, instead of your own internet connection.
An easy way to check whether this is the case is to check out another web page. If you see the same error message, then the problem most likely originates from your end. If the other page loads just fine, then the first website was probably at fault.
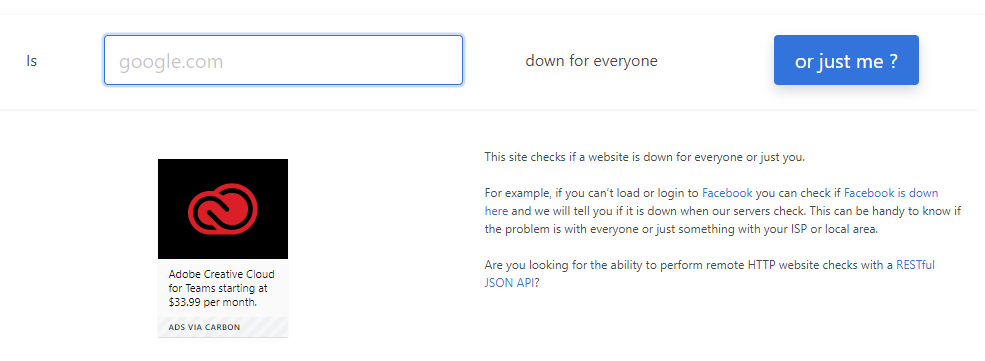
You can also use the Down For Everyone Or Just Me website to check. Simply enter the address of the page in question, then click on Or just me? button. This tool will then check whether the page or website is offline or online. If the page is down, the only thing you can do is wait for the web admin to get it fixed. But if the page is up and is still not working for you, you need to do some further troubleshooting.
Fix #2: Restart your router.
The next step is a tried-and-tested method for resolving many internet-related issues. Try to jumpstart your internet connection by turning the router off and back on again. Keep in mind that restarting your home or office router may or may not work, but the process takes just a few minutes so it’s no big deal. It’s more than worth a try when you encounter a potential internet connection issue.
To do this, you need to physically disconnect the power supply to your router. Unplug it from the power supply and wait for about 30 seconds or a minute before plugging it back in. After the router has restarted, try to visit the page that returned the error using your browser. If it loads, then good for you. If not, there’s probably another factor at play.
Fix #3: Clear your browser’s cache.
Like any other internet browser, Google Chrome stores information in its cache on your device. The data stored includes browsing history, saved login details, and cookies. All these are saved in order to load the web pages more quickly the next time you visit them.
Browser cache is useful, but they can cause numerous problems when they become outdated. This is because the cached version of the page you visited may no longer match the current version. This problem can be easily fixed by clearing your cache.
But before you proceed, you need to check first if it is indeed a browser cache issue. You can do this by launching your browser in incognito mode. Or maybe try a different browser. If you’re still facing the same error, then you can proceed with clearing your cache.
 To clear your browser’s cache, follow the steps here:
- Begin by clicking Chrome’s primary menu found in the top-right corner of your browser window. From there, click More Tools.
- Click on Clear browser data.
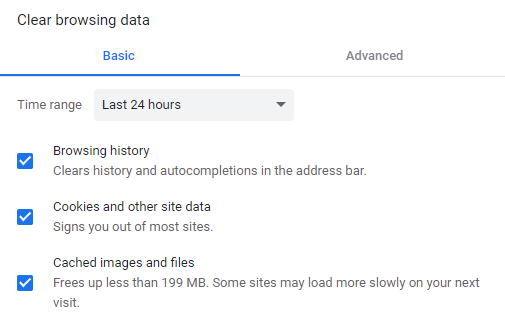
- On the next page, make sure to select all listed file categories. If they aren’t selected, Chrome will not be able to delete the entire cache. Instead, it will just remove the most recent entries.
Another method of clearing the cache is by copying and pasting the following URL into your address bar: chrome://settings/clearBrowserData
The next screen should give you access to the same options we’ve mentioned above.
Fix #4. Edit your proxy settings.
With online security threats always on the rise, more and more users are now turning to individual solutions to protect their sensitive information. And a common method of ensuring online security is with the use of proxy servers.
A proxy allows users to go online under a different IP address. The proxy acts as an intermediary between your browser and the websites you visit. It also keeps your IP address private and filter cache data and server communications.
Just like caching, using a proxy server has its benefits, but it can also trigger the ERR_CONNECTION_REFUSED problem. For instance, the web server you are trying to access might reject the IP address given by the proxy server, causing it to reject the connection request.
It is also possible for the proxy to be offline or incorrectly configured. So, if the error message in question occurs, it’s a good idea to check out your proxy settings.
Google Chrome comes with its own proxy section, making this step a very simple process. After all, you don’t want to be spending so much time searching for the right tools in your browser.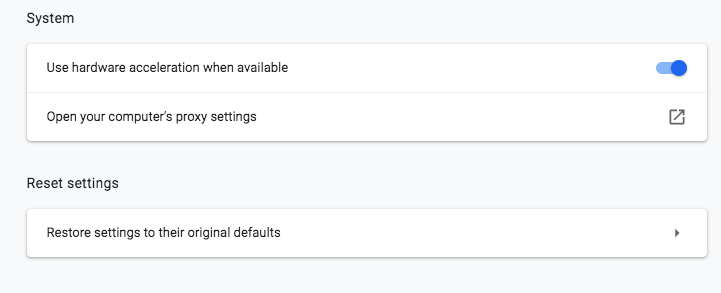
To get started, open the Settings menu in your Chrome browser by clicking the three vertical dots on the upper-right corner of the screen. This should open up the complete menu of options. Click Advanced from the left menu of the Settings page.
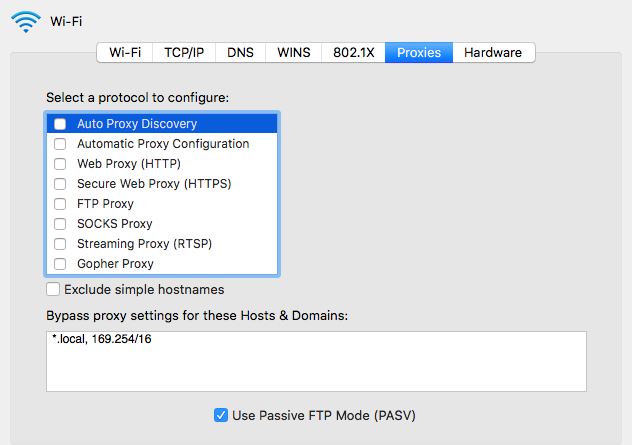
Click the System section from the contextual menu, then click on Open your computer’s proxy settings. If you’re using a Mac, you should see this window open up:
 If you’re using Windows, this is what you’ll see:
The next step depends on the operating system your computer is currently using.
For Windows users:
- Click on LAN Settings.
- Uncheck the Use proxy server for LAN option.
For Mac users, you should find yourself immediately in the relevant menu. Next, uncheck all proxy protocols available, then save your new settings. Then, check to see if the ERR_CONNECTION_REFUSED message has been fixed.
Fix #5. Disable Firewall and Antivirus temporarily.
Firewalls and antivirus programs are designed to protect users and their systems. They scan your computer regularly and automatically stop or block suspicious activities. But there are times when this type of advanced security can lead to connection issues.
This is because firewalls work by blocking the connection to pages that you don’t need to, or block content that is completely unsafe. To find out whether this is the case for you, try turning off your firewall and antivirus software temporarily while you’re trying to fix the issue. Of course, this is only recommended if you know for sure that the website you’re trying to visit is safe. If you’re not sure about the safety of the webpage you’re trying to access, then it would be better to skip this step and move on to the next method.
And more importantly, you should only disable your security software temporarily. Don’t forget to turn it back on after you’re done checking to see whether the issue has been resolved, so your computer doesn’t become vulnerable to online threats. If you continue to encounter errors because of your firewall or antivirus program, you might want to consider modifying your firewall settings or switching to a different security software.
Fix #6: Clear your DNS Cache.
This step is somewhat an extension of the earlier troubleshooting steps. If the previous methods don’t resolve the issue for you, your next task is to clear your DNS cache. Most users are aware that their browser creates a cache, but not as many know that operating systems, such as Windows and macOS, do the same thing.
For instance, your DNS cache might contain all of the temporary information you’ve entered for pages that you visited with your browser. These entries include key information related to the domain names and URLs of the pages you’ve visited. The purpose of this type of cache is similar to that of others. It is designed to accelerate the loading process of your browser, as it eliminates the need to connect to a site’s DNS server repeatedly. This helps save you time in the long run. The problem is that you might encounter some short-term issues, including the ERR_CONNECTION_REFUSED error.
If the stored entry does not match the current version of the website it tries to connect to, technical issues like the ERR_CONNECTION_REFUSED error are not unusual. Fortunately, clearing your DNS cache should do the trick. Again, the process of clearing the cache depends on your operating system.
For Windows:
- Open the Start menu by pressing the Windows key.
- Type in CMD in the search box and press Enter to open the Command Prompt.
- In the Command Prompt window, run the following commands, then press Enter after each line:
- ipconfig /flushdns
- ipconfig flush dns
- ipconfig /flushdns
Once done, you should see a confirmation that the system has successfully flushed the DNS resolver cache.
For macOS: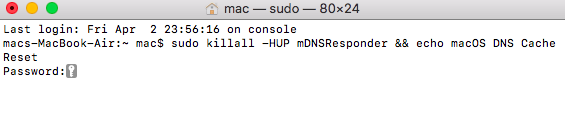
- On a Mac, you’ll need to click Go in the Finder toolbar, then Utilities. Alternatively, you can press the Shift-Command-U shortcut to open the Utilities folder.
- Click on Terminal.
- In the Terminal window, run the following commands then hit Enter after each line. You will need administrator access to do this.
- sudo killall -HUP mDNSResponder && echo macOS DNS Cache Reset
- Clear DNS cache Mac
- Clear DNS cache Mac
- Type in your admin password when prompted and wait for the process to be completed.
Once you’ve done that, try accessing the problematic website again to see if it is working now. If not, your DNS might require some more attention.
Fix #7: Edit your DNS address.
As mentioned above, an outdated DNS cache entry is a possible cause of various issues, including the ERR_CONNECTION_REFUSED notification. But the DNS address itself can also be the culprit behind these kinds of problems. This is because the address can easily become overloaded or even go completely offline.
In most cases, the DNS server address is automatically assigned by the internet provider. But, you have the option to change it if required. How you’ll accomplish this will again depend on your computer’s OS.
Let’s look at how you can edit your DNS address on a Mac.
- First, open up System Preferences by clicking the Apple menu and choosing this option from the dropdown.
- In the System Preferences screen, choose the option marked Network.
- Click on Advanced.

- From there, choose the DNS tab located at the top of the screen.
- To add a new DNS server, just click on the + button.
- To edit an existing DNS server, double-click on the DNS IP address you wish to change.
- You can try to temporarily change this address to a public DNS server, such as Google or Cloudflare.
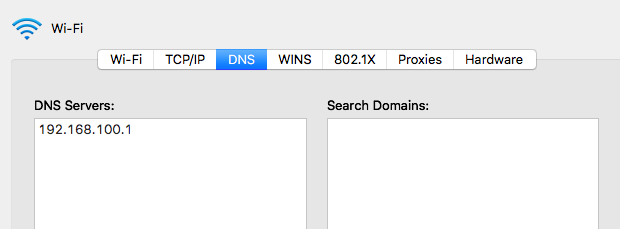
Some users prefer to use Google’s public DNS (8.8.8.8 and 8.8.4.4) permanently because they are more reliable. Other options include Cloudflare’s secure and free DNS (1.1.1.1 and 1.0.0.1).
If you’re using Windows, there are three methods to change the DNS settings.
Using Control Panel
- Open Control Panel.
- Click on Network and Internet > Network and Sharing Center.
- Click Change adapter settings in the left menu.
- Right-click on the network interface that connects Windows to the internet, then choose Properties.
- Tick off the Internet Protocol Version 4 (TCP/IPv4) option.
- Click Properties.
- Click Use the following DNS server addresses. When you choose the option to specify the DNS settings manually, the computer will continue to receive the TCP/IP address from your router.
- Type in your Preferred and Alternate DNS addresses.
You can also use Cloudflare, Google Public DNS, or Cisco OpenDNS by entering these addresses:
- Cloudflare: 1.1.1.1 and 1.0.0.1
- Google Public DNS: 8.8.8.8 and 8.8.4.4
- OpenDNS: 208.67.222.222 and 208.67.220.220
Once you’ve completed the steps, your PC will immediately restart using the new DNS settings that you specified.
Using Settings
- Open Settings > Network & Internet.
- Click on Ethernet or Wi-Fi depending on your connection.
- Choose the connection that connects Windows 10/11 to the network.
- Under the IP settings section, click Edit.
- In the Edit IP settings dropdown, select the Manual option.
- Toggle on the IPv4 switch.
- Confirm your Preferred DNS and Alternate DNS addresses.
Using Command Prompt
- Open Start and launch an elevated Command Prompt window by selecting the Run as administrator option.
- Type in the following command and press Enter: netsh
- Type in the following command to identify the names of the network adapters, press Enter: interface show interface
- Type in this command to set the primary DNS IP address, then press Enter: interface ip set dns name=”ADAPTER-NAME” source=”static” address=”X.X.X.X” Change ADAPTER-NAME with the name of your network adapter and and change X.X.X.X with the IP address of the DNS server that you want to use.
- Type in this command to add an alternative DNS IP address, then press Enter: interface ip add dns name=”ADAPTER-NAME” addr=”X.X.X.X” index=2. Change ADAPTER-NAME with the name of your network adapter and and change X.X.X.X with the IP address of the DNS server that you want to use.
Once you’ve completed these steps, your PC will restart using the new DNS server addresses to resolve the issue.
But if you’re already using a free DNS server when you encounter these issues, removing them and defaulting back to your ISP’s DNS servers can sometimes fix things. Free DNS servers aren’t always perfect and switching back can resolve the issue. You can then attempt to access the website again.
Fix #8: Disable your Chrome browser extensions.
Installing extensions can contribute to a more comfortable and well-rounded Google Chrome experience. The different extensions can add key features and help automate complex processes.
However, most of the extensions available for Google Chrome are not actually developed by the browser’s developers. They are usually created by third party developers for the Chrome browser. This means that there’s no guarantee they’ll work as intended or that they will be regularly updated over time.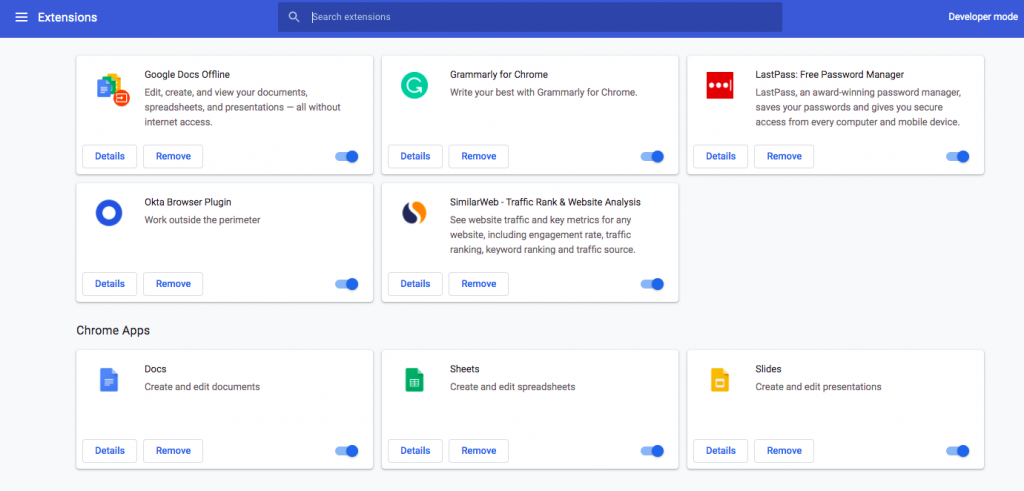
Faulty or outdated extensions are most likely to cause various issues, including the ERR_CONNECTION_REFUSED error. For this reason, it is important to regularly check the extensions that are installed on your browser.
To do that, first open the Extensions menu by clicking the Chrome browser menu, then choosing More Tools > Extensions. Look at each of the installed extensions and start deliberating whether you actually need each one. If an extension is not being used or is no longer necessary, you can just remove it.
Next, determine if each extension that you want to keep is updated. Ideally, every extension should have been updated within the last three months. If it is longer than that, the extension might be neglected by its developers. You’ll want to remove those neglected extensions and replace them with better alternatives.
If your extensions are causing problems despite being updated, you need to find which one is causing the error. Begin by disabling all extensions then load the problematic website you’ve been trying to access. If it loads after doing this, then at least one of them is at fault. Reactivate one extension at a time until you’ve narrowed down the culprit.
9. Reinstall the Chrome browser.
As with any other app, Google Chrome itself is never going to be perfect. The installation of the browser can trigger various issues, especially if the app hasn’t been updated in a while. What’s more, issues between browser and the operating system are surprisingly common.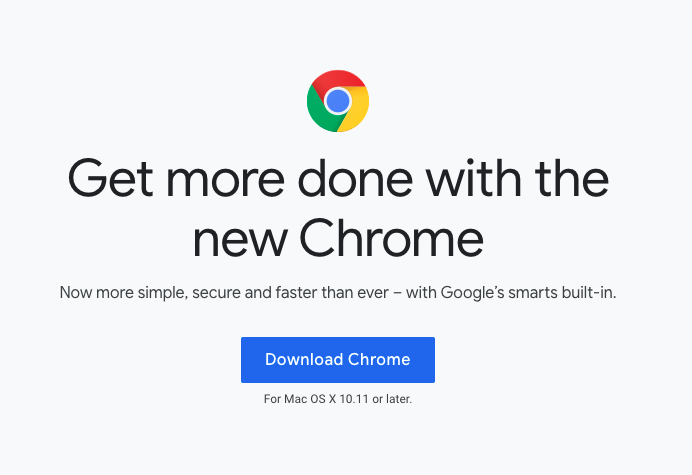
Because of this, sometimes the only solution is to delete your installation and then reinstall Chrome. Once you’ve completely deleted the app from your computer, you can then download the latest version of the browser by visiting the official Chrome website.
If None of These Solutions Work
If none of the fixes we’ve outlined above worked, it can be a sign that something more serious has gone wrong on the server or the website itself. If this is the case, the only thing you can do is be patient. Maybe the website’s administrators are already working to resolve the issue.
Summary
Connection errors can be endlessly frustrating, but it’s important to remember that they can be easily resolved using the steps above. Your first port of call should be to determine whether the problem lies with the web page itself or your connection. If it is the latter, there’s nothing you can do except wait. But if the problem is with your own connection, all you need to do is put in a little work to get things back up and running.