
Experiencing a blue screen error on Windows is frustrating, as it can disrupt work, cause data loss, and corrupt files. Numerous BSOD errors exist, with some addressed on this website.
- VIDEO_DXGKRNL_FATAL_ERROR
- WHEA_UNCORRECTABLE_ERROR
- Netwsw00.Sys BSOD Error
- LGBusEnum.sys BSOD Error
- Ndistpr64.sys BSOD Error
- Dxgmms2.sys BSOD Error
- KMODE EXCEPTION NOT HANDLED (e1d65x64.sys) BSOD
- IRQL_NOT_LESS_OR_EQUAL BSOD Error
- DATA_BUS_ERROR
- DRIVER_POWER_STATE_FAILURE Error
- BAD_POOL_HEADER Error
- VIDEO MEMORY MANAGEMENT INTERNAL BSOD Error
This is just a short list of what can go wrong in Windows 10/11. In this article, we’ll discuss another BSOD error that is commonly encountered by Windows users: the Kernel Mode Heap Corruption Blue Screen on Windows 10/11.
What Is the Windows 10/11 Blue Screen Kernel Mode Heap Corruption?
 The KERNEL_MODE_HEAP_CORRUPTION bug check has a value of 0x0000013A. This indicates that the kernel mode heap manager has detected corruption in a heap.
Kernel Mode Heap Corruption is one of the stop codes presented by Windows when you run into a ‘blue screen error of death’ BSOD error. As is the case with other codes, ‘Kernel Mode Heap Corruption’ is created uniquely to help users identify the problems triggering system crashes. Usually, the error is caused by driver issues (especially graphics card drivers) or software conflicts, but it may also be caused by hardware malfunction.
Expert Tip: For smoother PC performance, consider using a PC optimization tool. It handles junk files, incorrect settings, and harmful apps. Make sure it's right for your system, and always check the EULA and Privacy Policy.
Special offer. About Outbyte, uninstall instructions, EULA, Privacy Policy.
People have encountered the Kernel Mode Heap Corruption error in different situations. Some said the error happened on startup of Windows 10/11, while others the moment of launching specific programs such as a video game.
In the kernel mode operation of your computer, programs have unrestricted access to the foundational hardware components. When a kernel mode heap corruption occurs, it means a flaw in a running program’s code has modified the contents of a data heap. This also means that the allocator’s handle of the heap has been affected.
Some possible outcomes are critical memory faults within the allocator itself and memory leaks, where some parts of the memory become inaccessible in the future.
What causes Kernel Mode Heap Corruption Blue Screen in Windows 10/11?
The error occurs mostly when a PC is overloaded or used over a long period. Most often, it has to do with the system drivers of a computer. However, users have identified many other conditions that cause the issue.
- Hardware Malfunctions – A faulty hardware component in your computer, such as a corrupt RAM, can trigger the error.
- Driver Problems – According to reports by several Windows 10/11 users, the issue started after they updated their system drivers. In this case, all you need to do is to undo the updates. It’s also possible that the drivers might already be outdated.
- Software Compatibility Issues – Compatibility problems between specific software in your PC can lead to unstable system behaviors, causing the BSOD error.
- System Graphics Card – It might be that you attempted to open some graphics-intensive software too heavy for your graphics card to support.
- Corrupt Files – If there are corrupt files in your system, they can also trigger the Kernel mode heap corruption problem. Note that you must diagnose the cause of the issue using the in-built Event viewer.
To know more about the cause of the error, follow the guide below:
Press the Windows logo + R keys and hit Enter to open the Run dialog box.
- Type “eventvwr” (no quotes) in the Run dialog box and hit Enter.
- In the Event viewer window, navigate Windows logs>System.
- In the System window, find the Kernel Mode Heap Corruption BSOD log from the list table.
- Read the log description displayed under General and Details. The log should describe the cause of the issue, particularly the Event ID and Source information.
How to Fix Kernel Mode Heap Corruption BSOD on Windows 10/11
Getting the KERNEL_MODE_HEAP_CORRUPTION blue-screen error? Don’t panic – you’re not alone. This is a fairly common error, and it’s usually not very hard to resolve. Here are several ways to fix this error:
Method 1: Boot Windows 10/11 into Safe Mode.
 Since you are getting the Blue Screen, you won’t be able to log into Windows normally. So, you need to first boot into Safe Mode then perform the below workarounds. Only a handful of Windows 10/11 programs and services run on this mode preventing any kind of conflicts from third-party apps.
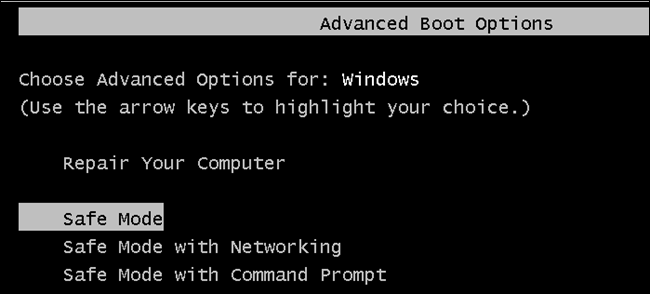
Here are the steps to enter Safe Mode:
- Press the Power button for 5 seconds and wait till it shuts down successfully.
- Repeat this process for 2-3 times until the Preparing Automatic Repair screen comes into view.
- Let the system diagnose this error for a few seconds thereafter click Advanced options.
- On the Windows Recovery Environment (WinRE), go to – Troubleshoot > Advanced options.
- Hit Startup Settings on the next screen followed by the Restart button.
- When Windows reboots, press F5 to boot into Safe Mode with Networking.
Selecting “Safe Mode with Networking” is essential to fix black or blue screen issues. If not, this won’t connect to the Internet causing problems in troubleshooting the actual problem.
Method 2: Roll back your graphics card drivers.
Some Windows users have reported that they experienced this ‘blue screen of death (BSOD)’ error right after an update of their graphics card drivers (or a Windows Update). If that’s when you got the error, you should restore your video driver to a previous version to secure the stability of your hardware device. Here’s how to do it:
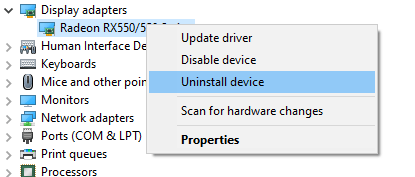
- On your keyboard, press the Windows logo key and R at the same time to invoke the Run dialog box. Then type devmgmt.msc into the box and click OK.
- In the Device Manager window, double-click on the Display adapters node to expand its drop-down list.
- Right-click on your video card and select Properties from the context menu.
- Go to the Driver tab and select Roll Back Driver.
- If the Roll Back Driver option is grayed out, that means there’s no driver to roll back to. In this case you’ll have to try other fixes.
- Choose one of the reasons based on your own situation and click Yes.
- Restart your computer for the changes to take effect.
After you restore your video driver to a previous version, verify if the ‘Kernel Mode Heap Corruption’ error still persists. If it does, try the next fix, below.
Method 3: Update your device drivers.
 The Kernel Mode Heap Corruption error may be caused by an outdated or corrupt device driver. If you’re not sure whether all your device drivers (especially graphics card drivers) are up-to-date, you should check.
You can do this in Windows Device Manager, one device at a time. But this takes a lot of time and patience, and if any of your drivers do happen to be out of date, you’ll need to manually update them, which is difficult and risky. If you don’t have the time, patience or computer skills to update your device drivers manually, you can do it automatically with Outbyte Driver Updater.
This will automatically recognize your system and find the correct drivers for it. You don’t need to know exactly what system your computer is running, you don’t need to risk downloading and installing the wrong driver, and you don’t need to worry about making a mistake when installing. Driver Updater takes care of everything.
Method 4: Check graphics card for problems
As we’ve mentioned earlier the leading cause are drivers, and the graphics card is among the drivers that cause this error. So we need to first identify if there are problems with your display drivers before proceeding with any other troubleshoot. Here are the steps to follow in order to confirm that:
- Open the Run dialogue by typing Windows + R.
- In the dialogue box, you should type msc and hit enter or press OK.
- The device manager will open and you should expand Display Adapters.
- Identify your video card and right-click on it to check for updates.
- When updates are installed the driver will be repaired automatically.
- Windows will search for updates if available and will download the update packs and install them.
- Alternatively, you can check the driver website to see if there are updates available, you can then download manually from the driver site and run the updates on your PC to install them. This should be your option when you receive update error which can happen sometimes.
- After installing updates, you should restart your PC and see if the problem is resolved.
Method 5: Run Driver Verifier Manager.
Driver Verifier Manager is a great tool to discover the problematic drivers on Windows 10/11. So, if you are still getting the Kernel Mode Heap Corruption 0x0000013A error, you should run this tool to check the obsolete device drivers. Here’s how to perform this task –
- Launch Windows PowerShell (Admin).
- On the elevated console, type “verifier“, and hit Enter.
- Open Verifier using PowerShell 0x0000013A
- Subsequently, mark the “Create Standard Settings” checkbox followed by Next.
- 0x0000013A
- Now, mark “Automatically select all drivers installed on this computer” and hit Finish.
- 0x0000013A
- The system prompts to “Restart PC” so as to start scanning for any corrupted or damaged drivers.
- After the reboot, Windows will display a list of drivers that are found to have some errors.
- You may now update, rollback, or uninstall-reinstall the above-displayed device drivers.
Method 6: Run the Windows BSOD Troubleshooter (For Windows version earlier than 1809).
The Blue Screen (BSOD) troubleshooter interprets the bugcheck codes, and tells you if the blue screen crash was caused by:
- Faulty hardware
- Failing disk drive
- Malware
- Memory failure
- Services
- Device drivers
Unfortunately, the Blue Screen troubleshooter is no longer available starting with Windows 10 version 1809. But if you’re running an earlier version, these are the steps to use this tool:
- Open the Control Panel (icons view), and click/tap on the Troubleshooting icon.
- Click/tap on the View all link at the top left in Troubleshooting.
- Right click or press and hold on the Blue Screen troubleshooter, and click/tap on Run as administrator.
- Click/tap on the Advanced link.
- Check the Apply repairs automatically box, and click/tap on Next.
- The troubleshooter will now start detecting problems you may have with blue screen errors.
- If problems were identified, then follow any given instructions to continue troubleshooting.
- If no problems were identified, then you could click/tap on View detailed information to see the troubleshooting report.
You can also use the “Troubleshoot blue screen errors” at Microsoft. Just go to the Troubleshoot blue screen errors web page at Microsoft and follow the steps to answer questions to troubleshoot your blue screen error.
Method 7: Run Windows Memory Diagnostic Tool.
 The Windows Memory Diagnostic tool will check to see if there’s a problem with your Random Access Memory (RAM):
- On your keyboard, press the Windows logo key and R at the same time to invoke the Run dialog box. Type mdsched.exe and hit Enter.
- Select either Restart now and check for problems (recommended) to check your memory straight away, or Check for problems the next time I start my computer if you want to keep working and do the memory check later.
- Remember to save your work before clicking Restart now and check for problems (recommended). It will reboot your computer instantly.
- When the Windows Memory Diagnostic Tool actually runs, you’ll see the following screen that indicates the number of passes it’s doing, along with how far it has progressed.
If you don’t see any errors here, that means the memory in your computer is fine. Otherwise you should replace your RAM or simply contact the hardware manufacturer for assistance.
Method 8: Repair corrupted system files.
Sometimes this blue-screen error is caused by corrupt system files. To repair them, there are two things you should do:
- Scan with System File Checker
- Scan with dism.exe
To scan with System File Checker, follow the instructions below:
System file checker (sfc) is a Windows utility that identifies and repairs corrupted system files: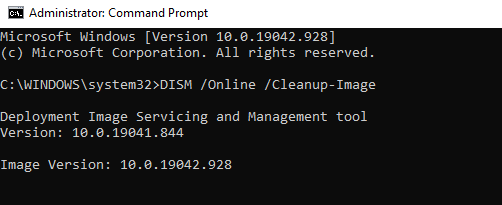
- On your keyboard, press the Windows logo key and R at the same time to open the Run dialog box. Type cmd and press Ctrl+Shift+Enter to run Command Prompt as administrator.
- When Windows asks for permission to make changes to your device, click Yes.
- In the Command Prompt, type the following command (note that there’s a space between sfc and /): sfc /scannow
- After you finish entering the command, hit Enter on your keyboard. Then the sfc tool will begin to scan all system files and repair the corrupted or missing ones.
- Wait until the verification process completes. Then restart your computer for the changes to take effect.
If you continue to experience the Kernel Mode Heap Corruption Error, try running dism.exe as described below.
To scan with dism.exe:
- On your keyboard, press the Windows logo key and R at the same time to open the Run dialog box. Type cmd and press Ctrl+Shift+Enter to run Command Prompt as administrator.
- If prompted for consent, click Yes.
- In Command Prompt, type the following command (note that there’s a space to the left of each slash “/”): dism.exe /online /cleanup-image /restorehealth
- After that, hit Enter on your keyboard. Then the DISM tool will begin to scan for any problems and try to fix them.
Wait for the process to complete. Then, reboot your computer and see whether the Kernel Mode Heap Corruption error reoccurs.
Method 9: Resolve any software conflicts.
Another possible culprit for your Kernel Mode Heap Corruption error is a software conflict. This is particularly likely if you get the error after installing a new app or when you’re trying to launch a certain program, such as a video game.
There’s no quick way to pinpoint which applications are conflicting. You have to fully shut down every unnecessary program (including any associated background processes) and wait to see whether the error reoccurs.
For this, you need to:
- Check to see if you have any software conflicts
- Find out which programs are causing them
- De-prioritize, disable and uninstall those programs
Check to see if you have any software conflicts
Close all programs. To do this, switch to the program, and close it as you normally would (e.g. by clicking the × at the top right of the program). End all unnecessary background processes by the following procedure:
- On your keyboard, press the Windows logo key and X at the same time, then click Task Manager.
- On the Processes tab, select the program that you want to shut down from the list in Task Manager and click End task to force a close. (If it’s a program you’re using, e.g. Microsoft Word, make sure you save any unsaved work first.)
- Do not close any unfamiliar programs. If you mistakenly shut down the important system programs, that may bring about even more problems. Before you take the step, consult a technician or search for information about the program.
- Wait to see whether the error reoccurs:
- If the error DOES reoccur – It’s probably not caused by a software conflict.
- If the error does NOT reoccur – One or more of the programs you shut down is probably causing the error. Now you need to identify which program(s) caused the error, as described in the next step below.
Find out which programs are causing your conflicts
If closing all unnecessary programs stopped the error from reoccurring, you know that one of those programs was causing the error. Now you just need to figure out which one.
To do this, restart one of your programs, and wait to see if the error comes back. If it doesn’t, restart the next program, and wait for the error again. Then the next, and the next, and so on.
When the error eventually reoccurs, you know that the program you restarted most recently is a problem.
But bear in mind, it may not be the only problem. It may actually be conflicting with another program – one you restarted earlier – and that conflict is what’s causing the error.
If you don’t really need the offending program, you can just disable or uninstall it immediately, as described below. But if you do need the offending program, you should check if it’s conflicting with something else (because then you may be able to disable/uninstall the other program instead).
To do this, leave the offending program open, but shut down all other programs again. If the error reoccurs, you know the program is the sole cause. If the error doesn’t reoccur, you know the program is conflicting with another program. To figure out which one, restart each program again, one at a time, and wait for the error to come back.
When you find which programs are conflicting with each other, you can disable or uninstall the one you need the least.
De-prioritize, disable or uninstall conflicting programs
Once you identify the program(s) causing the conflict, you have three options:
- Set the program’s priority to low
- Permanently disable the program
- Uninstall the program
If you don’t want to disable or uninstall the offending program, you can try de-prioritizing it first. This has resolved the error for some users. To de-prioritize the program:
- On your keyboard, press the Windows logo key and R at the same time to invoke the Run dialog box. Type in taskmgr and hit Enter.
- Go to the Details tab. Scroll through the list until you find the process for which you want to change the priority. Right-click on that item and select Set priority > Low.
- Do not change the priorities for any programs that you’re not familiar with. If you mistakenly set the priority of a crucial system process to low, it may lead to system crashes, freezing or other critical problems.
- Click Change priority if prompted for permission.
To permanently disable the program:
- On your keyboard, press the Windows logo key and X at the same time, then click Task Manager.
- On the Processes tab, select the program that you want to shut down from the list in Task Manager and click End task to force a close.
- If the program is also among the startup items, you should stop it from running at startup.
- On your keyboard, press the Windows logo key and R at the same time to invoke the Run dialog box. Type in msconfig and hit Enter.
- Go to the Startup tab, and click Open Task Manager.
- Select the programs you don’t want to start when Windows starts, then click Disable.
To uninstall the program:
- On your keyboard, press the Windows logo key and R at the same time. Type appwiz.cpl and press Enter.
- In Programs and Features, right-click on the program that you want to uninstall and click Uninstall.
If, after de-prioritizing, disabling or uninstalling conflicting programs the error reoccurs, try the other fixes below.
Method 10. Check for other issues such as overheating.
It’s not that easy to tinker with the hardware if you’re a computer newbie. You need to disassemble the computer chassis, look for problems in each separate component, and find ways to fix them – all by yourself. Merely thinking of it is horrible enough, not to mention putting it into practice. Anyway, if you don’t have much interest in learning the skills, you should contact a local technician for further help.
If you’ve checked for hardware issues, and you’re still getting the error, you still have one more fix to try – reinstall the Windows system.
Method 11: Reinstall your Windows system
If none of the fixes above work for you, you may need to reset or reinstall your Windows operating system.
Resetting Windows will revert your system to its initial state as if it’s your first time to turn on the computer. It removes all the apps that didn’t come with your PC, but you can decide whether to retain your personal data or not. Besides, you don’t need any external storage devices to perform the resetting, because Windows will complete the whole process by itself.
A clean install of Windows will erase everything (including all the apps you installed and your personal data) from the drive where your system is installed. You need an external storage device, e.g. a USB drive, to perform the clean install. Compared with the above option, clean install seems more complex, yet more impactful.
Listed below are some useful articles that teach you how to reset or reinstall Windows 10/11 step by step:
To reset your PC, follow these steps:
- Type settings in the search bar, and then choose Settings that comes up.
- Click on the Update & security icon.
- On the left side of the panel, choose Recovery. On the right side of the panel, choose Restart Now under the option Advanced startup.
- Choose Troubleshoot.
- Click Reset this PC.
- Click Remove everything. Please make sure you have backed up your important files and applications because they will be all gone once you complete the reset.
- If prompted to Insert media, you will need to insert your Windows 10/11 installation media or recovery drive to continue.
- If your computer has more than one drive partition on Windows 10/11 disk, you need to select to remove all files from only the Windows driver or from all drives.
- Click on either Just remove my files or Fully clean the drive accordingly. Please make sure that you have backed up your important personal files and software before you go any further.
- Just remove my files will perform a quick format and it won’t take long. Your files might be recoverable by someone else since they are only marked as deleted. It is suggested that you choose this option if you are keeping your computer.
- Fully clean the drive performs a secure erase to fully clean your drive and your files cannot be recovered easily. It could take hours to finish. It is suggested that you choose this option if you are recycling or selling your computer.
- Tab the Reset button for the reset to begin.
- Resetting will now start. It will take a while to finish and your computer will restart a few times during the process. Unless your computer ran into a server problem, or you know pretty well what you are doing, performing a reset on your work computer or home computer is not recommended.
- When finished, you will need to set up your personal preference. Then click Next.
- Click Accept.
- You could choose the Customize settings on the left side corner or Use express settings on the right corner to go to the next step. If you choose Customize settings, you could change the settings as you will.
After the settings, your computer will be good to go.
To perform a clean install of Windows 10/11, follow the steps here:
- First, you need to create an installation media using the Microsoft Media Creation Tool.
- Next, insert the installation media into your computer.
- With your USB drive or DVD inserted, restart your computer. Press a key for Boot Menu. The key to press for Boot Menu varies for different motherboards. Usually, the boot screen will show you which key to press. You can also read the manual for your motherboard to see what specific key to press for Boot Menu. Usually speaking, Acer is F12/ F9/ Esc, ASUS is F8/ Esc, Dell is F12, HP is Esc/ F9, Lenovo is F12/ F8/ F10 etc.
- Alternatively, you can also go to Use a device option in the Advanced startup options.
- Follow the path Start> Settings> Update & security> Recovery> Restart now button under Advanced startup.
- Then click Troubleshoot> Advanced options and you will see this page.
- Some users might not be able to see the Use a device option here. But we find that if the USB flash drive with the ISO files or the DVD disc is connected to the computer, you can boot from the device by clicking the Continue button.
- You will see the activation screen next. If you have installed Windows 10/11 on this computer, please choose I don’t have a product key. If you have never installed Windows 10/11 on this computer before, please type in your valid license key, which could be the key for Windows 7, Windows 8 or Windows 8.1.
- Continue the clean install process normally until you see Which type of installation do you want? Choose Custom option to ensure that you are perform a clean install instead of and upgrade.
- Choose which partition you would like to install your system drive. If you have only one drive, just click Next to continue. If you have multiple drives, choose the primary partition and click Next.
- Then all you need to do is to wait with patience for the installation to end. Some might encounter a few reboots during the process.
Usually, your computer will be activated automatically once you have access to the Internet. If the activation is not happening, you can force an activation by running the following command.
- Type cmd in the search box, then choose Command Prompt from the list of choices.
- Type in the command slmgr.vbs /ato and press Enter key.
You might need to try this command a couple of times. If you see any errors, please reboot your computer and run this command again. Or you can just wait for Microsoft to help you activate your system automatically.
Wrapping Up
The Kernel Mode Heap Corruption Blue Screen on Windows 10/11 might be a familiar issue for most Windows users, but it doesn’t mean that it is less troublesome. In some cases, you won’t be able to boot normally so some troubleshooting methods won’t apply. So if you are faced with this BSOD, work your way down the list of solutions above until you find the one that works for you.