
Experiencing the LiveKernelEvent 117 error on your computer? This error, indicated by a black screen and the corresponding error code, can be attributed to either hardware or software issues. It can be particularly frustrating, especially when you’re in the midst of important tasks, as it often results in data loss.
If you’re getting this LiveKernelEvent 117 error in Windows, it is important to understand more about the error to be able to formulate the best solution.
What are Windows Hardware Errors?
A hardware error means a problem with any of the hardware components in your computer system. The hardware components are equipped with error detection systems that can determine when a hardware error occurs. They can be classified as either corrected or uncorrected errors.
A corrected error is one that has been corrected by the hardware or firmware by the time that it was detected by the operating system. An uncorrected error, on the other hand, cannot be corrected by the hardware or firmware.
Expert Tip: For smoother PC performance, consider using a PC optimization tool. It handles junk files, incorrect settings, and harmful apps. Make sure it's right for your system, and always check the EULA and Privacy Policy.
Special offer. About Outbyte, uninstall instructions, EULA, Privacy Policy.
Uncorrected errors are further classified as either fatal or nonfatal. Fatal hardware errors are uncorrected or uncontained errors that are determined to be unrecoverable by the hardware. When a fatal uncorrected error happens, the OS generates a bug check to contain the error.
Nonfatal hardware errors, on the other hand, are those issues from which the system can attempt recovery by trying to correct the error. But if the operating system is not able to correct the error, a bug check is generated to contain the error.
The LiveKernelEvent 117 error in Windows is an uncorrected fatal error that Windows cannot recover from or fix, hence the crash and the appearance of the LiveKernelEvent 117 error message.
The concept of a hardware error source is a core concept of the Windows Hardware Error Architecture or WHEA. It means any hardware unit that notifies Windows of the presence of the issue. Examples of hardware error sources include:
- Processor machine check exception, such as MC#
- Chipset error signals, such as SCI, SMI, SERR#, MCERR#
- I/O bus error reporting, such as PCI Express root port error interrupt
- I/O device errors
A single hardware error source can handle the reporting for more than one type of hardware errors. For instance, a processor’s machine check exception generally reports cache and memory errors, processor errors, and system bus errors.
A hardware error source is usually represented by the following:
- Single or multiple hardware error status registers
- Single or multiple hardware error configuration or control registers
- A signaling mechanism alerting the OS that a hardware error condition exists
In some cases where there is no explicit signaling mechanism, the operating system polls the error status registers to scan for errors. Unfortunately, polling can only be applied for corrected errors because uncorrected errors need immediate attention by the operating system.
What is LiveKernelEvent 117 Error in Windows?
LiveKernelEvent 117 is an error that can be seen using the Event Viewer logs after your computer crashes. Alternatively, you can also see it via the Control Panel. The system crash happens when the system stops working correctly, causing it to crash. According to several reports, the crash does not happen abruptly but rather gradually.
In most scenarios, the desktop freezes even though the mouse and keyboard are still working. At this point, users are forced to reboot their systems only to find the Reset button as the only option. For other users, Windows continues to run for some time before the crash happens.
Along with the LiveKernelEvent error 117, you might also see a log file that is related to the crash. In most cases, the problem is caused by the nvlddmkm.sys Nvidia video driver, for those who are using an Nvidia graphics card. According to the details provided in the error message, Windows should be able recover after the driver stops working. Unfortunately, that’s not always the case.
Here’s what the error message usually looks like:
Description
A problem with your hardware caused Windows to stop working correctly.
Problem signature
Problem Event Name: LiveKernelEvent
Code: 117
Parameter 1: ffffe087338b7460
Parameter 2: fffff807902171c0
Parameter 3: 0
Parameter 4: 514
OS version: 10_0_19042
Service Pack: 0_0
Product: 256_1
OS Version: 10.0.19042.2.0.0.256.48
Locale ID: 4105
Extra information about the problem
Bucket ID: LKD_0x117_Tdr:3_TdrBug:575504_TdrVTR:0_IMAGE_nvlddmkm.sys_Pascal
Server information: fe105004-c35c-42aa-8dc6-96a8a7d4d7eb
The issue is often encountered by users doing resource-intensive activities on their computer, such as gaming, streaming videos, or running third-party applications. The computer immediately crashes and returns with this error message for no reason at all. This happens with old computers as well as with brand new or newly set up computers, even those with powerful specifications.
The LiveKernelEvent 117 error in Windows is also usually accompanied by other error messages. For instance, LiveKernelEvent 141 is a constant companion of this issue. In other instances, the BSOD error 116 also occurs. Others also noted that some apps are not working when this happens, such as PowerShell and Command Prompt.
What Causes LiveKernelEvent 117 Error in Windows?
There are several reasons why the crash could occur, but more often not, it is an error related to your hardware components. The components that most commonly break down are hard disk drives, fans, CPUs, and GPUs. The best way to check is to perform a hardware diagnostic test on your computer. Here are the steps on how to do hardware tests on Windows 10/11.
Windows 10/11 has two built-in PC hardware diagnostic tools.
- Performance Monitor
- Windows Memory Diagnostic
The first tool analyzes the system performance of your computer while the second tool runs memory tests on your PC.
How to Use Performance Monitor
Performance Monitor is a built-in Windows 10/11 hardware diagnostic tool for locating and diagnosing hardware and system issues. To perform a scan, follow the steps below.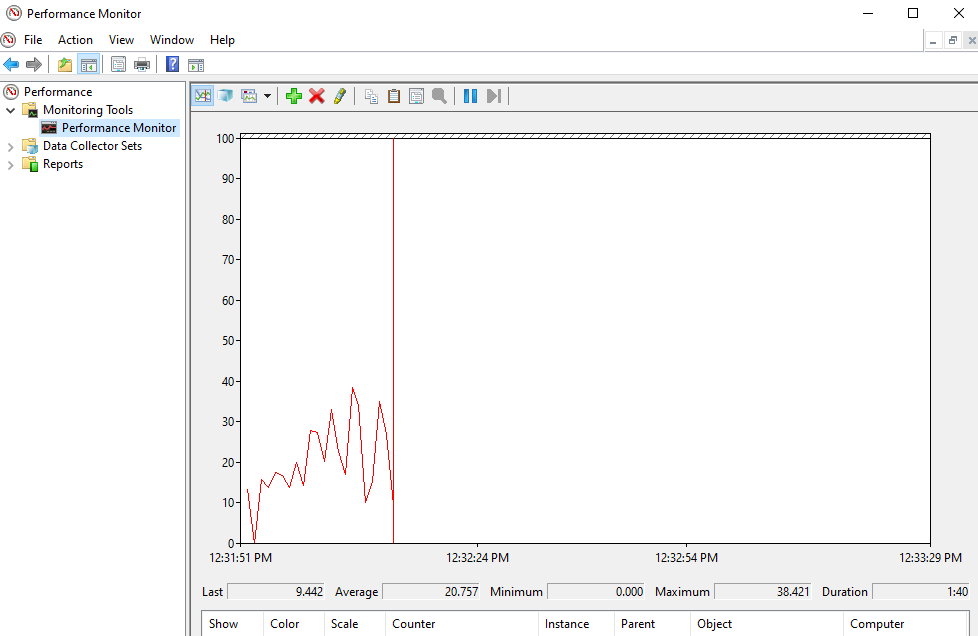
- Open the Start menu, then search for Performance Monitor.
- Click on the link to open the app.
- You might need to wait for a few minutes while the app collects data.
If you want to get a quick overview of your computer’s hardware, you can use the left-hand panel to go to Reports > System > System Diagnostics > [Your Computer’s Name].
It gives you multiple checks for your hardware, software, disk, CPU, network, and memory, along with the detailed statistics. If you need to find out more, you can check out the live performance graphs under Monitoring Tools > Performance Monitor and customizable data sets under Data Collector Sets.
How to Use Windows Memory Diagnostic
The central processing unit or CPU uses RAM to save short-term information. The data contained in the RAM gets deleted when you turn off your machine. There are several warning signs when your memory is close to failing, such as worsening performance and video cards failing to load on boot.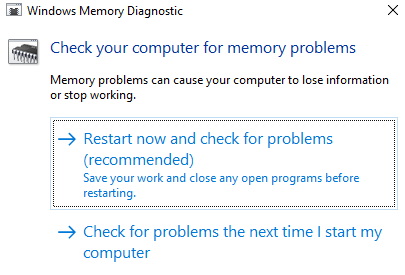
To run a memory test on your RAM, you can use the Windows Memory Diagnostic tool. This tool works by writing to, then reading, your PC’s RAM. When you see differing values, it means that you have faulty hardware.
- To open the tool, press Windows + R to launch the Run window.
- Then type mdsched.exe and hit Enter.
- Windows will prompt you to reboot your computer before proceeding with the scan.
- The test might take a few minutes to complete.
Once completed, your machine will restart once again. You should see the results once you return to the Windows desktop. If your system does not automatically show you the results, launch the Event Viewer by right-clicking on the Start button. Head to Windows Logs > System and find the most recent file called MemoryDiagnostic.
Stress Test Your GPU
Another way to determine if your graphics card is faulty is to stress test it. This should be done if your graphics driver crashes when playing games or you notice odd graphical corruption. You can use a graphics benchmark utility, such as 3DMark. The benchmark works by stressing your graphics card to see how much it can handle. If it overheats or fails under load, you’ll experience graphical issues, crashes, or blue screens while running the benchmark.
If the benchmark works fine but you still have issues with your GPU, the problem might lay somewhere else.
Swap Out Your Graphics Card
Not all hardware problems are easy to diagnose. Case in point, if you have a faulty motherboard or power supply, their issues may manifest through random odd issues with other components. It’s difficult to tell if these components are the ones causing the problem unless you replace them completely.
Finally, the best way to know whether a piece of hardware is faulty is to swap it out. For example, if you believe your graphics card may be causing the LiveKernelEvent 117 error, just pull your graphics card out of your CPU and swap in a new one. If everything works well, it’s likely that your old graphics card was failing or faulty.
This method might not be easy for people who don’t have spare components sitting around, but it’s the best way to troubleshoot. Troubleshooting means a lot of trial and error, and swapping components out lets you pin down which one is actually causing the problem by process of elimination.
What to Do About LiveKernelEvent 117 Error in Windows
In some cases, the LiveKernelEvent 117 error is able to resolve itself after refreshing Windows. Simply restart your computer and see if the issue persists. It is also a good idea to do some housekeeping, such as deleting cache and junk files using a reputablePC Repair tool. If the error doesn’t go away or it keeps on coming back every time, then you need to do some troubleshooting.
How to Fix LiveKernelEvent 117 error in Windows Related to Nvidia
Nvidia graphics card problems can be either hardware or software related. If you’ve figured out that you have a GPU problem with your Nvidia graphics card, you can use the steps here to resolve this LiveKernelEvent error and other errors associated with this issue.
Fix #1: Disable your background applications.
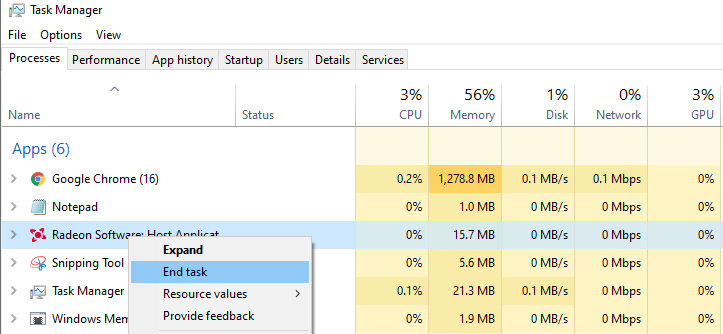
Multiple apps running in the background can affect the performance of the videos you are watching or the games you are playing on your computer. Your games might even crash if too many apps are actively running simultaneously.
Disable programs that are not required from getting automatically launched in the background. It may also include security programs, such as antivirus or anti-malware apps. You can temporarily disable them to see if it resolves the LiveKernelEvent 117 error.
Fix #2: Check the PCI slot of the Nvidia graphics card.
Sometimes there is no problem with the graphics card itself but how it is seated on your computer. Check whether the graphics card is snugly and properly fitted in the PCI slot. It should be tightly fitted and shouldn’t be loose. You can also try placing the Nvidia graphic card on another PCI slot to rule out any slot issue.
Fix #3: Clean the dust inside your computer.
Since computers are not always opened frequently, lots of dust might gather inside it and form a blanket around the components inside. This prevents proper heat dissipation, leading to overheating. Open your CPU and use a blower to blow the dust off from your PC’s components.
Fix #4: Cool down your Nvidia video card.
The heat generated by your computer should be dispelled properly. Otherwise, it would cause overheating that damages the Nvidia graphics card, along with your motherboard. Video card overheating impacts the PC’s performance, especially when running GPU-intensive applications, such as games and streaming services.
To cool down your Nvidia graphics card, here are the things you can do:
- If you overclocked your graphics card to boost its performance, revert to its original settings.
- Check your GPU fans and clean them. Replace them if they are broken or not working.
- Use a bigger computer case for more space.
- Install a case fan to cool down the machine.
Take note that you should only perform these cooling methods and other physical checks if you are familiar with your machine’s hardware. Otherwise, ask the help of a technician.
Fix #5: Lower overclocked GPU/CPU to default speed.
Overclocking your GPU can speed up your computer’s performance, but sometimes it may stress the card so much that it causes performance issues. If you overclocked your CPU or GPU, revert the speeds to their default values. This will stop the overheating of the system and resolve any error you might be experiencing.
Fix #6: Update your Nvidia graphic card drivers.
Since Nvidia is regularly working to improve its performance via regular updates, installing the latest drivers can help fix the LiveKernelEvent 117 issue. There are several ways to update your Nvidia graphic card drivers.
If you installed the GeForce/ION Release 270 driver or later from the Nvidia website, then you might have already installed the NVIDIA Update app on your PC as well. You can then directly update your drivers via the Nvidia Update app on your computer.
If you don’t have the Nvidia Update app, you can follow the instructions below to update your graphic card drivers:
Step 1: On your computer, launch the DirectX Diagnostic tool to know your exact graphics card model. If you already know it, you may skip this step. To do this:
- Type in dxdiag in the Windows search box.
- Click on System.
- Note the Operating System entry, either 32-bit or 64-bit Windows.
- Click on Display.
- Note the Chip Type entry, which should be your graphics card model.
Step 2: Go to the Nvidia website and follow the steps below to update the driver.
- Click on the Nvidia Support tab.
- Click on Download drivers.
- Type in your product type, product, series, operating system, and language from the dropdown menus. You can get this information from DirectX Diagnostic tool.
- Click Search.
- Choose the latest version of your graphic card, then click on Download.
- Double click the downloaded file on your PC and follow the onscreen instructions to update your graphic card driver.
Fix #7: Disable then enable the Nvidia graphics card.
To fix the LiveKernelEvent 117 error due to Nvidia graphics card problems, you should try to disable and enable the drivers to see if it helps.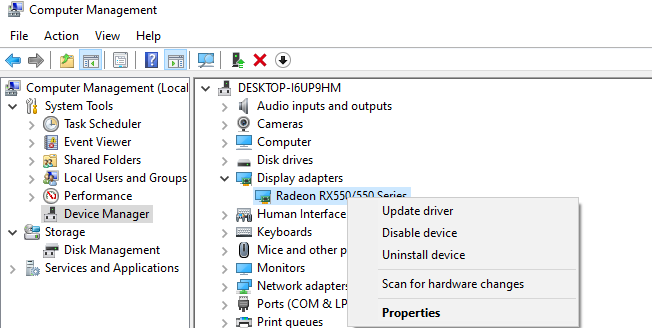
Follow the instructions below to disable/enable Nvidia card drivers:
- Right-click on This PC.
- Click on Manage > Device Manager.
- Click on Display Adapters.
- Right-click on your Nvidia graphics driver and click Disable device.
- Reboot your computer.
- When your computer restarts, go back to Device Manager > Display Adapters.
- Double click on your Nvidia graphics card, then choose Properties.
- Click on the Driver tab and choose Enable.
Restart your PC again for the changes to take effect and watch out for the occurrence of the LiveKernelEvent error.
Fix #8: Uninstall and reinstall the Nvidia graphic drivers.
If updating or re-enabling the Nvidia graphics card didn’t help, it might indicate that the drivers were not installed properly. This could be because of a third-party security software interfering with your graphics card. What you can do is to uninstall and then reinstall your Nvidia drivers.
Note: Before you start, close all running applications on your PC and temporarily disable your antivirus as they may interfere with the display driver installation. Follow the recommended steps below to reinstall NVIDIA display drivers:
- Log in using an administrative account on your PC.
- Download the latest NVIDIA display drivers from the website.
- Your browser will ask to Save or Run the file.
- Select Save to save the driver on your desktop.
- Right-click on the installer and choose Run as administrator.
- Follow the onscreen prompt to go through the installation process.
- Accept the Nvidia software license agreement by clicking AGREE and CONTINUE.
- In the next window, choose from the install options. You may select Express (Recommended) or Custom (Advanced) to view additional installer options for Advanced users.
- Click Next.
- Once the process is completed, click on Restart now to finish.
Fix #9: Replace your Nvidia video card.
If all the troubleshooting did not work to fix the LiveKernelEvent 117 error related to your Nvidia graphics card, then you should replace it.
How to Prevent Video Card Errors
It would help a lot if you take care of your graphics card to prevent it from being damaged and affect its performance. Replacing a faulty graphics card is quite costly, so here are some steps that you can take to prevent video card failure.
Clean your computer regularly.
Sometimes your video card stops working just because it has been covered by dust. Dust can create an insulation layer causing the graphics card to overheat even when working at low capacity. When you remove the dust layer from your computer, the heating stops and the card is able to operate normally.
Clean your RAM terminals.
Aside from removing the dust, you should remove the RAM from its slot and clean the terminals from time to time. This ensures there is no dirt or dust that brings about bad connectivity issues.
Double-check the seating of the video card.
Sometimes video card errors occur due to poor seating, which means that the connections are loose. Try to unseat the video card, dust off the terminals, and firmly secure it on the motherboard or slot. Now your graphics card should work normally.
Swap graphics card or slot.
You may check whether your graphics card is faulty by moving it to another slot to see if it will work properly. If this does not work, then try using a different graphics card. This will determine whether it is the card that is faulty or the slot.
How to Fix LiveKernelEvent 117 error in Windows Caused by Software Error
If you’ve figured out that the error is not hardware-related but software-related, these are the steps that you can take:
Fix #1: Optimize your PC.
Windows is a sophisticated operating system with thousands of various settings and parameters that all need to work together in order to provide a smooth user experience. In some instances, settings, files, features, or other components malfunctions for one reason or another, causing system instability, errors, application crashes, random restarts, and other performance issues.
While some provide an error code, that is not always the case. Hence troubleshooting becomes relatively difficult for those who are not familiar with Windows. Even some power users might sometimes struggle with troubleshooting a certain problem.
If you want to attempt a quick and easy fix for common Windows errors and optimize your Windows processes, you might consider running a scan with reputable PC repair software such as PC repair software.
Fix #2: Perform a clean boot.
A good way to isolate the issue is to perform a clean boot. This method boots Windows with the basic set of drivers and startup programs, so you can determine whether a background app is causing the issue. This is similar to booting Windows in Safe Mode, but gives you more control over which services and apps to run at startup, helping you isolate the cause of the problem.
To perform a clean boot in Windows 10/11, this is what you need to do:
- Sign in to your computer as an admin. If you don’t have an admin, you need to create one. If you have trouble signing in with a Microsoft Account, this article should help.
- In the Taskbar search box, type in msconfig and choose System Configuration from the results.
- On the Services tab, tick off Hide all Microsoft services, then select Disable all.
- On the Startup tab, select Open Task Manager.
- Under Startup in Task Manager, select each startup item and then click Disable.
- Close Task Manager.
- On the Startup tab, click OK.
When you restart the computer, it will boot in a clean boot environment. Note that your computer might temporarily lose some functionality while you are in a clean boot environment. Check if the error persists in this environment and do the troubleshooting steps above. Once done, reset the computer to boot normally.
Fix #3: Rollback to previous driver version.
If you updated your graphics card and it did not help resolve the error, you can try to rollback to an older version of your graphic driver. You can do this via Device Manager. The process of rolling back drivers to their previous version is the same for all versions of Windows — from Windows XP to Windows 10/11.
- Hold the Windows key and press R.
- Type in devmgmt.msc in the Run dialog and press Enter.
- Expand the Display adapters section.
- Right click on your graphic card and choose Properties.
- Choose the Driver tab.
- Click Roll Back Driver. If you did not update your graphics card driver, then you will not see this option.
- Wait for the process to be completed and restart your Windows computer.
Fix #4: Turn off ATI Catalyst Gaming Overclocking (For ATI Radeon only).
If you are using an ATI Radeon graphic card and installed the ATI Catalyst software, you will have to turn off Gaming Overclocking or Graphic OverDrive.Here’s how to do it on a Radeon HD 7950 graphic card:
- Click on the Start menu and type in ATI Catalyst Control Center.
- Choose the Performance tab and then click ADM Overdrive.
- Uncheck Enable Graphics OverDrive.
- Click Apply and restart your PC.
Fix #5: Repair Windows Image using DISM.
For this method, you need a built-in tool named DISM or Deployment Image Servicing and Management. This is a command line tool that allows you to mount a Windows image file (install.wim) and do image servicing, such as installing, uninstalling, configuring and Windows update. To run a scan using DISM, open Command Prompt and run it as an admin. Then type in this command line: Dism /Online /Cleanup-Image /RestoreHealth. Press Enter and wait for the process to be finished. You’ll be prompted to restart your computer once done.
Fix #6: Turn off virtualization.
Virtualization is a type of technology that allows you to run multiple operating systems on your computer. There are different types of virtualization, including server virtualization, storage virtualization, network virtualization, application virtualization and others. For instance, if you want to run Hyper-V or VMware on your PC, then you need to enable virtualization support in your BIOS or UEFI. But if you encounter this error, you might want to turn off Intel Virtualization Technology temporarily while you’re resolving this error. You can do this through BIOS or UEFI. The process is not the same for all motherboards, but you just need to find the equivalent values. To do this:
- Restart your computer.
- While booting, press F2, Delete, or other keys that correspond to BIOS or UEFI settings.
- Press F7 to access Advanced mode.
- Click OK to confirm.
- Go to the Advanced tab and click on CPU Configuration.
- Navigate to Intel Virtualization Technology.
- Disable Intel Virtualization Technology from here and click Exit.
- Save your settings and restart your PC.
Fix #7: Update BIOS or UEFI.
Sometimes when your computer crashes or encounters errors, one of the solutions is to update the BIOS or UEFI firmware. First, you need to know the current version of your computer’s BIOS or UEFI. The process is not the same for all motherboards, but you just need to find the equivalent values. To do this:
- Hold the Windows key and press R.
- Type msinfo32.exe in the Run dialog and press Enter.
- Navigate to BIOS Version/Date.
- Open your web browser (Google Chrome, Mozilla Firefox, Edge or others).
- Go to your motherboard manufacturer’s website to download the latest BIOS version and save it on a USB drive.
- Restart your computer.
- Connect the USB drive with the latest BIOS version to your computer.
- While booting, press F2, Delete, or other keys that correspond to BIOS or UEFI settings.
- Press F7 to access Advanced mode.
- Click OK to confirm.
- You might get a prompt asking you to update file from a USB flash drive.
- Click Install.
- Once done, restart your computer.
- After restarting, run msinfo32.exe again to check current BIOS version to be sure that BIOS is successfully updated to the newest version.
Fix #8: Use only one monitor.
If you are using two displays, it is recommended that you unplug one monitor from your graphics card. Leave only one display connected to your computer and see if the error persists. If the error has gone away, continue with a single monitor for the meantime because this means that your graphics driver is having trouble supporting multiple displays.
Summary
The LiveKernelEvent 117 error may be hardware or software-related and is often associated with graphics cards, including those manufactured by Nvidia. The steps above should cover all scenarios and help you resolve this issue, along with the BSOD and other errors associated with it. If you know of other methods to resolve this problem, share with us in the comments below.