Capture your achievements, troubleshoot issues, or create tutorials with ease by taking screenshots on your Windows computer. There are numerous methods available to accomplish this task. Discover 7 efficient ways to capture screenshots in Windows 10/11 through this comprehensive guide.
Method 1: PrtScn or CTRL + PrtScn
The built-in screenshot tool for Windows is the Print Screen feature. You can take a screenshot on any Windows computer and save it as a file, take a screenshot without saving it as a file, or take a snap of just one window instead of the whole screen. This tool is very easy to use because you only have to press the print screen button labeled as ‘PrtScn’, ‘PrntScrn’, or Print Scr’, depending on the keyboard you are using. Here’s a tip though: the print screen button is usually located between the F12 and Scroll Lock keys.
If you’re using a laptop, you might need to press the Function or Fn key for the print screen feature to work. Once you press the print screen button, it might seem that nothing happened because there is no sound or changes that would indicate that a snap has been taken, but in fact, the screenshot has already been saved to your clipboard. There are several things you can do with your screenshot. So, you can:
Save Your Screenshot as a File
If you want to take a screenshot of your whole screen and save it directly to your computer, follow these steps:
Expert Tip: For smoother PC performance, consider using a PC optimization tool. It handles junk files, incorrect settings, and harmful apps. Make sure it's right for your system, and always check the EULA and Privacy Policy.
Special offer. About Outbyte, uninstall instructions, EULA, Privacy Policy.
- Press the Windows key + PrtScn. If you’re using a tablet, hit the Windows logo button + Volume down button. For other laptops or devices, you may need to press the Windows key + Ctrl + PrtScn or the Windows key + Fn + PrtScn.
- You will notice your screen dimming for a moment. This means that the screenshot has been taken and the file has been saved on your computer.
- Check the saved file in the Pictures > Screenshots folder.
Tip: Screenshots that are saved automatically are usually named according to the date and time they were taken. Regularly delete old screenshots from your computer and clean out junk files, using an app like Outbyte PC Repair, so you don’t get confused. It will also be easier for you to look for the screenshot you need.
Take a Screenshot Without Saving
If you want to do more with your screenshot, you can take a snap of the screen and directly edit it after. To take a screenshot without saving it as a file, follow these steps:
- Hit the PrtScn button. For some devices, you might need to hit Alt + Fn + PrtScn. You won’t notice any change but the image has been copied to your clipboard.
- Open the program where you want to paste the image to. It can be an image editor, email or word processor. Click Edit > Paste or hit Ctrl + V to paste the image. The dimensions of your screenshot will be the same as you computer’s screen resolution.
- If you want to edit, crop or annotate your screenshot before pasting it somewhere or sending it to someone, you can paste the screenshot to your favorite photo editing app and edit it from there.
Take a Screenshot of an Active Window
If you want to take a snap of a single active window, follow these steps:
- Click the title bar of the window you want to take a picture of to make sure it is active.
- Press Alt + PrtScn. The image will be then saved to your clipboard.
- Click Edit > Paste or press Ctrl + V to paste it to your photo editor, a Word document, or another app.
Method 2: Windows + Shift + S
This shortcut can only be used to take a screenshot on Windows 10/11. This keyboard combination lets you capture a part of your screen and copy it to your clipboard. When you press Windows + Shift + S, your screen will dim slightly and a cursor will appear. You can use that cursor to draw the part of the screen that you want to take a snap of. Hold down the cursor while you draw the area, then release the cursor. The screenshot will be automatically saved to the clipboard.
Open your favorite photo editing tool like Paint or Photoshop, paste the screenshot, then edit or save it as a file. This shortcut makes it easier to take a screenshot of just a part of your screen. Before this, you had to capture the whole screen, then crop the image to show what you want to be included in the screenshot.
Method 3: Snipping Tool
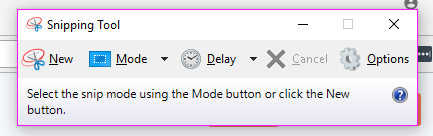
The Snipping Tool is a very helpful built-in desktop app for taking screenshots. It is one of the most popular tools used to screenshot PC Windows in different ways. You can have a full-screen snip, rectangular snip or free-form snip. You can also use a timer to delay the screen capture for 1, 2, 3, 4 or 5 seconds.
To use the Snipping Tool, follow the instructions below:
- Search for the snipping tool in the Start Menu search box and tap the top result. Or you can go to All apps > Windows Accessories.
- Once the Snipping Tool is launched, click the New button to take a screenshot. Choose what mode you prefer.
- Hold and drag the cursor to the area you want to take a snip of. Release the mouse button, and the area will be automatically copied to the mark-up window.
- You can edit, annotate, copy, share, or save the file from the mark-up window.
Microsoft has announced that it will be phasing out the Snipping Tool in the near future and has even introduced a new tool for taking screenshots called Snip & Sketch (which we will be discussing below) with its Windows 10/11 October 2018 update, but there is no definite announcement, so perhaps the Snipping Tool will be sticking around for now.
Method 4: Take a Screenshot, Using Windows Tablet
If you’re using a Surface tablet, ASUS Vivotab, Dell Venue, or any other Windows tablet, you won’t have a keyboard with a PrtScn button to use for taking screenshots. Although Snipping Tool is also available for Windows tablets, it is not a great tool to use on a device with touch features.
The most efficient way to take screenshots on Windows tablets is to use their hardware buttons. To capture the whole screen of your tablet, press the Windows logo + Volume Down buttons at the same time. The screen will dim down once you press this shortcut, which means that the screenshot has been made. You can access your screenshots in the Screenshots folder inside the Pictures library.
If you’re still using Windows 8.1 for some reason or another, you can use the Charms to take a screenshot and share it using Windows apps. This is helpful when you’re browsing the web or using an app and you want to quickly share what’s on your screen. Just bring up the Share charm, tap the arrow next to the item you want to share, then click the Screenshot option.
Method 6: Windows + Alt + PrtScn (Windows 10/11 Creators Update only)
Microsoft introduced new features in Windows 10/11 Creators Update, including a new Game Bar, which can be used when playing games. Taking screenshots of an active game window is one of the things Game Bar can do. While playing the game, hit Windows + Alt + PrtScn, and a screenshot will be automatically created and stored on your device.
You can access the screenshot in the Videos > Captures folder. The filename will include the name of the game you were playing, the date and the time the screen capture was taken.
Method 7: Snip & Sketch
This is the new screenshot tool Microsoft has introduced in its Windows 10/11 October 2018 update. It is easier to access and makes sharing screenshots faster.
The steps below will show you how to screenshot on Windows, using Snip & Sketch:
- Open the app and click the New button in the upper-left corner.
- The Snip & Sketch window will disappear, and a tiny menu will appear at the top of the screen.
- Choose which type of screenshot you want to take—rectangular, free-form or full-screen. There is no option to capture an active window though.
- Once the screenshot has been taken, it is loaded directly to the Snip & Sketch window, where you can edit or annotate the image.
- Once done, save the file or share it to your email or social media.
Conclusion:
There are many ways to screen capture windows and apps on your computer, and unless you have complex or specific needs, the built-in tools and features on Windows are enough to do the job.