If you’re an iMac or a MacBook Pro user, you probably heard the news about the changes in the macOS server. Before, Mac’s operating system used to be the hub for different network services – from sharing files and hosting a website to running a virtual private network and other related services. Mac made it easy to set up and configure services.
However, with Apple’s recent announcement for its plan to depreciate most of these services to focus more on computer, device, and storage management within the network all these services will be hidden but will only be accessed via the command line. Here is the list of the services that will be depreciated:
- Calendar
- Contacts
- DHCP
- DNS
- Messages
- NetInstall
- VPN
- Websites
- Wiki
But not everything is lost since some services will remain including Profile Manager, Time Machine Server, File Sharing, Content Sharing, and Software Update. Check the listing below to help you turn on useful services even with the limited use of the Mac server.
Turn On File Sharing
File Sharing is one of Mac’s very useful features. You can set it up so other computers on your network can access your files. You can assign limited access to specific users, set up guest access, or choose specific folders these users can access.
Pro Tip: Scan your Mac for performance issues, junk files, harmful apps, and security threats
that can cause system issues or slow performance.
Special offer. About Outbyte, uninstall instructions, EULA, Privacy Policy.
To configure File Sharing in macOS, follow these steps:
- Open System Preferences.
- Click sharing, and then tick off the box next to File Sharing.
- Go to Shared Folders pane, and click +.
- Choose the folder you want to share.
- Once the folder has been selected, choose which users you want to give access to the folder.
The folders you have selected are now accessible by the users you have given permissions. They will have no access to other folders on your computer but will only be able to access all the files and folders within the shared folder. For example, if you are given access to your Pictures folder, everything within that folder can be deleted, moved, re-sized, re-purposed, or anything you can do to a photo.
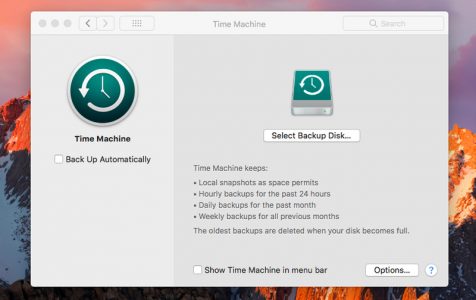
Turn On Time Machine Backups
The Time Machine is the ultimate Mac life-saving feature, allowing users to create a backup point where files, documents, photos, and applications can go back and retrieve specific files or documents you might have lost in the long run. Just like what the name means, you get to travel back in time and find the previous versions of your unit because It stores previous versions of your files and documents.
The Time Machine can be connected to the external hard drive to your Mac unit. Once the feature is switched on, your Mac will display available drives you can access to create store points for backups. To turn on Time Machine and set a different folder for backups, follow these steps:
- Create a shared folder following the steps above.
- Right-click on the folder.
- Select Advanced Options.
- Tick off Share as a Time Machine backup destination.
- You can also set a size limit for your backups.
- Click OK.
If you’re considering using an external hard drive for backup across multiple computers, regular hard drive clean-up could be beneficial. Tools like Outbyte macAries aim to help with this. Ensure that the software fits your backup and storage needs. To use your shared folder as a backup location for another Mac, do the following steps:
- Go to System Preferences and then choose Time Machine.
- Click Add Backup Disk. The shared folder you selected as the designated Time Machine backup it should show up.
- Choose the folder and then click OK.
Turn On Content Caching
This feature caches content of downloaded applications, apps, software updates, or other iCloud-related content that your computer downloads within your network. When you have the service turned on and you are downloading something, your other devices within the network will check, first, if the content you want is available in cache form. If it is, then there will be no need to download it anymore. If not, then it will download through content caching. This way, the download will be cached and will be available for other people in your network to use.
To turn on Content Caching, follow these steps:
- Open System Preferences > Sharing.
- Check Content Caching.
- If you want to cache iCloud data, check Cache iCloud content.
- Click Options and choose where you want to save your cache and the size limit.
Now, you don’t have to worry about Apple depreciating the MacOS server services. If you have additional information, comment them below.