
macOS Mojave was released several months ago, bringing features like Dark Mode, Desktop Stacks, and an improved Finder. However, some users have encountered issues, including MacBooks returning to the login screen unexpectedly.
Users have experienced their Macs reverting to the login screen or sleep mode while actively using the device, similar to pressing Control + Shift + Power.
Some of them have also reported screensavers activating at random, with neither Touch ID nor passwords successfully unlocking the computer. These issues have caused significant frustration, and there’s limited information available online. This article aims to provide potential solutions for these concerns.
Why Does My Mac Keep Going to the Lock Screen?
One possible reason why your Mac locks the screen automatically is that you have set up a Hot Corner that quickly activates the screen saver when you leave your computer. To check whether this is the case, click System Preferences from the Apple menu, then go to Desktop & Screen Saver. Click on Screen Saver, and then choose Hot Corners.
Pro Tip: Scan your Mac for performance issues, junk files, harmful apps, and security threats
that can cause system issues or slow performance.
Special offer. About Outbyte, uninstall instructions, EULA, Privacy Policy.
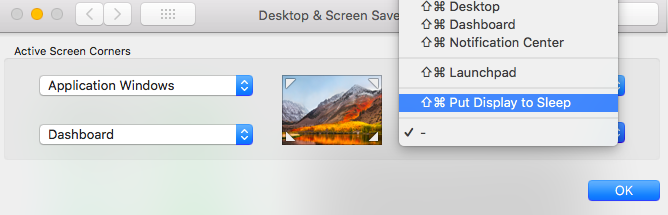
Click the list next to the corner of the screen to see if any of the corners are set to “Put Display to Sleep.” If it is, remove it from the Hot Corners list to fix the error.
Another possible reason is that your Mac’s Energy Saver feature is not configured correctly. If your Energy Saver feature is not set up properly, it can cause your Mac to go to sleep randomly. To check, click Apple menu > System Preferences, then choose Energy Saver.
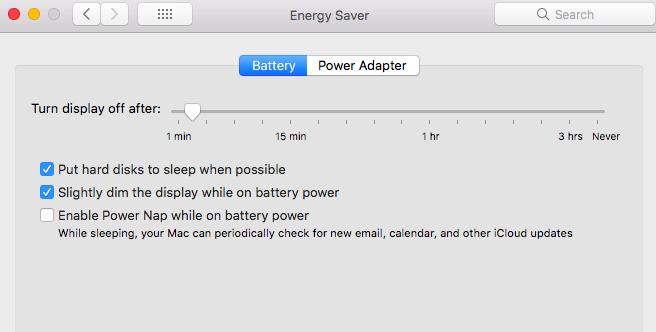
Adjust one or more of the following settings when your Mac goes to sleep. Keep in mind that some of these controls might not be available on your Mac.
- “Turn display off after”
- “Display sleep”
- “Computer sleep”
If a slider is set to Never, sleep is disabled for that feature.
You also need to make sure that there are no magnets near your Mac because magnets can interfere with your operating system and put it to sleep.
MacBook Pro Goes Back to Login Screen Randomly
The difficulty here is that there appears to be no clear pattern or trigger for the misbehavior. The computer seems to return to login screen randomly and without any exact reason to do so, other than it happens following a Mojave update.
We’ve consulted with our in-house experts and researched extensively online to find potential solutions for this issue following the Mojave update. Before performing these fixes, it is advisable to check everything from your hardware connections to your system’s stability by running a trustworthy Mac repair tool. Sometimes, junk files that have accumulated over time can interfere with normal systems and processes, in turn ruining your Mac’s performance.
If your MacBook still randomly goes back to the login screen, try these solutions:
Making Basic Checks on Your MacBook
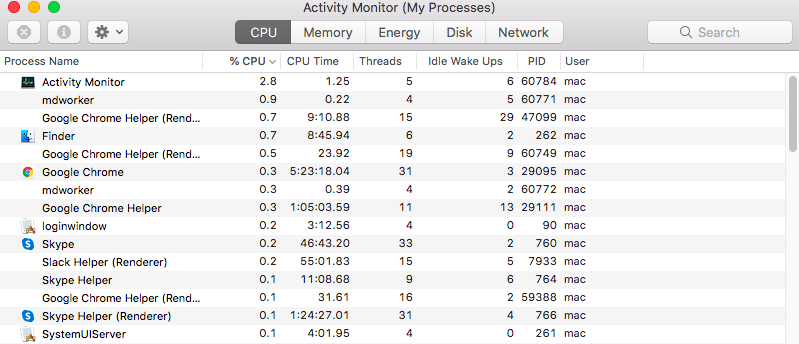
You can try to download iStat Pro and check on your actual RAM usage. It is recommended that you check how full your hard drive is, as you may already be using up your RAM. As a result, your hard drive may have insufficient space to create enough virtual memory.
Make sure, too, that your laptop is not overheating. This can happen while you are playing videos, gaming, or working on intensive processes for a long period of time. Rule out this reason for why your laptop is crashing and randomly returning to the login screen.
Boot into Safe Mode
Before you try anything else, you need to find out whether the problem is caused by conflicts with third-party software. And you can do this by booting into a Safe Mode environment. Just press the Shift key when you restart to boot into Safe Mode. When you do this, all non-Apple components will be loaded so you can check whether the error is triggered by external factors.
Once you’ve booted into Safe Mode, observe your Macbook Pro if it is still going to sleep randomly. If it does, proceed to the next step.
Creating a New User Account
If it appears that the problem is occurring due to your user account, then you might want to consider creating a new one. Log out of your existing user profile and then log back in with the new one, checking if the issue is finally resolved.
Add a user by following these steps:
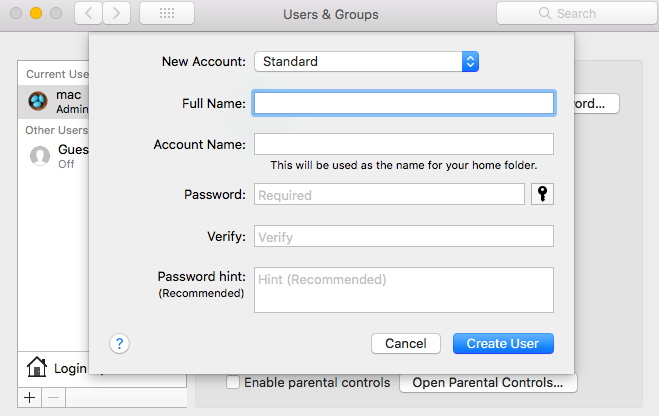
- On your Mac, click Apple menu > System Preferences. Next, proceed to Users & Groups.
- Click the lock icon in order to unlock it. Enter an administrator name as well as password.
- Afterwards, click the Add button located below the list of users.
- Click the New Account pop-up menu. From here, select a type of user. An Administrator can add and manage other users, install apps, and change settings. A Standard user is set up by an administrator, while users with Managed with Parental Controls type can access only the content specified by the admin. Sharing Only users, on the other hand, can access shared files remotely, but they cannot log in to or change settings.
- Input a full name for the new user. Then, an account name is automatically generated. Use a different account name by entering it now. Note that you cannot change this later.
- Enter a password for the user. Re-enter it to verify. Enter a password hint as well.
- Hit Create User.
- Depending on the type of user you create, you can perform different steps. For an administrator, choose Allow user to administer this computer. For a managed user, choose Enable parental controls.
Performing an SMS and PRAM/NVRAM Reset
System Management Controller (SMC) is a chip embedded in Intel-based Mac devices. It is responsible for the workings of most Mac parts, including keyboard and peripherals. It also figures in the operation of your hard drive and power supply. Reset the SMC of your MacBook with these steps:
MacBooks with Apple T2 security chip:
- Shut down your laptop.
- Press and hold the Power button for some 10 seconds. Restart afterwards. If you are having trouble upon startup, switch off your machine again.
- Press and hold the Power + Shift + left Control + left Option keys for a few seconds.
- Release all the keys and wait a few more seconds.
- Reboot your MacBook.
MacBooks with non-removable battery:
- Shut down your laptop.
- Press and hold the left Option + Control + Shift keys while you press the Power button for around 10 seconds.
- Release all the keys at once and wait for a number of seconds.
- Switch on your MacBook.
MacBook released before 2015:
- Shut down your laptop.
- Remove the battery.
- Press and hold Power for 15 to 20 seconds.
- Put back the battery again.
- Switch on your MacBook.
Older Mac models have Parameter Random Access Memory (PRAM), while modern Intel-based ones have Non-Volatile Random Access Memory (NVRAM). You can reset your PRAM or NVRAM when there are software-related issues, the computer forgot specific settings, or there are connectivity problems.
Follow these instructions to reset the PRAM or NVRAM:
- Turn off your MacBook.
- Press Power.
- Before reaching the grey screen, press the R + P + Command + Option keys all at once. Hold them down until the computer restarts and you hear the startup sound.
- Release the keys together.
Using Terminal
This method comes directly from Apple support, with guidance from their engineers. Here are the steps to follow closely:
- Boot into Recovery. Do this by holding the Command + R keys down and turning on your computer.
- Open Disk Utility. Next, choose the startup volume.
- Take note of the name of the volume, which is typically Macintosh HD. If the name is dimmed, hit the Mount button. Enter the password of a user who can unlock the disk.
- Take note of the number that is shown next to Available.
- It’s time to quit Disk Utility.
- Next, choose Utilities > Terminal. Replace the bolded hard drive name with the name your drive is called. Enter this command: cd “/Volumes/Macintosh HD/Library/Audio/Plug-Ins/HAL”
- If this command gets accepted, input this on the next line: mv *.plugin ..
- It the system takes the command, quit Terminal.
- Reboot your computer in normal mode and log in as usual.
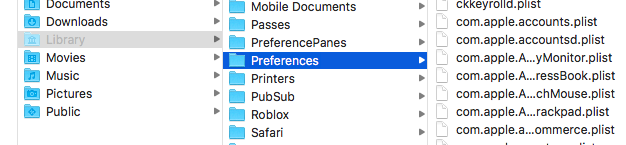
Rename the .Plist Files
Sometimes preferences files get corrupted and cause your Mac to go to sleep randomly or kick you back to the login screen. You can easily fix this by renaming the plist files to reset them. Remember that you must boot your device in Safe Mode and log in using your admin account to fix this.
Follow the steps below:
- Open Finder and click on Go in the menu bar.
- Press the Option key to reveal the Library menu.
- Click on Library to open the folder.
- Launch Terminal.
- Type in sudo mv and drag the Preferences folder from the Library folder directly to the open Terminal window.
- Rename the Preference folder. For example: sudo mv /Users/yourname/Library/Preferences to /Users/yourname/Documents/Preferences-Old
- Reboot your Mac.
Boot Your Mac into macOS Recovery Mode
macOS Recovery Mode is an integral part of the built-in recovery system of your Mac. You can boot from macOS Recovery and take advantage of its utilities to recover from specific software issues or perform other operations on your Mac. To boot into macOS Recovery Mode, follow the steps below:
- Press and then hold the power button until your Mac turns off.
- Reboot your Mac and immediately hold down the Command + R keys.
- Release both keys when you see the loading bar.
- Wait for the macOS Utilities screen to pop up.
There are several operations you can do in macOS Recovery Mode when your Mac goes back randomly to the login screen. One of the things you can do is to repair the corrupted startup disk, in case your login problem is related to your hard drive.
It is possible that you are always logged out and brought back to the login screen due to disk corruption. Once your startup disk is damaged, some of the functions won’t load normally. To fix the damaged drive, you have to use Mac’s built-in helper in the macOS Utilities window, the Disk Utility. The appearance might be different in OS X and mac OS, but the functions are the same. Here’s how you can use it:
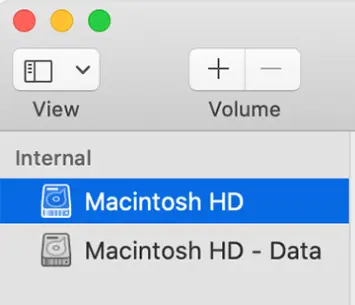
- Choose Disk Utility from the macOS Utilities window, then click Continue.
- Click on View and select Show All Devices to list all detected drives and volumes.
- Select Macintosh HD, which is the startup disk in the left sidebar.
- Click First Aid on the top menu of Disk Utility.
- Click on Run to check and repair errors in this drive.
- Once the drive is fixed, you are good to go.
Aside from fixing the corrupted disk, there are other things you can do within the macOS Recovery utility to fix Mac going back to the login screen. For instance, you can reset the password, reset the launch services database, check and fix user preference settings, and even reinstall the mac OS to make your computer work again.
Disable the Razer plugin
Some Mac users found that disabling the Razer plugin helped in preventing the error from showing. So, it is definitely something you can consider doing, too.
Follow these steps:
- Press the Command + R buttons simultaneously while your Mac is booting into Recovery Mode.
- Then go to Utilities and select Terminal.
- Navigate to the Volumes section and select Macintosh HD.
- After that, go to this location: /Library/Audio/Plug-Ins/HAL/.
- Finally, remove the Razer plugin and see if the error has been resolved.
This fix aims to bypass any login item in your profile that may be causing problems and bringing you to the login screen at random. Here’s how:
- Turn on your MacBook as you normally would.
- On the login screen, input your Mac account password. But don’t enter the Login button yet.
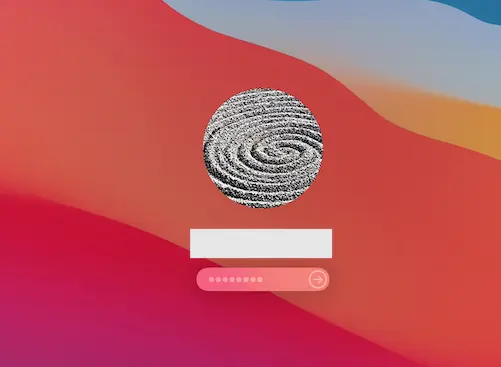
- Press and hold the Shift key on your keyboard while pressing the Login button.
- See if this has resolved the issues on your Mac.
Create a user account in the Single User Mode
Do you have another Mac admin account? Then you can use it to fix your Mac problem. But if you have no extra admin account, here’s how you can create a new account even while you are locked out:
- Switch off your Mac device by pressing the Power button.
- While starting, press and hold the Command + S buttons to enter the Single User Mode.
- At this point, a sequence of codes begins to show. Then a Command Prompt will appear with the line: /root#.
- Next, gain access to your files by typing this command: /sbin/mount -uw /
- Hit the Enter key.
- The command will then remove a certain file on your Mac, making your system believe it is the very first time you logged in.
- Then enter this line below: rm /var/db/.applesetupdone/
- Press the Enter button.
- Then type reboot and press Enter.
- At this point, you should be able to create a new account and use it to access your files and system.
Reinstall macOS
If all else fails, try to reinstall macOS on your device. It could be the case of a problematic operating system that is causing you to go back and forth to the login screen.
However, before you reinstall your macOS, make sure you know what to do. You don’t want to do things on your own only to find that you have made the problem worse. If you are unsure about the steps that you are taking, do not hesitate to seek help from Mac experts on how to reinstall macOS correctly.
And if you are worried, reinstalling your macOS won’t actually delete your data. So, you can proceed with caution.
To reinstall macOS, here’s what to do:
- Go to Utilities and select macOS Recovery.
- Select Continue and follow the on-screen prompts.
- You should be notified once the reinstallation has been successful.
Please take note of the following to avoid problems while reinstalling:
- If you are asked to unlock your disk, input your administrator password.
- If the installer cannot detect your disk, you may have to erase your disk first.
- If the installer lets you choose between Macintosh HD or Macintosh HD – Data, then select Macintosh HD.
- Make sure to let the installation process complete first before shutting it down or closing its lid.
- During the process, your device will restart every now and then. So, relax.
Final Thoughts
It can be incredibly disruptive for your MacBook Pro to randomly return to the login screen following a Mojave update. Since it’s hard to figure out how long this issue will last and what is actually causing it, the solutions above are worth a try. Don’t think twice about getting help from Apple support if the issue persists!
Looks like a similar thing when El Capitan update was first launched.
MacBook Pro needed a clean system install on a clean disk (back up your stuff) and install from a bootable (usb) disk made from the same (type) MacBook with the required System installer (find installer file and instructions online).