If there’s a single and direct answer to the question, what makes Android better than iPhone?, it will have something to do with how versatile and customizable Android is. And we’re not just talking about the ability to add widgets on the home screen and changing fonts here. There are a lot more you can do with an Android phone than superficially changing its appearance. Without further ado, here are some of the top Android tips that can make the most out of your device.
Cast Your Android Screen to a Bigger One
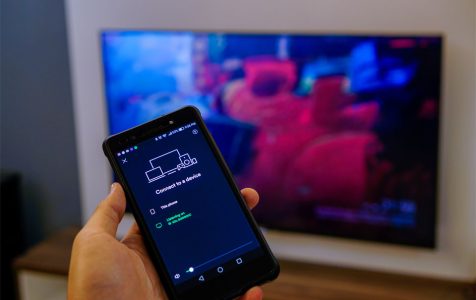
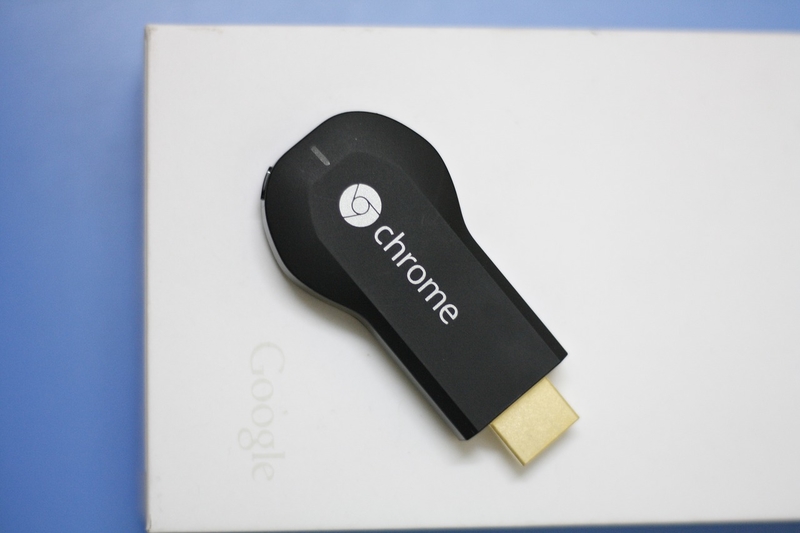
If you’re using one of the latest Android versions, your device might have Chromecast support built into it. Chromecast is a device that instantly turns your regular TV to an Internet TV. It is plugged into the TV’s HDMI port, via a USB cable. Then, using your Android phone as the remote control, you can access content from video streaming services such as Netflix, Hulu, and YouTube. Chromecast can also be used to view any content from your desktop’s Chrome on your TV.
Chromecast allows you to mirror what’s on your phone and cast it to your TV. To start reflecting your phone’s screen over your Chromecast-powered TV:
- Drag down from the top of your phone’s screen using two fingers.
- It will launch the Quick Settings pane where you will find the Cast option.
- Tap on it to begin casting your phone’s screen.
If this doesn’t work, check if Google Home app is installed on your phone. If not, download and install it.
- Once installed, open the app, tap “Cast screen/audio”, then choose Chromecast.
Multitask by Running Apps Side-by-Side
One of the most notable Android phone tricks that came with Android 7.0 Nougat is the ability to run apps side-by-side or over one another. It comes in handy when you want to see contents of different apps at the same time — for instance, when you need to double-check the published address of a restaurant in Google while looking for it on Google Maps. To use this feature, follow these steps:
- Tap the Overview button (appears as a square icon below your device’s screen).
- Choose which app you want to show side-by-side another app. Hold and drag that app to the top or left of the screen.
- Choose the other app you want to view and drag it below or beside the first app you chose.
- You can also try double-tapping on the Overview button to quickly switch between two recently used apps.
Adjust Font and Image Size
If you’re having a hard time reading texts and other content on your phone, you can choose to enlarge them. On the contrary, if you don’t like the idea that other people can easily see what’s on your screen, you can also reduce font and content size. To change font and display settings:
- Go to Settings > Display > Font.
- You can choose from Tiny to Huge.
- Font style may also be changed.
- On some devices, you can also select Display size to make on-screen objects bigger or smaller.
Note, however, that not all apps will respond to your new display settings, but most will.
Change Different Volume Settings Independently
Smartphones are designed to play different sounds and audio to let you distinguish for which apps each of them are. These include message notifications, ringtones, alarms, app notifications, and media.
Typically, to set the volume for each of these, you’ll go to Settings, then Sounds. You’ll be able to adjust the volumes individually here. However, there’s a shortcut that you might not know.
- Press any of the physical volume buttons on your device.
- A small box will then pop up, showing the volume setting for the app you’re currently on. But if you press the icon on the right side of the box, a gear icon or an arrow, the box will expand and show multiple sliders for various apps or features.
- You can now set the volume for your alarm, notifications, etc. without having to go to Settings.
Lock a User into One App with Screen Pinning
Can’t say no to friends or family who borrow your phone? If they only need to use one app, they probably won’t mind being locked into it. With screen pinning, you can still let someone else use your phone without worrying that they might sneakily access other apps and items on your device. For instance, if your brother borrows your phone to play a game, you can pin the app to the screen using your lock screen code, and the app can only be closed or removed from being pinned when you enter the code again. Here are the steps to set up screen pinning:
- Go to Settings > Lock screen and security > Other security settings.
- Find “Pin windows” under the Advanced options.
- Toggle the switch on.
- Toggle the switch beside “Use screen lock type to unpin” on. You might be asked to create a PIN if you don’t have one set up yet.
- Select from the display options for notifications while an app is pinned on the screen.
- Open the app you need to pin.
- Press the recent apps key.
- Tap the pin icon found in the bottom right corner of the window of the app you want to pin on the screen.
- Tap Start.
- To exit the pinned screen, you’ll be asked to press the Back and Recent apps keys at the same time. It will launch the keypad so you can enter the screen lock code.
Disable the Lock Screen When You’re in a Safe Location
To keep our devices safe, we usually set up PIN, pattern, or fingerprint lock. However, this can be inconvenient at times. With Google’s Smart Lock feature, you can disable screen lock when you’re safely at home. To set this up:
- Go to Settings and find Smart Lock.
- If you have your Location services turned on and you have your home address set, your phone can automatically detect that you’re already home and it will temporarily disable screen lock.
Customize the Status Bar
The status bar is the section that shows up when you slide down from the top of your screen. It shows notifications, as well as your phone’s status: signal strength, battery life, and connection status for Wi-Fi, mobile data, and Bluetooth, among others. With the feature called System UI Tuner, you can choose which icons or elements you want to be readily available in the status bar. To access System UI Tuner, follow these steps:
- Swipe from the top of your screen downwards using two fingers to launch Quick Settings.
- Press and hold the Settings gear icon in the top right for a few seconds.
- You should see a confirmation message saying you’ve enabled Settings UI.
- Go to the Settings menu where you will find System UI Tuner.
- Choose Status bar to control and customize which icons to show in the status bar.
Note that System UI Tuner is only available in newer Android versions. But if you have an older Android phone, you can still customize which icons appear in the status bar. When you slide down from the top of the screen to show the status bar, tap Edit. You can then drag the icons to the positions where you want them.
Change Default Apps
Among the differences between iOS and Android is that the latter allows you to choose your preferred default apps for functions such as web browsing, messaging, and viewing media, among others. Default apps are the ones that automatically opens when you do something on your phone. For instance, when you open a link, it will open in the set default browser. To change default apps:
- Go to Settings, then Applications.
- Tap the gear icon in the upper right corner, then select any of the categories listed.
- You will then see the apps that can be set as the default app for that particular category. For example, you can select Facebook Messenger as your default messaging app instead of your phone’s built-in SMS app.
Restore Hidden or Cleared Notifications
Often, we swipe away notifications out of habit and regret it later. It could be an exclusive discount code from one of your favorite online shopping apps or other app-specific notification that you realized, too late, you’re interested to read more about. Luckily, you can still review all the notifications on your Android. Here are the steps how:
- Tap and hold on a blank or empty part of your home screen. The screen-adjusting mode will launch.
- Select Widgets, then locate the Setting shortcut.
- Drag the Settings shortcut to one of your home screens. Drop it in place. A list will pop up.
- Select Notification log from the list.
- Tap the icon to open the notification history.
Clean Your Phone of Junk and Boost RAM Automatically
To free up space on your phone, you have to delete or move files. Meanwhile, to ease up your RAM, background and unused apps must be closed or disabled. However, doing these actions can be a bit tricky. For one, there are files that you may not know actually exist and taking up storage space — you might not even know where they are located.
To automatically delete unnecessary files and boost your RAM, you can use apps such as Android cleaner tool. With just a click of a button, you can get rid of unused cache files and other junk, and close background apps and functions that are not needed for your current activities.
We hope that with these Android phone tips, you can better make the most out of your device. Take note, though, that Android comes in different versions, which also vary from device-to-device. If you find that some of the tips and steps provided above do not specifically suit your phone’s settings, it’s either you have an older Android version or that your phone has a different yet similar settings and options, so go ahead and explore a bit more.